系列:從鐵人賽到 Agent Orchestration — AI 自動建立 .NET 測試的完整方案(10)
前言
前面幾篇講了架構設計、四種測試領域的 Orchestrator、以及 v2.0.0 的改進方向 — 都是「這東西怎麼運作」的故事。但我猜不少人心裡想的其實是:到底要怎麼裝、怎麼用?
v2.0.0 的安裝流程跟 v1.0.0 有明顯差異。最大的不同是引入了 mcp-local-rag — Skills 不再是直接放進 .github/skills/ 讓 AI 逐個讀取,而是 clone 一份 dotnet-testing-agent-skills 到本機、建立本地語意索引,再由各 Subagent 透過 MCP 查詢。所以這篇使用指南會把 v2.0.0 的完整安裝流程走一遍,包含 mcp-local-rag 的安裝、索引建立、.vscode/mcp.json 設定這些 v1.0.0 沒有的步驟。
環境需求
在開始之前,確認你的環境符合以下條件:
| 需求 | 最低版本 | 說明 |
|---|---|---|
| VS Code | 1.118+ | 需要 Custom Agents / Subagents 支援 |
| GitHub Copilot Chat | 已安裝 | workflow 的執行環境 |
| Node.js | 18+ | mcp-local-rag 的必要前置 |
| Python | 已安裝 | 建立索引腳本需要 |
| .NET SDK | 8 / 9 / 10 | 被測專案的 SDK |
| Docker Desktop | — | Integration / Aspire 測試需要 |
| .NET Aspire workload | — | Aspire 測試需要(dotnet workload install aspire) |
| dotnet-testing-agent-skills | 已 clone | mcp-local-rag 的技能索引來源 |
v2.0.0 的 VS Code 最低版本要求是 1.118(需要 Custom Agents 支援),比 v1.0.0 高。如果你的 VS Code 版本較舊,請先更新。
安裝流程總覽
v2.0.0 的安裝分為四個大步驟:
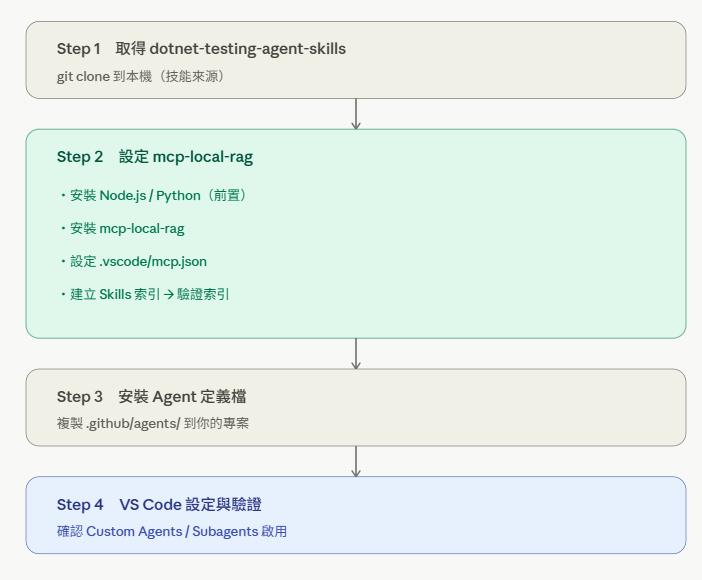
跟 v1.0.0 相比,最大的差異在 Step 2 — 整個 mcp-local-rag 的設定是全新的。另外 v1.0.0 有 16 個 Custom Prompts,v2.0.0 已經移除,使用入口統一到 Agent。
Step 1:取得 dotnet-testing-agent-skills
dotnet-testing-agent-skills 是 mcp-local-rag 索引庫的技能來源,需要先 clone 到本機:
bash
git clone https://github.com/kevintsengtw/dotnet-testing-agent-skills.git
clone 完成後,記住它的 .github/skills 路徑,後面設定 mcp-local-rag 時會用到:
- Windows:
C:\projects\dotnet-testing-agent-skills\.github\skills - macOS / Linux:
/path/to/dotnet-testing-agent-skills/.github/skills
注意:v2.0.0 不再是把 Skills 複製到你專案的
.github/skills/目錄。這份 clone 下來的 skills 是給 mcp-local-rag 建索引用的,可以放在任何固定位置(例如統一的C:\projects\目錄),多個專案可以共用同一份。
Step 2:設定 mcp-local-rag
這是 v2.0.0 的核心安裝步驟。mcp-local-rag 是一個本地端語意搜尋 MCP server,完全在本機運行、不需外部 API、無需 Docker。它會把 dotnet-testing-agent-skills 建成本地語意索引,讓 Subagent 用查詢的方式取得相關 Skill 片段,而不是逐個讀取整份 SKILL.md。
2.1 確認前置環境
node --version
python --version
確認 Node.js 18+ 與 Python 都已安裝。
2.2 安裝 mcp-local-rag
npm install -g mcp-local-rag安裝後可以驗證:
npm list -g mcp-local-rag
npx --prefer-offline mcp-local-rag --help
2.3 設定 .vscode/mcp.json
在你的專案根目錄建立 .vscode/mcp.json,把 BASE_DIR 替換為 Step 1 clone 下來的 dotnet-testing-agent-skills 的 .github/skills 實際路徑:
{
  "servers": {
    "dotnet-testing-skills": {
      "command": "npx",
      "args": ["-y", "mcp-local-rag"],
      "env": {
        "BASE_DIR": "/path/to/dotnet-testing-agent-skills/.github/skills",
        "DB_PATH": "${workspaceFolder}/.mcp/dotnet-testing-skills",
        "CACHE_DIR": "${workspaceFolder}/.mcp/cache",
        "RAG_HYBRID_WEIGHT": "0.7",
        "RAG_GROUPING": "similar"
      }
    }
  }
}
幾個環境變數的意義:
BASE_DIR:指向本機dotnet-testing-agent-skills的.github/skills目錄(技能來源)DB_PATH:本地向量索引的存放位置,用${workspaceFolder}指向目前專案CACHE_DIR:快取目錄,同樣指向目前專案RAG_HYBRID_WEIGHT:語意搜尋與關鍵字加權的混合比例RAG_GROUPING:查詢結果的分組策略
2.4 建立索引
mcp-local-rag 提供線上與離線兩種索引建立方式。線上模式會在首次執行時自動下載 embedding model,適合可連網的環境;離線模式則使用 repo 內預先準備的 model zip,適合受管制網路或無外網環境。
以線上模式為例,Windows(PowerShell):
.\docs\mcp_local_rag\scripts\mcp-local-rag-index-skills-online.ps1 -SkillsPath C:\projects\dotnet-testing-agent-skills\.github\skills跨平台(Python):
python docs/mcp_local_rag/scripts/mcp-local-rag-index-skills-online.py --skills-path /path/to/dotnet-testing-agent-skills/.github/skills若需要完整重建索引,加上 -Mode rebuild(PowerShell)或 --mode rebuild(Python)。
若環境只有
python3,請將python改為python3。
2.5 驗證索引
Windows(PowerShell):
.\docs\mcp_local_rag\scripts\mcp-local-rag-verify-skills-index.ps1跨平台(Python):
python docs/mcp_local_rag/scripts/mcp-local-rag-verify-skills-index.py索引驗證通過後,mcp-local-rag 的設定就完成了。詳細的安裝、索引與排查文件,集中在 orchestration repo 的 docs/mcp_local_rag/ 目錄。
Step 3:安裝 Agent 定義檔
Agent 定義檔可以從 dotnet-testing-agent-orchestration repo 取得,放到你專案的 .github/agents/ 目錄。共 20 個 Agent 定義檔,分屬 4 個 Orchestrator(每組 1 Orchestrator + 4 Subagent)。
完整安裝
最直接的方式是 clone 整個 orchestration repo,然後複製需要的檔案:
# Clone orchestration repo
git clone https://github.com/kevintsengtw/dotnet-testing-agent-orchestration.git

# 複製 Agent 定義檔(20 個)
mkdir -p .github/agents
cp dotnet-testing-agent-orchestration/.github/agents/*.agent.md .github/agents/

# 複製 .github/skills(v2.0.0 只含 dotnet-test)
cp -r dotnet-testing-agent-orchestration/.github/skills/ .github/skills/

# 複製 Repository Custom Instructions
cp dotnet-testing-agent-orchestration/.github/copilot-instructions.md .github/copilot-instructions.md
v2.0.0 的
.github/skills/只保留dotnet-test這一個 SKILL,這是 Executor Subagent 會用到的測試執行流程規範。dotnet-testing-agent-skills的其他 Skills 已經改由 mcp-local-rag 查詢取得,不再放在這裡。
20 個 Agent 定義檔分屬 4 個 Orchestrator:
| Orchestrator | Agent 定義檔(5 個一組) |
|---|---|
| Unit Test | dotnet-testing-orchestrator、-analyzer、-writer、-executor、-reviewer |
| Integration | dotnet-testing-advanced-integration-orchestrator 及其 4 個 Subagent |
| Aspire | dotnet-testing-advanced-aspire-orchestrator 及其 4 個 Subagent |
| TUnit | dotnet-testing-advanced-tunit-orchestrator 及其 4 個 Subagent |
你不一定要全部安裝。如果只需要單元測試功能,安裝 5 個 Unit Test Agent 就夠了。
確認 Agent 出現在選擇器中
安裝完成後:
- 開啟 VS Code Chat(
Ctrl + Shift + I) - 切換到 Agent Mode
- 在 Agent 選擇器中應該看到已安裝的 Orchestrator(最多 4 個)
只有 Orchestrator 會出現在選單中,16 個 Subagent(Analyzer、Writer、Executor、Reviewer)不會出現 — 這是設計上刻意的,它們只能由 Orchestrator 委派。
安裝後的目錄結構:
your-project/
├── .vscode/
│   └── mcp.json                        # mcp-local-rag 設定
├── .github/
│   ├── agents/
│   │   ├── dotnet-testing-orchestrator.agent.md
│   │   ├── dotnet-testing-analyzer.agent.md
│   │   ├── dotnet-testing-writer.agent.md
│   │   ├── dotnet-testing-executor.agent.md
│   │   ├── dotnet-testing-reviewer.agent.md
│   │   └── (進階 Orchestrator 的 Agent,選用)
│   ├── skills/
│   │   └── dotnet-test/                # 只保留這一個
│   └── copilot-instructions.md
├── .mcp/                               # 索引與快取(自動產生)
├── src/
└── tests/
Step 4:VS Code 設定
開啟 VS Code Settings(Ctrl + ,),確認以下設定:
{
  // 啟用 Subagent 機制(Orchestrator 必要)
  "chat.customAgentInSubagent.enabled": true
}
chat.customAgentInSubagent.enabled 讓 Orchestrator 能呼叫 Subagent — 沒開的話,Orchestrator 跑完 Analyzer 就會停住。
{
  // 思考過程顯示方式(除錯時有用)
  "chat.thinking.style": "Detailed"
}
chat.thinking.style 設為 Detailed 可以讓你看到 Agent 的完整思考過程,包含它對 mcp-local-rag 發出了哪些查詢、載入了哪些 Skill 片段 — 除錯時特別有用。
Step 5:使用 Unit Test Orchestrator
基本操作
- 在 VS Code 開啟你的 .NET 專案
- 開啟 Chat(
Ctrl + Shift + I)→ 切換到 Agent Mode - 在 Agent 選擇器中選擇
dotnet-testing-orchestrator - 輸入你的需求
指令範例
單一目標 — 標準 Service:
「為 OrderService 建立完整的單元測試」
單一目標 — Validator:
「為 OrderValidator 建立完整的單元測試」
單一目標 — Legacy Code:
「為 LegacyReportGenerator 建立單元測試,這是一個 Legacy 類別」
單一目標 — 含 IFileSystem:
「為 ConfigurationLoader 建立單元測試,注意它有使用 IFileSystem」
多個目標:
「為 Services/ 目錄下所有 Service 建立單元測試」
指定特殊要求:
「為 UserService 建立單元測試,使用 AutoFixture + NSubstitute 整合,並確保覆蓋所有邊界條件」
四階段自動執行
輸入指令後,Orchestrator 會自動執行四個階段:
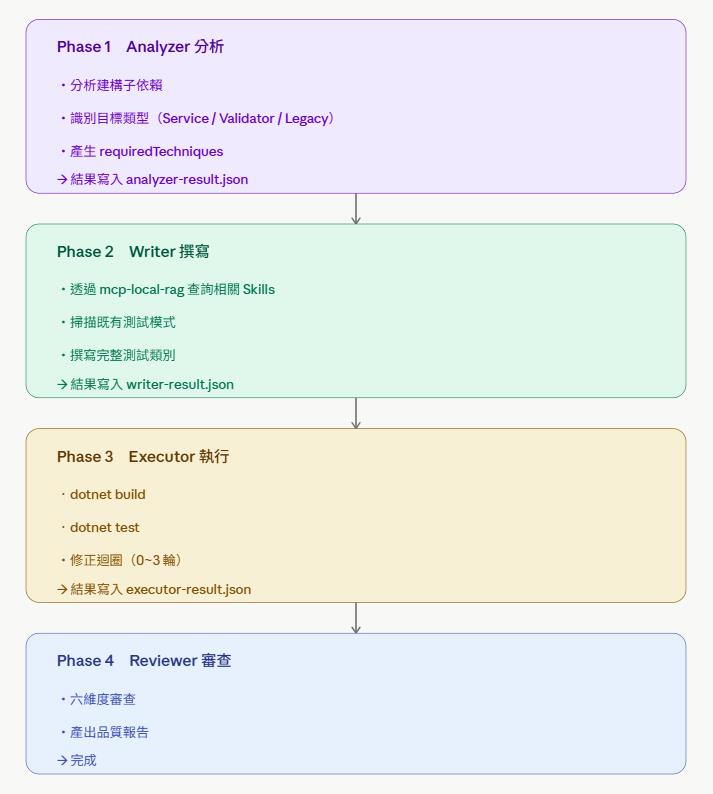
完整流程結束後,會輸出 orchestrator-timing.log 記錄各階段耗時。整個流程大約 2~5 分鐘,取決於被測類別的複雜度和 Executor 是否需要修正。
v2.0.0 的 workflow 產出
跟 v1.0.0 相比,v2.0.0 跑完一次 workflow 後,除了測試程式碼,還會在專案下產生:
.orchestrator/{TargetName}/
├── analyzer-result.json    # Analyzer 的分析報告
├── writer-result.json      # Writer 的輸出摘要
└── executor-result.json    # Executor 的執行結果

orchestrator-timing.log     # 各階段耗時記錄
這些是 v2.0.0 的 JSON 交接機制與 Phase Timing 的產物。如果某次執行有問題,這些檔案是診斷的主要依據。
檢視產出結果
完成後你會收到:
- 測試程式碼 — 一個完整的測試類別檔案,已寫入專案中
- 品質報告 — 包含整體評分、各維度審查結果、具體的改善建議
- JSON 交接檔案與 timing log — 如上所述
Step 6:使用進階 Orchestrator
Integration Test Orchestrator(詳見第七篇)
- 確認 Docker Desktop 已啟動(
docker info) - 在 Agent 選擇器中選擇
dotnet-testing-advanced-integration-orchestrator - 輸入需求,例如:「為 OrdersController 建立完整的整合測試」
- 執行時間約 3~8 分鐘(含容器啟動)
Aspire Testing Orchestrator(詳見第八篇)
- 確認 Docker Desktop 已啟動
- 確認 .NET Aspire workload 已安裝(
dotnet workload list) - 在 Agent 選擇器中選擇
dotnet-testing-advanced-aspire-orchestrator - 輸入需求,例如:「為 BookingsController 建立 Aspire 整合測試」
- 執行時間較長(10-15 分鐘),需耐心等待 Resource readiness
TUnit Testing Orchestrator(詳見第九篇)
- 在 Agent 選擇器中選擇
dotnet-testing-advanced-tunit-orchestrator - 輸入需求,例如:「為 BookCatalog 建立 TUnit 單元測試」
- 適用場景:新建 TUnit 專案或從 xUnit 遷移
- 注意:TUnit 使用 Source Generator,csproj 配置與 xUnit 完全不同
各 Orchestrator 的操作差異
| 面向 | Unit Test | Integration | Aspire | TUnit |
|---|---|---|---|---|
| Agent 選擇 | dotnet-testing-orchestrator | ...-integration-orchestrator | ...-aspire-orchestrator | ...-tunit-orchestrator |
| Docker 需求 | 不需要 | 必須啟動 | 必須啟動 | 不需要 |
| 額外需求 | — | — | Aspire workload | — |
| 執行時間 | 10 ~ 15 分鐘 | 15 ~ 20 分鐘 | 30 ~ 40 分鐘 | 10 ~ 15 分鐘 |
| 產出物 | 1 個測試類別 | 測試類別 + WebApiFactory + TestBase + Collection | 測試類別 + AspireAppFixture + TestBase | 測試類別(OutputType=Exe 專案) |
測試專案 NuGet 套件建議
Agent 會根據 Analyzer 分析的技術需求,自動在測試專案中加入需要的 NuGet 套件,以下是常用套件清單:
單元測試
| 套件 | 用途 |
|---|---|
xunit | 測試框架 |
xunit.runner.visualstudio | VS 測試運行器 |
AwesomeAssertions | 斷言庫(FluentAssertions 的 Apache 2.0 fork) |
NSubstitute | Mock 框架 |
AutoFixture | 測試資料自動產生 |
AutoFixture.AutoNSubstitute | AutoFixture + NSubstitute 整合 |
AutoFixture.Xunit2 | AutoFixture + xUnit 整合 |
Bogus | 假資料產生 |
Microsoft.Extensions.TimeProvider.Testing | FakeTimeProvider |
System.IO.Abstractions.TestingHelpers | MockFileSystem |
coverlet.collector | 程式碼覆蓋率收集 |
整合測試(額外需要)
| 套件 | 用途 |
|---|---|
Microsoft.AspNetCore.Mvc.Testing | WebApplicationFactory |
AwesomeAssertions.Web | Web 專用斷言(.Be200Ok() 等) |
Testcontainers.MsSql | SQL Server 容器 |
Testcontainers.PostgreSql | PostgreSQL 容器 |
Testcontainers.MongoDb | MongoDB 容器 |
Testcontainers.Redis | Redis 容器(視需要) |
TUnit 測試
| 套件 | 用途 |
|---|---|
TUnit | TUnit 測試框架(meta-package) |
AwesomeAssertions | 斷言庫 |
Writer 會根據分析結果自動加入缺少的套件,並透過 dotnet list package --outdated 查詢決定版本。你不需要手動安裝,但事先在 .csproj 把常用套件加好,可以讓 Executor 的 dotnet build 更快,也比較不容易因為套件問題多跑一輪修正迴圈。
Model 選擇建議
v2.0.0 的 agent 定義檔目前統一採用的模型:
| Model | 說明 |
|---|---|
GPT-5.3-Codex (copilot) | 主要模型 |
GPT-5.4 (copilot) | 備用模型 |
如果你想改用其他模型(例如 Claude 系列),可以直接編輯 .agent.md 檔案 frontmatter 中的 model 欄位。建議初次使用時先挑一個依賴最少的 Service 試跑,確認整個流程正常再擴大範圍。
常見問題與排除
Agent 沒出現在選單中
可能原因:
.agent.md檔案沒放在.github/agents/目錄- VS Code 版本低於 1.118
- 檔案名稱有誤
排除方式:
- 確認
.github/agents/目錄存在且包含正確的.agent.md檔案 - 確認 VS Code 版本 1.118 以上
- 重啟 VS Code
mcp-local-rag 相關問題
MCP server 沒有啟動:
- 確認
.vscode/mcp.json存在且格式正確 - 確認 Node.js 18+ 已安裝
- 在 VS Code 中重新載入 MCP 設定
Subagent 查不到 Skills:
- 確認索引已建立並通過驗證(Step 2.5)
- 確認
mcp.json中的BASE_DIR指向正確的dotnet-testing-agent-skills/.github/skills路徑 - 確認
DB_PATH對應的索引目錄存在 - 重新執行索引建立腳本(必要時加
rebuild模式)
embedding model 下載失敗(線上模式):
- 若環境網路受限,改用離線模型安裝方式
- 詳見 orchestration repo 的
docs/mcp_local_rag/MCP_LOCAL_RAG_SETUP_GUIDE_OFFLINE.md
Subagent 沒有啟動
可能原因:
chat.customAgentInSubagent.enabled未啟用- Agent 定義檔中的
agents:欄位不正確
排除方式:
- 確認
chat.customAgentInSubagent.enabled: true - 確認 Orchestrator 的
.agent.md中agents:列出了正確的 Subagent 名稱
Executor 多輪修正
可能原因:
- 被測類別有未公開的內部依賴
- 缺少必要的 NuGet 套件
- 專案結構複雜,Build 設定特殊
排除方式:
- 觀察 Executor 的錯誤訊息,通常是缺少套件引用或型別不匹配
- 查看
.orchestrator/{TargetName}/executor-result.json確認執行細節 - 如果持續修正 3 輪後仍失敗,手動檢查錯誤訊息並調整
Docker 相關問題(整合測試 / Aspire 測試)
Docker 沒有啟動:
Executor Step 0:docker info → 失敗
→ 請啟動 Docker Desktop 後重試
Aspire workload 未安裝:
Executor Step 0:dotnet workload list → aspire 未安裝
→ 執行 dotnet workload install aspire
最佳實踐
1. 先從簡單的 Service 開始
第一次使用時,選一個依賴較少(2~3 個介面)的 Service 類別。確認整個流程能正常跑完、Reviewer 也能正確出報告,再逐步往複雜的類別走。
2. 先確認 mcp-local-rag 索引正常
v2.0.0 的 Skills 是透過 mcp-local-rag 查詢的,所以在跑第一個 workflow 之前,務必先完成 Step 2.5 的索引驗證。如果索引沒建好,Writer 查不到 Skill,產出品質會大打折扣。
3. 觀察 Agent 的思考過程
將 chat.thinking.style 設為 Detailed,可以看到每個階段 Agent 在想什麼、對 mcp-local-rag 發了哪些查詢、做了什麼決策。這對理解和除錯都很有幫助。
4. 善用 JSON 交接檔案診斷
如果某次執行的結果不如預期,先看 .orchestrator/{TargetName}/ 下的三個 JSON 檔案。Analyzer 的分析對不對、Writer 的輸出摘要、Executor 的執行結果 — 都在裡面,比從對話記錄裡翻找快得多。
5. 既有測試模式會被重用
如果你的專案已經有測試(使用 AutoFixture 自訂 Attribute、共用 Fixture 等),Analyzer 會掃描這些既有模式,Writer 會重用它們,不會「重新發明輪子」。
小結
v2.0.0 的安裝流程比 v1.0.0 多了一個 mcp-local-rag 的設定環節 — clone skills、裝 mcp-local-rag、建索引、設定 mcp.json。第一次設定確實會比 v1.0.0 多花一些時間,但這個前置作業換來的是 Skill 載入延遲的明顯改善,以及 JSON 交接、Phase Timing 帶來的可觀測性。
一旦 mcp-local-rag 索引建好、Agent 定義檔放對位置、Subagent 開關打開,後面的使用就跟 v1.0.0 一樣直覺:選 Agent、下指令、等結果。而且因為 skills 是 clone 在本機固定位置、多專案共用,第二個專案要導入時,只需要重複 Step 3、Step 4,省去了重新建索引的功夫。
如果你是從 v1.0.0 升級,建議先讀 orchestration repo 的 docs/v2_0_0/V1_TO_V2_MIGRATION_GUIDE.md,裡面有完整的升級檢查清單。
結語 — 這段路與它的意義
這篇使用指南,也是 GitHub Copilot 版本系列的最後一篇。在收尾之前,想把整段路回顧一下。
從 2025 年的 iThome 鐵人賽到現在,這個專案的演進,每一步都在解決上一步留下的問題:
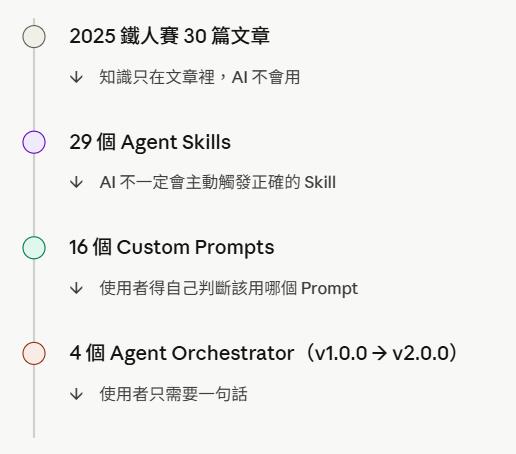
從「人讀文章」到「AI 讀技能」,再到「AI 自動調度」,每一步都讓「為 .NET 專案產生高品質測試」這件事,門檻又降低了一些。
而四個 Orchestrator 的開發過程,最大的收穫是架構模板化:第一個 Unit Test Orchestrator 花最多時間建立 1 + 4 的架構模式,後面三個(Integration、Aspire、TUnit)都是在同一個框架上,套用各自領域的知識。這也印證了整個系列反覆出現的主軸 — 架構是可複製的模板,領域知識才是填進去的內容。
對 .NET 開發者來說,這套工具的價值在於降低測試門檻、統一團隊的測試品質,並讓專家的經驗透過 Skills 傳遞給整個團隊:你不需要精通每個測試工具的最佳實踐,那些都封裝在 Skills 裡,一句話就能用上。
這套架構本身是平台無關的設計概念,也已經被實作到其他 AI 開發平台上 — 但那是另一段故事了。就 GitHub Copilot 版本而言,從 v1.0.0 到 v2.0.0,它已經是一套完整、經過驗證、可以實際使用的工具。29 個 Agent Skills 全部開源,Agent 定義檔與驗證專案也都公開在 GitHub 上。歡迎使用、歡迎回饋。謝謝你一路讀到這裡。
參考資源
- dotnet-testing-agent-orchestration:https://github.com/kevintsengtw/dotnet-testing-agent-orchestration
- v2.0.0 總覽:https://github.com/kevintsengtw/dotnet-testing-agent-orchestration/blob/main/docs/v2_0_0/RELEASE_OVERVIEW.md
- v1 → v2 升級指南:https://github.com/kevintsengtw/dotnet-testing-agent-orchestration/blob/main/docs/v2_0_0/V1_TO_V2_MIGRATION_GUIDE.md
- mcp-local-rag 文件中心:https://github.com/kevintsengtw/dotnet-testing-agent-orchestration/tree/main/docs/mcp_local_rag
- mcp-local-rag 安裝指南:https://github.com/kevintsengtw/dotnet-testing-agent-orchestration/blob/main/docs/mcp_local_rag/MCP_LOCAL_RAG_SETUP_GUIDE.md
- v2.0.0 常見問題排查:https://github.com/kevintsengtw/dotnet-testing-agent-orchestration/blob/main/docs/v2_0_0/TROUBLESHOOTING.md
- dotnet-testing-agent-skills:https://github.com/kevintsengtw/dotnet-testing-agent-skills
- mcp-local-rag:https://github.com/shinpr/mcp-local-rag
- 鐵人賽範例程式碼:https://github.com/kevintsengtw/30Days_in_Testing_Samples
- 鐵人賽系列文章:https://ithelp.ithome.com.tw/users/20066083/ironman/8276
- agentskills.io 官方規範:https://agentskills.io
- Use Agent Skills in VS Code:https://code.visualstudio.com/docs/copilot/customization/agent-skills
- VS Code Custom Agents:https://code.visualstudio.com/docs/copilot/customization/custom-agents
純粹是在寫興趣的,用寫程式、寫文章來抒解工作壓力