之前有寫過用 Web API 2 整合 JWT [ASP.NET Web API] 實作 System.IdentityModel.Tokens.Jwt 進行身分驗證,到了 ASP.NET Core 之後,用法沒有太大變化,不過我個人認為驗證的注入設定可讀性變的更高了...
ASP.NET Core 3.1
開發環境
- VS 2019
- ASP.NET Core 3.1
- NSwag.AspNetCore.13.2.5
實作
安裝套件
Install-Package Microsoft.AspNetCore.Authentication
Install-Package Microsoft.AspNetCore.Authentication.JwtBearer
Install-Package Microsoft.Extensions.DependencyInjection
Install-Package Microsoft.Extensions.Options
Install-Package MNSwag.AspNetCore
JwtAuthenticationProvider.cs
模擬 User 假物件,驗證帳號
產生 / 驗證 JWT:JwtSecurityTokenHandler 的用法沒有太大的改變
public class JwtAuthenticationProvider : IJwtAuthenticationProvider
{
    private readonly AppSettings _appSettings;

    // users hardcoded for simplicity, store in a db with hashed passwords in production applications
    private readonly List<User> _fakeUsers = new List<User>
    {
        new User {Id = 1, FirstName = "Test", LastName = "User", Username = "yao", Password = "123456"}
    };

    public JwtAuthenticationProvider(IOptions<AppSettings> appSettings)
    {
        this._appSettings = appSettings.Value;
    }

    public string Authenticate(string userName, string password)
    {
        var user = this._fakeUsers.SingleOrDefault(x => x.Username == userName && x.Password == password);

        // return null if user not found
        if (user == null)
        {
            return null;
        }

        // authentication successful so generate jwt token
        var tokenHandler         = new JwtSecurityTokenHandler();
        var key                  = Encoding.UTF8.GetBytes(this._appSettings.Secret);
        var symmetricSecurityKey = new SymmetricSecurityKey(key);
        var tokenDescriptor = new SecurityTokenDescriptor
        {
            Subject = new ClaimsIdentity(new[]
            {
                new Claim(JwtRegisteredClaimNames.Sub, userName),
                new Claim(JwtRegisteredClaimNames.Jti, Guid.NewGuid().ToString()) // JWT ID

                //new Claim(ClaimTypes.Name, user.Id.ToString())
            }),
            Expires = DateTime.UtcNow.AddDays(7),
            SigningCredentials =
                new SigningCredentials(symmetricSecurityKey, SecurityAlgorithms.HmacSha256Signature)
        };
        var token = tokenHandler.CreateToken(tokenDescriptor);
        return tokenHandler.WriteToken(token);
    }
}
Startup.cs
注意順序!
// This method gets called by the runtime. Use this method to configure the HTTP request pipeline.
public void Configure(IApplicationBuilder app, IWebHostEnvironment env)
{
    if (env.IsDevelopment())
    {
        app.UseDeveloperExceptionPage();
    }

    app.UseHttpsRedirection();

    app.UseRouting();

    // global cors policy
    app.UseCors(x => x
                     .AllowAnyOrigin()
                     .AllowAnyMethod()
                     .AllowAnyHeader());

    app.UseAuthentication();
    app.UseAuthorization();

    app.UseEndpoints(endpoints => { endpoints.MapControllers(); });

    // Add OpenAPI/Swagger middlewares
    app.UseOpenApi();    // Serves the registered OpenAPI/Swagger documents by default on `/swagger/{documentName}/swagger.json`
    app.UseSwaggerUi3(); // Serves the Swagger UI 3 web ui to view the OpenAPI/Swagger documents by default on `/swagger`
}
注入 JwtAuthenticationProvider
services.AddSingleton<IJwtAuthenticationProvider, JwtAuthenticationProvider>();
Key 存放在組態設定 appsettings.json
key 要 16 字元以上
var key = Encoding.ASCII.GetBytes(appSettings.Secret);
appsettings.json,內容如下
"AppSettings": {
  "Secret": "D8AE7CCF-8E64-4843-9CC6-76EBBB87B440"
},
注入組態設定
services.Configure<AppSettings>(appSettingsSection);
注入驗證
services.AddAuthentication().AddJwtBearer(x =>{});
注入 NSwag
框起來的地方要一樣
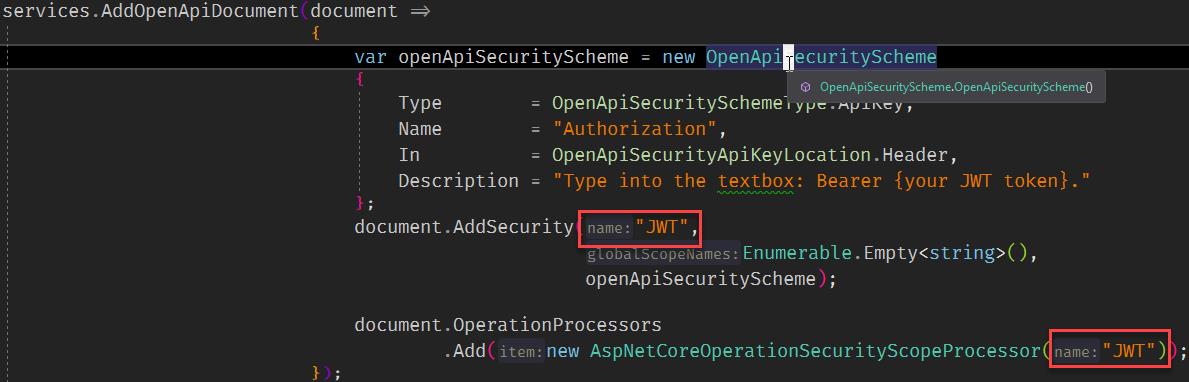
完整代碼如下:
// This method gets called by the runtime. Use this method to add services to the container.
public void ConfigureServices(IServiceCollection services)
{
    services.AddCors();
    services.AddControllers();
    services.AddSingleton<IJwtAuthenticationProvider, JwtAuthenticationProvider>();

    // configure strongly typed settings objects
    var appSettingsSection = this.Configuration.GetSection("AppSettings");
    var appSettings        = appSettingsSection.Get<AppSettings>();

    services.Configure<AppSettings>(appSettingsSection);

    // configure jwt authentication
    var key = Encoding.ASCII.GetBytes(appSettings.Secret);
    services.AddAuthentication(x =>
                               {
                                   x.DefaultAuthenticateScheme = JwtBearerDefaults.AuthenticationScheme;
                                   x.DefaultChallengeScheme    = JwtBearerDefaults.AuthenticationScheme;
                               })
            .AddJwtBearer(x =>
                          {
                              x.RequireHttpsMetadata = false;
                              x.SaveToken            = true;
                              x.TokenValidationParameters = new TokenValidationParameters
                              {
                                  ValidateIssuerSigningKey = true,
                                  IssuerSigningKey         = new SymmetricSecurityKey(key),
                                  ValidateIssuer           = false,
                                  ValidateAudience         = false
                              };
                          });

    services.AddOpenApiDocument(document =>
                                {
                                    var openApiSecurityScheme = new OpenApiSecurityScheme
                                    {
                                        Type        = OpenApiSecuritySchemeType.ApiKey,
                                        Name        = "Authorization",
                                        In          = OpenApiSecurityApiKeyLocation.Header,
                                        Description = "Type into the textbox: Bearer {your JWT token}."
                                    };
                                    document.AddSecurity("JWT",
                                                         Enumerable.Empty<string>(),
                                                         openApiSecurityScheme);

                                    document.OperationProcessors
                                            .Add(new AspNetCoreOperationSecurityScopeProcessor("JWT"));
                                });
}
測試
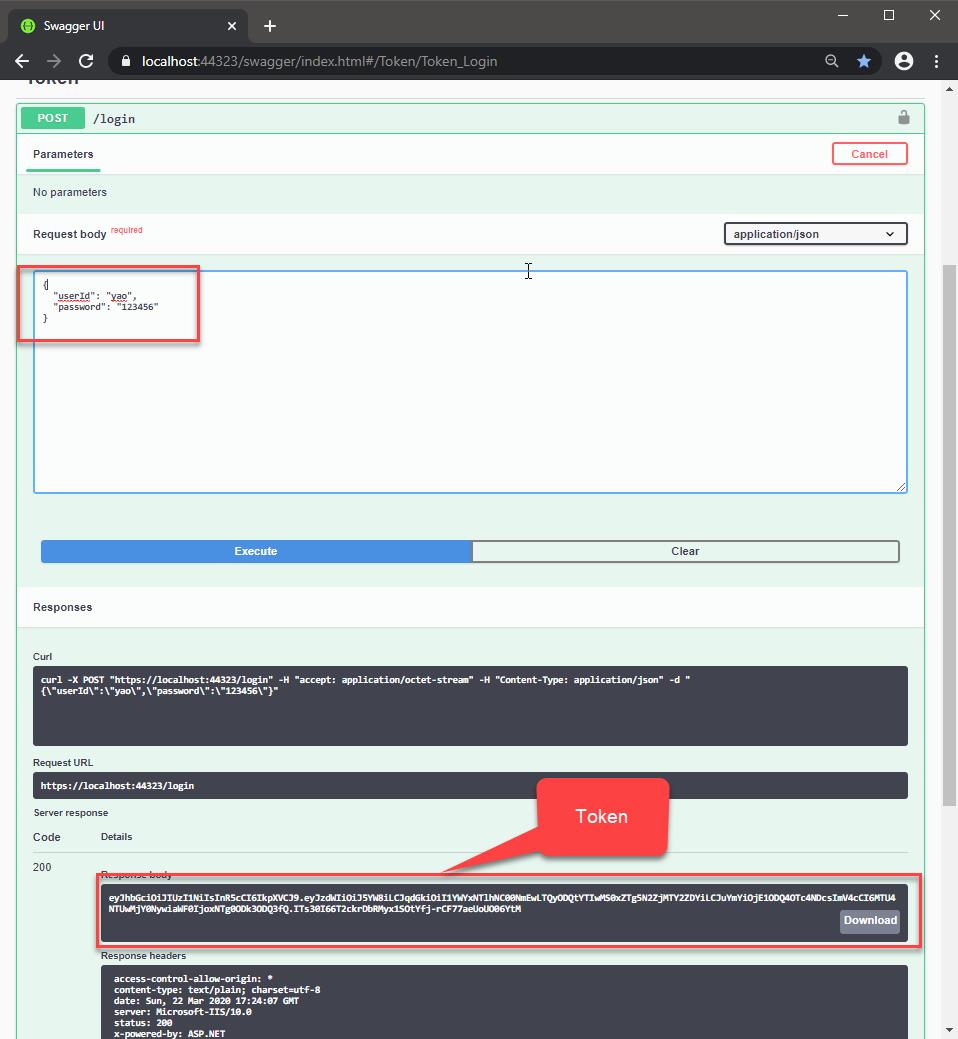
用一個 Action 驗證帳密、產生 JWT
[Authorize]
[ApiController]
public class TokenController : ControllerBase
{
    private readonly IJwtAuthenticationProvider _jwtProvider;

    public TokenController(IJwtAuthenticationProvider jwtProvider)
    {
        this._jwtProvider = jwtProvider;
    }

    [AllowAnonymous]
    [HttpPost("login")]
    public async Task<IActionResult> LoginAsync(LoginRequest login)
    {
        var token = this._jwtProvider.Authenticate(login.UserId, login.Password);
        if (string.IsNullOrWhiteSpace(token))
        {
            IActionResult result = new BadRequestObjectResult(new {Message = "Invalid Authorization Header"});
            return result;
        }

        return this.Ok(token);
    }
}
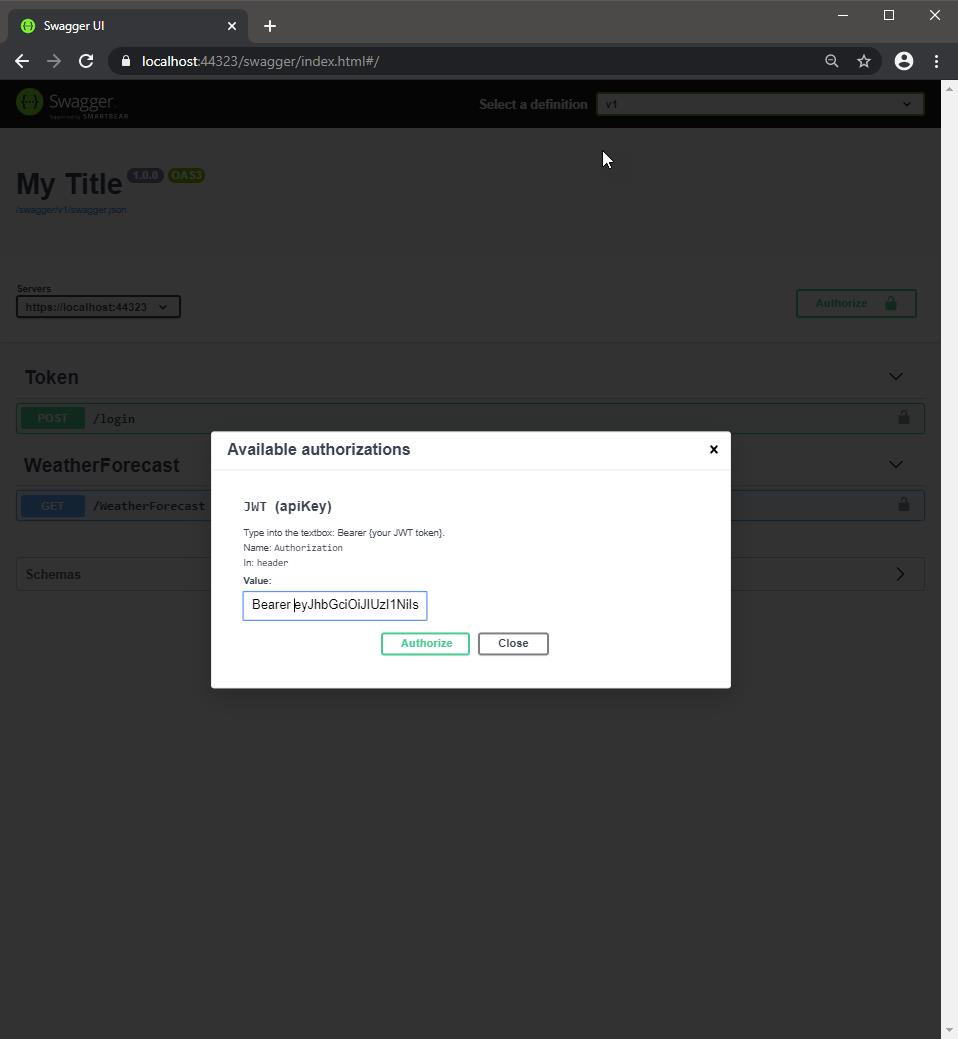
登入成功後,取得 Token,把他複製下來
在 Swagger UI 輸入授權
Bearer {token}
最後訪問受保護的資源,得到 200,資料也印出來了

範例位置
https://github.com/yaochangyu/sample.dotblog/tree/master/WebAPI/NSwag/Lab.JwtAuth
若有謬誤,煩請告知,新手發帖請多包涵

Microsoft MVP Award 2010~2017 C# 第四季
Microsoft MVP Award 2018~2022 .NET
