系統的驗證與授權,這是每一代新技術出來的時候都要面對的課題,從.NET Framework 2.0時代的 MemberShip,到後來的Identity,雖然開發工具都包了一個簡單產生對應資料表的機制來讓過程簡化,但是,實際上小喵我從來都不是用他精靈產生的資料表,而是配合當下的技術來產生一套可以搭配自訂資料表的權限控管。不免俗的,Blazor的到來,也要來嘗試著找出,不使用內建的方式建立資料表,而是想辦法配合自己的資料表來運作權限控管。
有別於 WebForm 與 MVC 在 web.config 中設定<authentication><authenlization>即可運作,Blazor的機制複雜了一些,因此特別寫此篇來筆記一下這個過程,未來再以此篇的筆記結果,來衍生符合自己需求的一套機制。相關內容,就一起看下去吧~
緣起
系統的驗證與授權,這是每一代新技術出來的時候都要面對的課題,從.NET Framework 2.0時代的 MemberShip,到後來的Identity,雖然開發工具都包了一個簡單產生對應資料表的機制來讓過程簡化,但是,實際上小喵我從來都不是用他精靈產生的資料表,而是配合當下的技術來產生一套可以搭配自訂資料表的權限控管。不免俗的,Blazor的到來,也要來嘗試著找出,不使用內建的方式建立資料表,而是想辦法配合自己的資料表來運作權限控管。
有別於 WebForm 與 MVC 在 web.config 中設定<authentication><authenlization>即可運作,Blazor的機制複雜了一些,因此特別寫此篇來筆記一下這個過程,未來再以此篇的筆記結果,來衍生符合自己需求的一套機制。相關內容,就一起看下去吧~
參考
這篇的過程,是參考小喵找到的一個Blazor教學系列影片中的其中一篇,相關內容算是很完整,小喵很推薦有興趣研究Blazor的朋友可以去參考該作者的一些文章或者影片
完整的系列教學影片列表: Blazor C# Tuorials (Youtube)
自訂權限控管:Blazor Tutorial : Authentication | Custom AuthenticationStateProvider - EP12
建立 Blazor伺服器應用程式
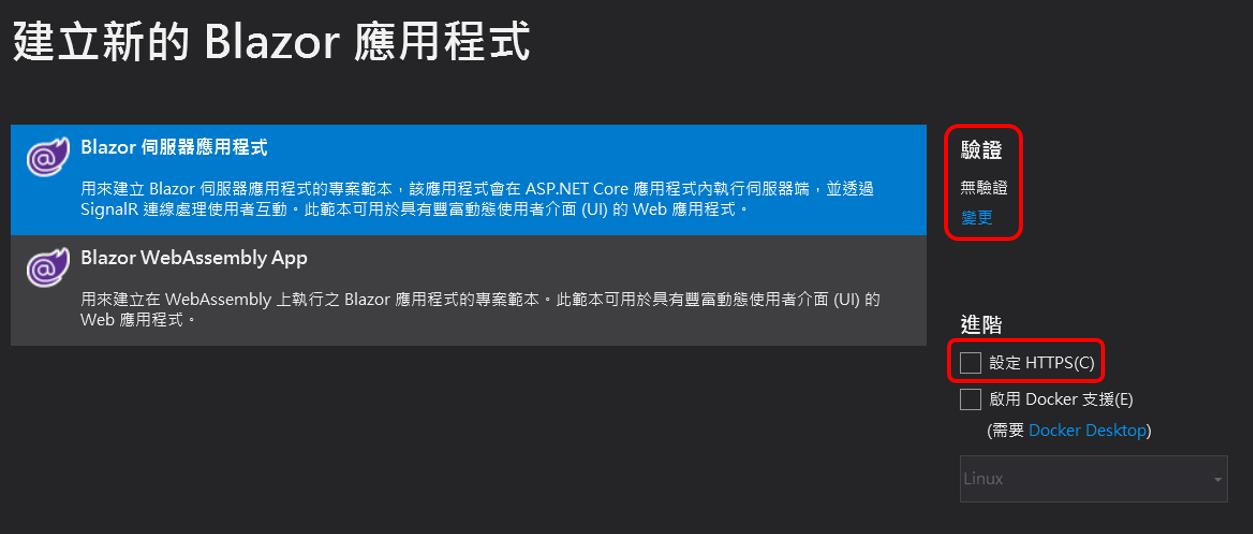
首先,先建立一個空的 Blazor應用程式。記得驗證要【無驗證】,Https的部分暫時取消

我們參考YT影片中,他主要是以伺服器應用程式的專案來處理,並且為了讓這個由無到有的建立過程筆記,所以我們建立一個空白的Blazor伺服器應用程式。並確保驗證的部分使用無驗證。
StartUp.cs設定使用驗證與授權
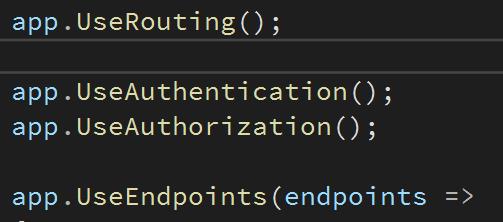
依據影片的指導,我們在【Startup.cs】中,新增以下的內容,來使用Authentication, Autorization
app.UseAuthentication();
app.UseAuthorization();

Blazored.SessionStorage
系統登入後,如果按了重新整理時,會發現原本已經登入的狀態又變成登出,因此我們需要把登入的狀態,存在 HTML5 中 WebStorage 的 SessionStorage 中,關於這部分,有神人已經寫好相關的機制,我們只需透過 Nuget 把相關機制裝起來,這樣就可以方便處理儲存、讀取、清除 SessionStoarge 的部分。

安裝後,需要在【Startup.cs】中,加上相關的程式碼
namespace,加上using
using Blazored.SessionStorage;
在ConfigureServices中,加上
services.AddBlazoredSessionStorage();
撰寫使用者資料物件類別(ViewModel) UserVM
這裡先暫時先滿足【登入】所需的ViewModel,後續再逐步的完整這個類別
我們在Data資料夾,新增一個名稱為【UserVM】的類別,相關內容如下:
using System;
using System.Collections.Generic;
using System.Linq;
using System.Threading.Tasks;

namespace BlazorAuthH20201119.Data
{
    public class UserVM
    {
        public string UserId { get; set; } = "";
        public string PW { get; set; } = "";
        public string UserName { get; set; } = "";
        public string EMail { get; set; } = "";
        public string UserToken { get; set; } = "";

    }
}
撰寫自訂的【CustomAuthenticationStateProvider】
小喵希望把資料存取相關的,撰寫在DAOs這個資料夾
所以,在專案中,新增一個資料夾【DAOs】,並在該資料夾,新增一個類別,名稱就叫做【CustomAuthenticationStateProvider】,繼承【CustomAuthenticationStateProvider】,並實作。在這個類別中,登入、登出,都會寫在裡面。
這裡面,會:
- 透過Blazored.SessionStorage,來存放登入後的帳號
- 透過ClaimIdentity,來處理相關的登入登出相關的程式碼。
相關的內容如下:
using Microsoft.AspNetCore.Components.Authorization;
using System;
using System.Collections.Generic;
using System.Linq;
using System.Security.Claims;
using System.Threading.Tasks;
using Blazored.SessionStorage;
using BlazorAuthH20201119.Data;


namespace BlazorAuthH20201119.DAO
{
    public class CustomAuthenticationStateProvider : AuthenticationStateProvider
    {
        private ISessionStorageService _sessionStorageService;

        public CustomAuthenticationStateProvider(ISessionStorageService sessionStorageService)
        {
            _sessionStorageService = sessionStorageService;
        }

        public override async Task<AuthenticationState> GetAuthenticationStateAsync()
        {
            string UserToken = await _sessionStorageService.GetItemAsync<string>("UserToken");

            ClaimsIdentity identity;

            if (UserToken != null)
            {
                if (UserToken != "")
                {
                    UserVM oUser = getUserByUserToken(UserToken);

                    if (oUser.UserId != "")
                    {
                        identity = new ClaimsIdentity(new[] {
                            new Claim("UserToken",oUser.UserToken),
                            new Claim(ClaimTypes.Name,oUser.UserName),
                            new Claim(ClaimTypes.Email,oUser.EMail),
                            new Claim("UserId",oUser.UserId),
                        }, "apiauth_type");
                    }
                    else
                    {
                        identity = new ClaimsIdentity();
                    }
                }
                else
                {
                    identity = new ClaimsIdentity();
                }
            }
            else
            {
                identity = new ClaimsIdentity();
            }

            var user = new ClaimsPrincipal(identity);
            return await Task.FromResult(new AuthenticationState(user));
        }

        private UserVM getUserByUserToken(string UserToken)
        {
            UserVM oUser = new UserVM();
            if (UserToken == "94607556-FE6D-46DB-93B8-42873170404E")
            {
                oUser = fakeSetUserData();
            }
            return oUser;
        }

        public void MarkUserAsLogin(UserVM oUser)
        {
            ClaimsIdentity identity;

            if (oUser != null)
            {
                if (doLogin(ref oUser))
                {
                    identity = new ClaimsIdentity(new[] {
                        new Claim("UserToken",oUser.UserToken),
                        new Claim(ClaimTypes.Name,oUser.UserName),
                        new Claim(ClaimTypes.Email,oUser.EMail),
                        new Claim("UserId",oUser.UserId),
                    }, "apiauth_type");
                    _sessionStorageService.SetItemAsync<string>("UserToken", oUser.UserToken);
                }
                else
                {
                    identity = new ClaimsIdentity();
                }
            }
            else
            {
                identity = new ClaimsIdentity();
            }

            var user = new ClaimsPrincipal(identity);
            NotifyAuthenticationStateChanged(Task.FromResult(new AuthenticationState(user)));
        }

        private bool doLogin(ref UserVM oUser)
        {
            bool rc = false;
            //模擬資料庫驗證帳號密碼,取得User資訊
            if ((oUser.UserId == "topcat") && (oUser.PW == "abc123"))
            {
                //模擬驗證成功,將使用者資訊放入oUser中
                oUser = fakeSetUserData();
                rc = true;
            }
            else
            {
                throw new Exception("登入失敗,請確認您的帳號或密碼是否正確");
            }
            return rc;
        }

        /// <summary>
        /// 模擬從資料庫取資料放入UserVM物件中
        /// </summary>
        /// <returns>
        /// 成功回傳UserVM物件
        /// </returns>
        private UserVM fakeSetUserData()
        {
            UserVM oUser = new UserVM();
            oUser.UserId = "topcat";
            oUser.PW = "abc123";
            oUser.UserName = "小喵";
            oUser.EMail = "topcat@aaa.bb.cc";
            oUser.UserToken = "94607556-FE6D-46DB-93B8-42873170404E";
            return oUser;
        }

        public void MarkUserAsLogout()
        {
            ClaimsIdentity identity = new ClaimsIdentity();
            identity = new ClaimsIdentity();
            var user = new ClaimsPrincipal(identity);
            _sessionStorageService.ClearAsync();
            NotifyAuthenticationStateChanged(Task.FromResult(new AuthenticationState(user)));
        }

    }
}
這裡面要稍微說明一下的是,這篇只是用以說明開發的過程,實際上由於存放的方式是使用 WebStorage ,其實 Client 端可以透過很簡單的方式去改變這個內容,所以實際上不應該拿登入的帳號當作是個人的識別,而是應該以Token的方式來做為身分的識別,才是比較恰當的方式。在此特別聲明一下,實際上應該要更嚴謹的方式處理登入狀態的儲存。
CustomAuthenticationStateProvider加入Startup.cs
在【ConfigureServices】這裡面加上【services.AddScoped<AuthenticationStateProvider, CustomAuthenticationStateProvider>();】
到此,Startup.cs的內容大致完成,相關內容範例如下:
using BlazorAuthH20201119.DAOs;
using BlazorAuthH20201119.Data;
using Microsoft.AspNetCore.Builder;
using Microsoft.AspNetCore.Components;
using Microsoft.AspNetCore.Components.Authorization;
using Microsoft.AspNetCore.Hosting;
using Microsoft.Extensions.Configuration;
using Microsoft.Extensions.DependencyInjection;
using Microsoft.Extensions.Hosting;
using System;
using System.Collections.Generic;
using System.Linq;
using System.Threading.Tasks;
using Blazored.SessionStorage;

namespace BlazorAuthH20201119
{
    public class Startup
    {
        public Startup(IConfiguration configuration)
        {
            Configuration = configuration;
        }

        public IConfiguration Configuration { get; }

        // This method gets called by the runtime. Use this method to add services to the container.
        // For more information on how to configure your application, visit https://go.microsoft.com/fwlink/?LinkID=398940
        public void ConfigureServices(IServiceCollection services)
        {
            services.AddRazorPages();
            services.AddServerSideBlazor();
            services.AddSingleton<WeatherForecastService>();

            services.AddBlazoredSessionStorage();

            services.AddScoped<AuthenticationStateProvider, CustomAuthenticationStateProvider>();
        }

        // This method gets called by the runtime. Use this method to configure the HTTP request pipeline.
        public void Configure(IApplicationBuilder app, IWebHostEnvironment env)
        {
            if (env.IsDevelopment())
            {
                app.UseDeveloperExceptionPage();
            }
            else
            {
                app.UseExceptionHandler("/Error");
            }

            app.UseStaticFiles();

            app.UseRouting();

            app.UseAuthentication();
            app.UseAuthorization();

            app.UseEndpoints(endpoints =>
            {
                endpoints.MapBlazorHub();
                endpoints.MapFallbackToPage("/_Host");
            });
        }
    }
}
修改App.razor
將RouteView改成【AuthorizeRouteView】,NotFound的部分用【CascadingAuthenticationState】包起來,相關內容如下:
<Router AppAssembly="@typeof(Program).Assembly">
    <Found Context="routeData">
        <AuthorizeRouteView RouteData="@routeData" DefaultLayout="@typeof(MainLayout)" />
    </Found>
    <NotFound>
        <CascadingAuthenticationState>
            <LayoutView Layout="@typeof(MainLayout)">
                <h1>404 Error</h1>
                <p>Sorry, there's nothing at this address.</p>
            </LayoutView>
        </CascadingAuthenticationState>
    </NotFound>
</Router>
修改【Pages/_Host.cshtml】
將【component】的 render-mode 改為【Server】
<component type="typeof(App)" render-mode="Server" />
建立Login.razor
我們建立登入的頁面,讓帳號密碼綁上UserVM,並且透過CustomAuthenticationStateProvider來進行登入的工作。相關程式碼如下:
@page "/Login"
@using BlazorAuthH20201119.Data
@using BlazorAuthH20201119.DAO
@inject AuthenticationStateProvider AuthenticationStateProvider
@inject NavigationManager NavigationManager
@inject IJSRuntime JsRuntime;

<div class="row">
    <div class="col-sm-1"></div>
    <div class="col-sm-10">
        <div class="card border-primary mb-3">
            <div class="card-header"><h2>Login</h2></div>
            <div class="card-body">
                <fieldset>
                    <div class="form-group row">
                        <label for="txtUserId" class="col-sm-2 col-form-label">帳號:</label>
                        <div class="col-sm-10">
                            <input type="text" class="form-control" id="txtUserId" @bind="oUser.UserId">
                        </div>
                    </div>
                    <div class="form-group row">
                        <label for="txtPW" class="col-sm-2 col-form-label">帳號:</label>
                        <div class="col-sm-10">
                            <input type="password" class="form-control" id="txtPW" @bind="oUser.PW">
                        </div>
                    </div>
                </fieldset>
            </div>
            <div class="card-footer text-right">
                <button class="btn btn-primary" @onclick="(()=>doLogin())">登入</button>
            </div>
        </div>

    </div>
    <div class="col-sm-1"></div>
</div>

@code {
    private UserVM oUser = new UserVM();

    private void doLogin()
    {
        try
        {
            ((CustomAuthenticationStateProvider)AuthenticationStateProvider).MarkUserAsLogin(oUser);
            NavigationManager.NavigateTo("/");
        }
        catch (Exception ex)
        {
            JsRuntime.InvokeVoidAsync("alert", ex.Message);

        }
    }

}
修改首頁(Index.razor)的內容
透過AuthorizeView,針對【登入】與【未登入】的狀態,來設定不同的內容,相關程式碼如下:
@page "/"

<h1>Hello, world!</h1>
<AuthorizeView>
    <Authorized>
        歡迎您(@context.User.Identity.Name)使用本系統~
    </Authorized>
    <NotAuthorized>
        您目前已經登出
    </NotAuthorized>
</AuthorizeView>


<SurveyPrompt Title="How is Blazor working for you?" />
修改上方共同的登入/登出按鈕
修改【/Shared/MainLayout.razor】,登入時放上【登出】按鈕,登出時放上【登入】按鈕,相關內容如下:
@inherits LayoutComponentBase
@using BlazorAuthH20201119.DAO
@inject AuthenticationStateProvider AuthenticationStateProvider
@inject NavigationManager NavigationManager

<div class="page">
    <div class="sidebar">
        <NavMenu />
    </div>

    <div class="main">
        <div class="top-row px-4">
            <AuthorizeView>
                <Authorized>
                    <button @onclick="(()=>doLogout())" class="btn btn-secondary">登出</button>

                </Authorized>
                <NotAuthorized>
                    <button @onclick="(()=>goLogin())" class="btn btn-secondary">登入</button>
                </NotAuthorized>
            </AuthorizeView>
            <a href="https://docs.microsoft.com/aspnet/" target="_blank">About</a>
        </div>

        <div class="content px-4">
            @Body
        </div>
    </div>
</div>


@code{

    public void doLogout()
    {
        ((CustomAuthenticationStateProvider)AuthenticationStateProvider).MarkUserAsLogout();
        NavigationManager.NavigateTo("/");
    }

    public void goLogin()
    {
        NavigationManager.NavigateTo("/Login");
    }

}
末記
這篇筆記Blazor搭配自訂登入驗證的方式,裡面的內容為了讓測試的人可以直接上手,裡面用直接的程式碼替代資料庫存取的部分,實際應用時,需改寫相關的程式碼驗證資料庫中的資料。
以下是簽名:
- 歡迎轉貼本站的文章,不過請在貼文主旨上加上【轉貼】,並在文章中附上本篇的超連結與站名【topcat姍舞之間的極度凝聚】,感恩大家的配合。
- 小喵大部分的文章會以小喵熟悉的語言VB.NET撰寫,如果您需要C#的Code,也許您可以試著用線上的工具進行轉換,這裡提供幾個參考
| Microsoft MVP Visual Studio and Development Technologies (2005~2019/6) | topcat Blog:http://www.dotblogs.com.tw/topcat |