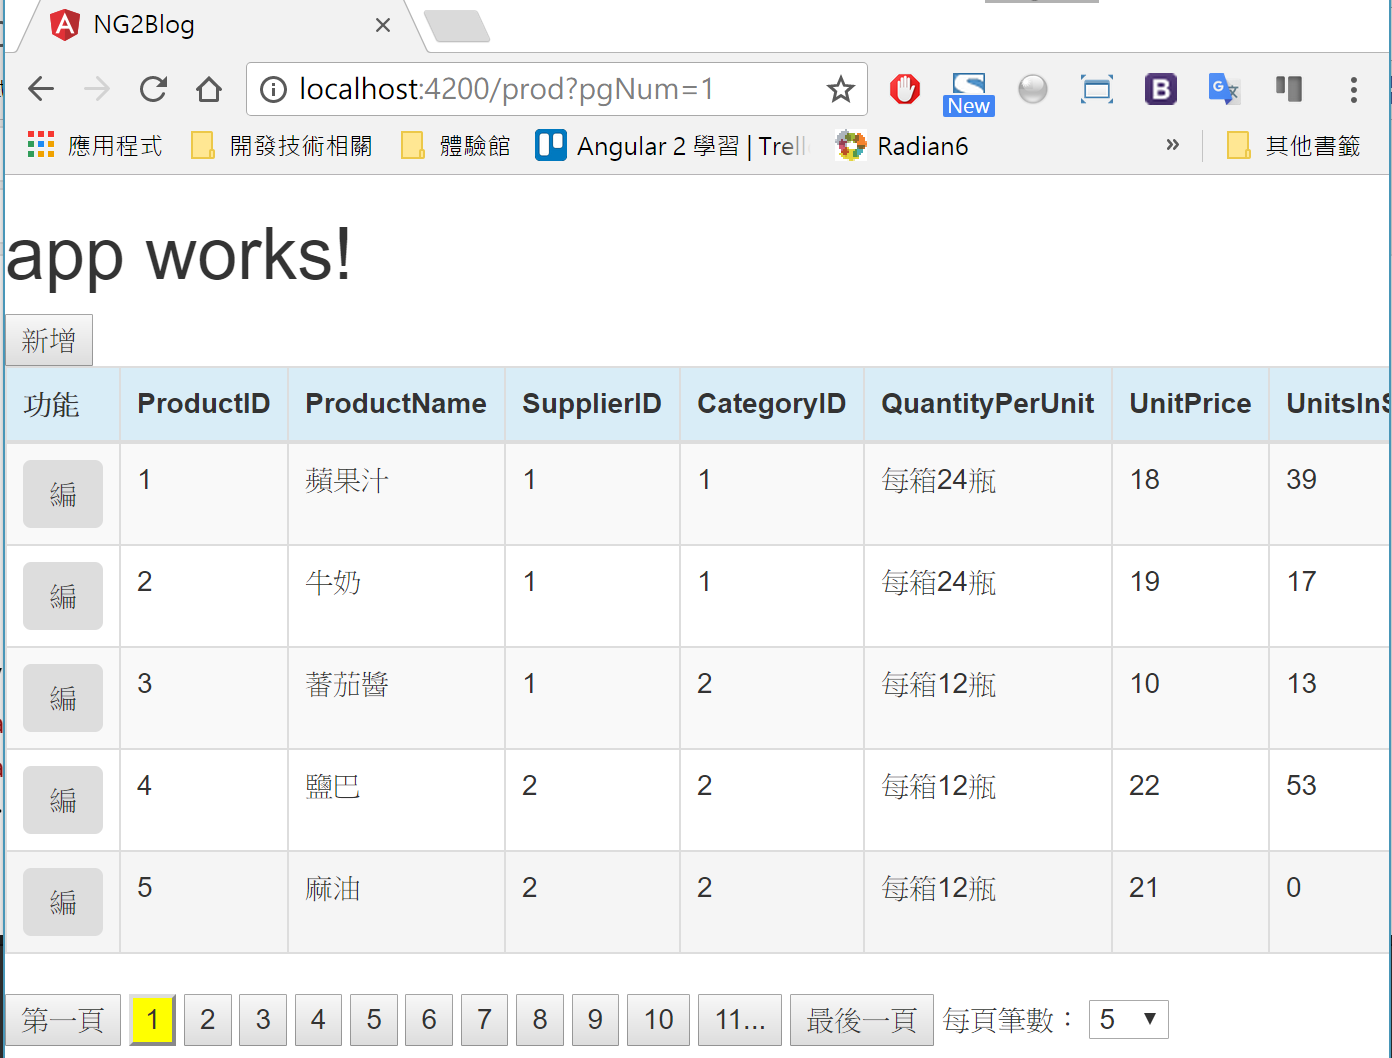
如何把分頁控制項的部分,抽出來變成共用的元件,讓分頁的部分可以重複使用。
緣起
小喵之前的一篇『[筆記][Angular 2]透過Angular-CLI 撰寫 Angular 2針對單一資料表的CRUD』,裡面有用到了分頁的功能,搭配Service,傳遞分頁代號 (PageNum) 與分頁的筆數 (PageSize) ,以控制資料表的分頁顯示。小喵心想,這樣的功能,相信很多的地方,要顯示資料表,都會用到。如果可以抽出這部分的功能,變成共用的元件,讓其他要顯示資料的時候,可以簡單的套用該元件,這樣應該會很方便,小喵這一篇就來記錄這樣元件的範例。
Pagging Service
藉由 Service 的特性,可以在各元件 Component 之間共用共存資料的特性,我們新增一個分頁專用的 Service,把分頁需要的變數、函數,都寫在這個 Service 中,這樣一來,「顯示資料的元件」、「存取資料的 Service」、「分頁顯示控制的元件」,都可以透過 DI 將這個 Service 注入,共同使用。
Pagging Service 的相關程式碼如下:
import { Injectable } from '@angular/core';

@Injectable()
export class PaggingService {

  //分頁相關屬性開始
  currentPageNum:number=1;
  pageSize:number=5;
  totalPage:number=0;

  pageNumArray:number[]=[];   //用以存放所有分頁的數字(3頁就會是1,2,3)
  pageNumArrayMax:number=0;   //分頁數的陣列最大數
  startPg:number=0;     //分頁陣列,開始的頁數
  //分頁相關屬性結束

  constructor() { }

  //分頁相關開始
  //  設定分頁控制項的陣列
  set_pageNumArray(){
      //初始劃分頁陣列
        this.pageNumArray=[];
        let i:number=0;

        //計算起始頁
        this.startPg = Math.floor((this.currentPageNum-1)/10)*10+1;

        if(this.startPg+10>this.totalPage){
          this.pageNumArrayMax = this.totalPage;
        }
        else{
          this.pageNumArrayMax = this.startPg+10-1;
        }
        for(i=this.startPg;i<=this.pageNumArrayMax;i++){
            this.pageNumArray.push(i);
        }
  }
  //分頁相關結束

}
記得,要到 app.module.ts 裡面,設定providers的部分。
providers: [PaggingService]
Pagging Component
接著,設計分頁的元件 (PaggingComponent)。
首先,是TypeScript,由於要讓分頁的部分,徹底的與資料顯示的部分徹底拖勾,這部分就利用QueryString的方式,傳遞要顯示第幾頁,以及每一頁有幾筆的部分。
另外,透過 DI 將 PaggingService 的服務注入,這樣在html內容,就可以直接存取相關的屬性。
import { Router} from '@angular/router';
import { PaggingService } from './../pagging.service';
import { Component, OnInit } from '@angular/core';

@Component({
  selector: 'app-pagging',
  templateUrl: './pagging.component.html',
  styleUrls: ['./pagging.component.css']
})
export class PaggingComponent implements OnInit {

  constructor(private svcPagging:PaggingService,private router:Router) { }

  ngOnInit() {
  }

  //設定第幾頁,透過queryParams傳遞第幾個分頁
  setPgNum(pgNum:number){
    this.svcPagging.currentPageNum = pgNum;
    this.router.navigate(['prod'],{queryParams:{pgNum:pgNum}});
  }

  //設定分頁的筆數,透過queryParams傳遞第幾個分頁,分頁的筆數
  setPgSize(){
    this.router.navigate(
      ['prod'],
      {
        queryParams:{
          pgNum:this.svcPagging.currentPageNum,
          pgSize:this.svcPagging.pageSize
        }
      }
    );
  }

}
接著,是分頁控制項的部分 (pagging.component.html)
由於在 TypeScript 中透過 DI 將 PaggingService 注入,頁面中就可以直接存取該 Service的屬性。
    <!--分頁開始-->
    <span><button (click)="this.setPgNum(1)">第一頁</button></span>
    <span *ngIf="(this.svcPagging.startPg-10)>=1">
      <button (click)="this.setPgNum(this.svcPagging.startPg-1)">...{{this.svcPagging.startPg-1}}</button>
    </span>
    <span *ngFor="let pn of this.svcPagging.pageNumArray">
      <button (click)="this.setPgNum(pn)" [ngClass]="{currentPage: pn==this.svcPagging.currentPageNum}">{{pn}}</button>
    </span>
    <span *ngIf="svcPagging.pageNumArrayMax < svcPagging.totalPage">
      <button (click)="this.setPgNum(svcPagging.pageNumArrayMax+1)">{{svcPagging.pageNumArrayMax+1}}...</button>
    </span>
    <span><button (click)="this.setPgNum(svcPagging.totalPage)">最後一頁</button></span>
    每頁筆數:
    <select name="sltPageSize" id="sltPageSize" [(ngModel)]="svcPagging.pageSize" (change)="this.setPgSize()">
      <option value="5">5</option>
      <option value="10">10</option>
      <option value="15">15</option>
      <option value="20">20</option>
    </select>
    <!--分頁結束-->
其中,按鈕與目前的頁數一樣,用不同顏色顯示,這部分的css設定,就設定在 (pagging.component.css) ,內容如下:
.currentPage{background-color:yellow;}
使用範例
用北風資料庫的Product為例,小喵新增一個Service,一個Component來作為範例
- ProdService
- ProdComponent
ProdService
如果要比對之前的作法,可以參考之前的「[筆記][Angular 2]透過Angular-CLI 撰寫 Angular 2針對單一資料表的CRUD」
import { PaggingService } from './pagging.service';
import { Http, Headers, Response, RequestOptions } from '@angular/http';
import { Injectable } from '@angular/core';

@Injectable()
export class ProdService {

  //API來源名稱
  serverName:string='http://localhost:54514/'

  //取回的內容
  datas:any=[];
  error:any;
  currentData:any={};   //被選取作用中的單筆資料
  editMode:string='';   //記錄編輯模式為何?Edit:編輯中, AddNew:新增中,空字串為非作用中,初始值為''非作用中。


  constructor(private http:Http, private svcPagging:PaggingService) { }

  GetDatasByPage(){
    let url:string=this.serverName + 'api/prod/' + this.svcPagging.currentPageNum.toString() + '/' + this.svcPagging.pageSize.toString();
    let headers = new Headers({'Content-Type':'application/json'});
    let options = new RequestOptions({headers:headers});

    this.http.get(url, options)
    .subscribe(
      (value:Response)=>{
        let jData:any;
        jData = value.json();
        this.datas = jData.oPages;
        this.svcPagging.totalPage = jData.TotalPage;
        this.svcPagging.set_pageNumArray();
      },
      (error)=>{
        this.error = error;
      }
    );
  }


}
ProdComponent
首先,是TypeScript的部分,這裡面透過 DI 注入分頁的服務 PaggingService。另外,透過ActiveRoute,在OnInit的事件中,藉由訂閱的方式,取得由 PaggingComponent透過QueryString傳遞過來的分頁代號(pgNum)與分頁筆數(pgSize),並觸發 ProdService 中的函數取得資料。
prod.component.ts
import { PaggingService } from './../pagging.service';
import { ProdService } from './../prod.service';
import { Component, OnInit } from '@angular/core';
import { ActivatedRoute } from "@angular/router";

@Component({
  selector: 'app-prod',
  templateUrl: './prod.component.html',
  styleUrls: ['./prod.component.css']
})
export class ProdComponent implements OnInit {

  constructor(private svcData:ProdService
    ,private svcPagging:PaggingService
    ,private route:ActivatedRoute
    ) { }

  ngOnInit() {
   this.route.queryParams.subscribe((value)=>{
      if(value['pgNum']==null){
        this.svcPagging.currentPageNum=1;
      }else{
        this.svcPagging.currentPageNum=parseInt(value['pgNum']);
      }
      //console.log(this.svcPagging.currentPageNum);
      if(value['pgSize']!=null){
        this.svcPagging.pageSize = parseInt(value['pgSize']);
      }
      this.svcData.GetDatasByPage();
    });
  }

}
顯示資料內容的html,並套用分頁控制項 <app-pagging></app-pagging>
prod.component.html
<div *ngIf="svcData.editMode==''">
  <button (click)="svcData.editMode='AddNew'">新增</button>
  <table class="table table-hover table-striped table-bordered">
    <thead>
      <tr class="info">
        <th>功能</th>
        <th>ProductID</th>
        <th>ProductName</th>
        <th>SupplierID</th>
        <th>CategoryID</th>
        <th>QuantityPerUnit</th>
        <th>UnitPrice</th>
        <th>UnitsInStock</th>
        <th>UnitsOnOrder</th>
        <th>ReorderLevel</th>
        <th>Discontinued</th>
      </tr>
    </thead>
    <tbody>
      <tr *ngFor="let oItem of svcData.datas">
        <td>
          <button type="button" (click)="svcData.doSetcurrentData(oItem)" class="btn">編</button>
        </td>
        <td>{{oItem.ProductID}}</td>
        <td>{{oItem.ProductName}}</td>
        <td>{{oItem.SupplierID}}</td>
        <td>{{oItem.CategoryID}}</td>
        <td>{{oItem.QuantityPerUnit}}</td>
        <td>{{oItem.UnitPrice}}</td>
        <td>{{oItem.UnitsInStock}}</td>
        <td>{{oItem.UnitsOnOrder}}</td>
        <td>{{oItem.ReorderLevel}}</td>
        <td>
            <input type="checkbox" [(ngModel)]="oItem.Discontinued">
        </td>
      </tr>
    </tbody>
  </table>
    <app-pagging></app-pagging>
</div>
執行結果

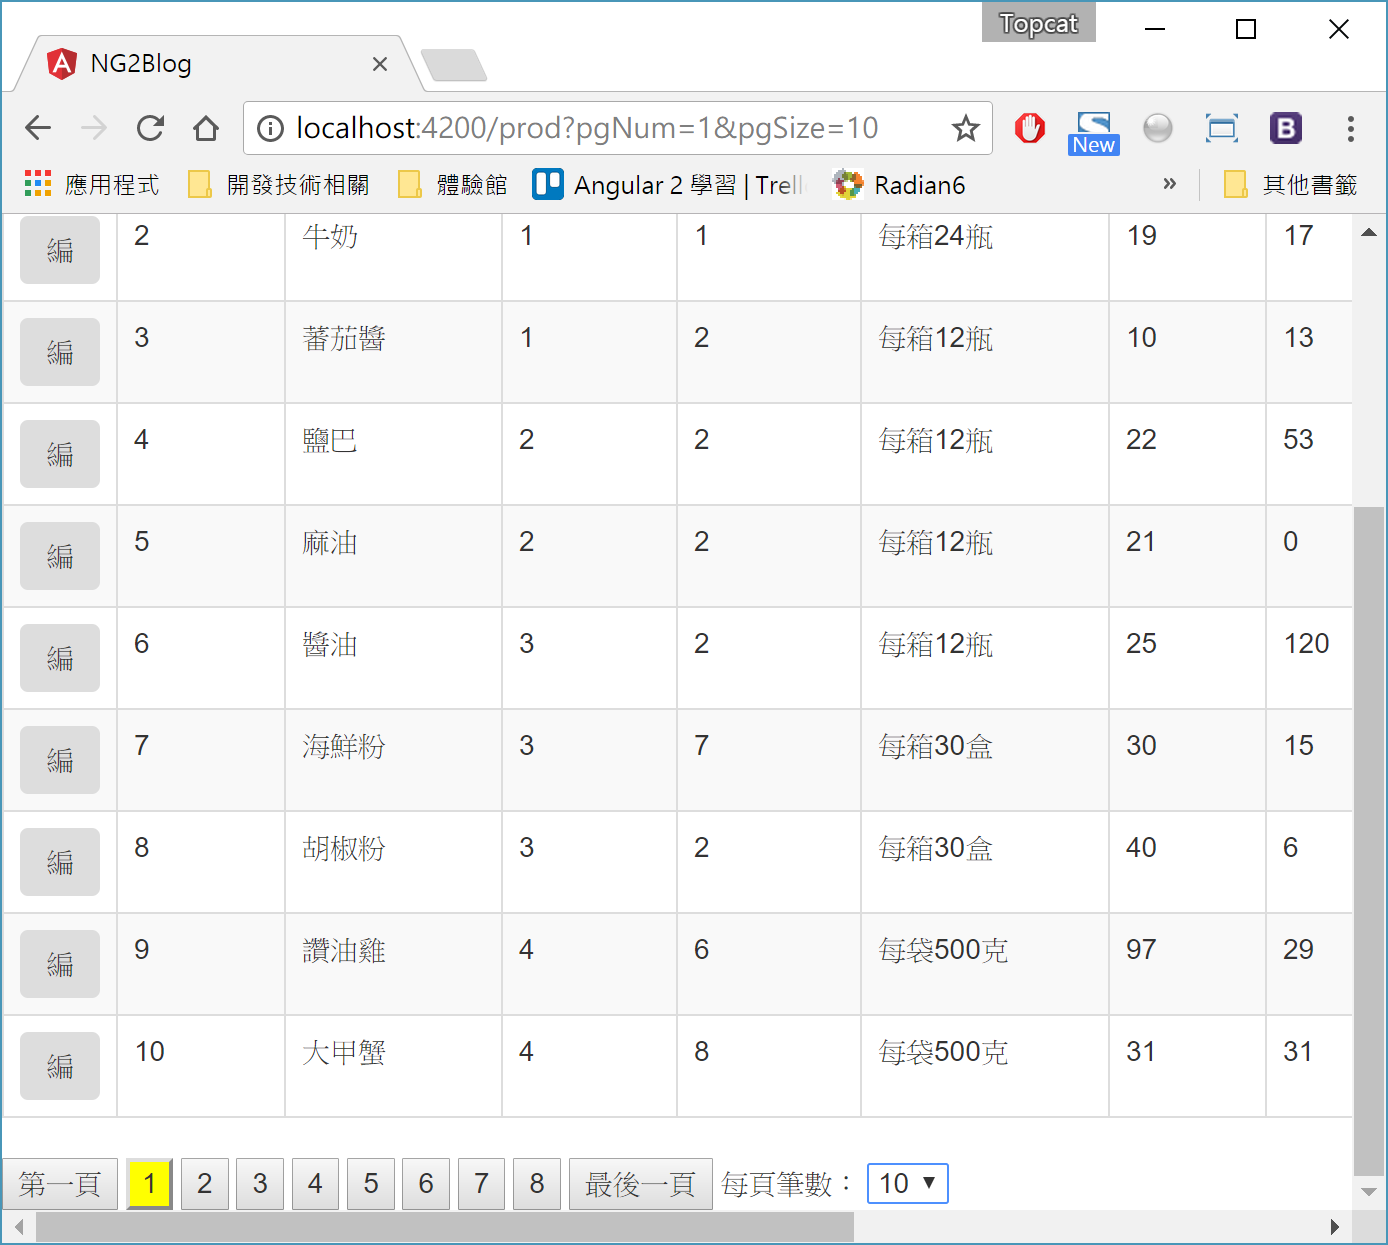
切換分頁Size:

殘留課題
目前的分頁 Service與Component ,可以讓資料顯示簡單的套用。不過,目前還有個狀況是,如果單一頁面,有兩個地方需要用到這個,由於 Service 是大家共用的,所以目前的方式,只適合一個頁面中,單一資料表顯示使用。後續小喵解決這個問題,會再發表新的文章。
以下是簽名:
- 歡迎轉貼本站的文章,不過請在貼文主旨上加上【轉貼】,並在文章中附上本篇的超連結與站名【topcat姍舞之間的極度凝聚】,感恩大家的配合。
- 小喵大部分的文章會以小喵熟悉的語言VB.NET撰寫,如果您需要C#的Code,也許您可以試著用線上的工具進行轉換,這裡提供幾個參考
| Microsoft MVP Visual Studio and Development Technologies (2005~2019/6) | topcat Blog:http://www.dotblogs.com.tw/topcat |