[ASP.net MVC 4] ASP.net MVC + jQuery Uploadify 3.x版 完整解決方案
前台
最近專案有個需求
1. 使用者可以在上傳檔案選檔時,一次選多個檔 => Html5 有支援:[HTML5] HTML5 File API by 小朱
2. 選擇檔案後,自動上傳,使用者不必再按Button去Post=>可以在<input type=”file” />加一個onchange的JS事件,讓表單POST,不過這招在IE會被擋
3. 剛好,客戶給我要上傳檔案的畫面又是包在頁籤div底下,所以我上傳檔案若POST頁面的話,User會回到第一個頁籤,降低使用者體驗
4. 客戶美工還給我一個上傳檔案的按鈕圖片,所以傳統<input type=”file” />得打造外觀了
經過以上考量,最後還是把以前寫WebForm用過的jQuery Uploadify套件拿出來用
翻譯:
1. 支援選擇多檔案上傳
2. 選擇檔案後自動上傳
3. 上傳按鈕可以客製化外觀
4. 進度條顯示(進度不用自己算,套件做掉了)
5. 上傳檔案不會刷新頁面
6. 前端JS判斷上傳限制
官網文件說明可以看到有兩種套件:Uploadify(Flash版)和UploadFive(Html 5版)
本文介紹的是Flash版※注意3.x版和2.x版本的程式碼,參數名稱會不太一樣
官網Flash版Demo頁:http://www.uploadify.com/demos/
使用jQuery Uploadify的環境需求:
翻譯:
1. jQuery 1.4版以上
2. 用戶端的Flash Player 9版以上
3. 一種Server Side動態網頁技術,本文以ASP.net MVC為範例
實作
1.一開始不用進官網下載壓縮包,直接用Visual Studio 2012的NuGet套件管理員找「Uploadify」安裝就行
由於Uploadify在FireFox使用會有掉Session問題
所以先在Global.asax.cs 寫下
using System;
using System.Collections.Generic;
using System.IO;
using System.Linq;
using System.Web;
using System.Web.Http;
using System.Web.Mvc;
using System.Web.Routing;
using System.Web.Security;

namespace MvcApplicationjQueryUploadify
{
    // Note: For instructions on enabling IIS6 or IIS7 classic mode,
    // visit http://go.microsoft.com/?LinkId=9394801
    public class MvcApplication : System.Web.HttpApplication
    {
        #region Firefox用的jQuery Uploadify設定
        void Application_BeginRequest(object sender, EventArgs e)
        {

                string session_param_name = "ASPSESSID";
                string session_cookie_name = "ASP.NET_SessionId";
                if (HttpContext.Current.Request.Form[session_param_name] != null)
                {
                    UpdateCookie(session_cookie_name, HttpContext.Current.Request.Form[session_param_name]);
                }
                else if (HttpContext.Current.Request.QueryString[session_param_name] != null)
                {
                    UpdateCookie(session_cookie_name, HttpContext.Current.Request.QueryString[session_param_name]);
                }


            //身份驗證

                string auth_param_name = "AUTHID";
                string auth_cookie_name = FormsAuthentication.FormsCookieName;
                if (HttpContext.Current.Request.Form[auth_param_name] != null)
                {
                    UpdateCookie(auth_cookie_name, HttpContext.Current.Request.Form[auth_param_name]);
                }
                else if (HttpContext.Current.Request.QueryString[auth_param_name] != null)
                {
                    UpdateCookie(auth_cookie_name, HttpContext.Current.Request.QueryString[auth_param_name]);
                }

        }

        private void UpdateCookie(string cookie_name, string cookie_value)
        {
            HttpCookie cookie = HttpContext.Current.Request.Cookies.Get(cookie_name);
            if (null == cookie)
            {
                cookie = new HttpCookie(cookie_name);
            }
            cookie.Value = cookie_value;
            HttpContext.Current.Request.Cookies.Set(cookie);//重新設定cookie
        }

        #endregion


        protected void Application_Start()
        {
            #region 建立資料夾(上傳檔案用)
            string fileDir = Server.MapPath("~/Uploads/");
            if (!Directory.Exists(fileDir))
            {
                Directory.CreateDirectory(fileDir);
            }
            #endregion


            AreaRegistration.RegisterAllAreas();

            WebApiConfig.Register(GlobalConfiguration.Configuration);
            FilterConfig.RegisterGlobalFilters(GlobalFilters.Filters);
            RouteConfig.RegisterRoutes(RouteTable.Routes);
        }
    }
}
再來是上傳檔案的Controller Code
using System;
using System.Collections.Generic;
using System.IO;
using System.Linq;
using System.Web;
using System.Web.Mvc;
using System.Web.Security;

namespace MvcApplicationjQueryUploadify.Controllers
{
    public class HomeController : Controller
    {

        [HttpGet]
        public ActionResult Index()
        {


            return View();
        }

        /// <summary>
        /// 上傳一筆檔案(前端Uploadify會呼叫此Action)
        /// </summary>
        /// <param name="Filedata">此參數名稱可以在Uploadify設定</param>
        /// <returns></returns>
        [HttpPost]
        public ActionResult UploadFile(HttpPostedFileBase Filedata)
        {

            if (Filedata != null && Filedata.ContentLength>0)
            {
                try
                {

                    // 檔案上傳的儲存資料夾
                    string fileDir = Server.MapPath("~/Uploads/");

                    string ext = Path.GetExtension(Filedata.FileName); //副檔名
                    string newName = Guid.NewGuid().ToString() + ext; // 新檔名

                    Filedata.SaveAs(Path.Combine(fileDir,newName));

                    //成功就回傳該圖片的URL
                    return Content(Url.Content("~/Uploads/" + newName));

                }
                catch (Exception ex)
                {
                    //寫Log
                    return Content("");
                }
            }
            return Content("");

        }


    }
}
前端View Uploadify叫用方法:
<!DOCTYPE html>

<html>
<head>
    <meta name="viewport" content="width=device-width" />
    <title>Index</title>
    @*引用Uploadify樣式,Queue會用到*@
    <link href="~/Scripts/uploadify/uploadify.css" rel="stylesheet" />
    @*引用jQuery核心函式庫*@
    <script src="~/Scripts/jquery-1.4.4.min.js"></script>
    @*引用uploadify核心*@
    <script src="~/Scripts/uploadify/jquery.uploadify-3.2.min.js"></script>
    <script type="text/javascript">
        $(document).ready(init);
        function init()
        {
            //解決Firefox掉Session用的程式碼
            var ASPSESSID = "@Session.SessionID";
            var AUTHID = "@(Request.Cookies[FormsAuthentication.FormsCookieName] == null ? string.Empty : Request.Cookies[FormsAuthentication.FormsCookieName].Value)";

            var width = 814;
            var height = 269;
            var buttonImageUrl = "@Url.Content("~/Content/Images/GoogleImg.png")";//這是我自己準備的按鈕圖

            //js註冊使用jQuery Uploadify
            //Filedata為input的id
            //queue為div id,佇列div的 id
            UploadFileFunc("Filedata", "queue", ASPSESSID, AUTHID,width,height,buttonImageUrl);


        }
        //這個function再自行放到自己的.js檔
        function UploadFileFunc(FiledataID, QueueID, ASPSESSID, AUTHID,width,height,buttonImageUrl)
        {
            $('#' + FiledataID).uploadify({
                buttonImage: buttonImageUrl,//依美工給的圖置換上傳按鈕圖
                width: width,//按鈕寬度和圖片一樣
                height: height,//按鈕高度和圖片一樣

                swf: '/Scripts/uploadify/uploadify.swf',//必填
                uploader: '/Home/UploadFile',//使用哪個Action 做上傳


                multi: true,//true支援選擇多檔案上傳
                auto: true,//設置true,檔案選擇框,一按確定就上傳,false的話,要另外呼叫方法傳遞upload參數觸發上傳行為
                fileTypeExts: '*.jpg;*.gif;*.png',//限制可以選擇的檔案類型
                fileTypeDesc: 'Image Files (.jpg, .gif, .png)',//選擇檔案時的說明
                fileSizeLimit: '4MB',//在js端就限制檔案大小,User選擇超過大小的檔案時,就會跳出error
                queueID: QueueID,//上傳進度條呈現的地方
                queueSizeLimit: 4,//限制queue的數量
                simUploadLimit: 0,//同時上傳檔案數,0為無限
                removeCompleted: true,//檔案上傳完成時,畫面上的佇列是否消失

                fileObjName: 'Filedata',//Server端的Action,以什麼名稱接收HttpPostedFileBase物件

                onSelectError: function (file) {//當選擇檔案不符合條件時,觸發: http://www.uploadify.com/documentation/uploadify/onselecterror/

                    //alert('The file ' + file.name + ' returned an error and was not added to the queue.');

                },
                onUploadSuccess: function (file, data, response) {
                    //一個佇列上傳成功時
                    //alert('The file ' + file.name + ' was successfully uploaded with a response of ' + response + ':' + data);
                    //data參數是Controller回傳的字串,想要Json格式的話,要再另外找Plugin把字串轉成Json物件
                    //以本文範例data就是該圖片上傳後的Url字串

                },
                onQueueComplete: function (queueData) {
                    //全部佇列執行完畢時
                    //alert(queueData.uploadsSuccessful + ' files were successfully uploaded.');


                },
                //解決Firefox掉Session的程式碼,ASPSESSID和AUTHID命名要和Global.asax.cs裡寫的一樣
                formData: {
                    ASPSESSID: ASPSESSID,
                    AUTHID: AUTHID
                }


            });

        }

</script>

</head>
<body>

     @*※為div queue加上style="display:none;",就可以隱藏queue了*@
     <div id="queue" ></div>
     <input id="Filedata" type="file" name="Filedata"   />


</body>
</html>
如果上傳中Queue發生錯誤404 Error
或 500 Error
這表示ASP.net預設的上傳限制4MB是不夠User上傳超大檔案
解決辦法參考他人文章:
win8下IIS8.0下uploadify-v3.1上传文件超过30M,报HTTP Error(404)
執行畫面:
本文範例檔下載,請用7-zip解壓,放到我的Azure沒錢
結語
雖然Uploadify能夠客製化很多東西,但事前配置是很麻煩的
一直想找個更簡單,程式碼寫更少的套件取代,但沒時間……Orz
2013.8.27 追記幾個實務上的經驗分享
1.畫面上不一定要有<input type=”file” name=”Filedata” id=”Filedata” />,因為最後會被套件Render成<object>使用.swf來上傳檔案
所以即使改成<div id=”Filedata”></div>也可以。
2.承上,因為只是專門呈現<object>的區域,所以名稱也不一定要叫Filedata,如果同個畫面有多個上傳按鈕,可以
<div id=”Filedata1”></div>
<br/>
<div id=”Filedata2”></div>
真正影響Action接收的HttpPostedFileBase名稱的是在uploadify的設定參數:fileObjName
3.queueSizeLimit參數為當前畫面上Queue的限制數量,可以指定數字,當做限制使用者選檔數量
4.如果發生
typeerror object has no method 'uploadify'
找不到uploadify方法的錯誤
那是因為uploadify這個function是註冊於jQuery之上,要記得引用順序
先jQuery核心函式庫→uploadify核心函式庫
然後注意頁面footer不要再引用一次jQuery核心函式庫,它會蓋掉剛剛註冊過的uploadify function
我的話會統一把jQuery核心函式庫放在head標籤,就解決了
5.如果在送檔案到Action時也要連同其他資訊一塊送的話,可以使用formData參數設定,本文有使用,只是沒在Action中寫出來而已,用法請參考官網
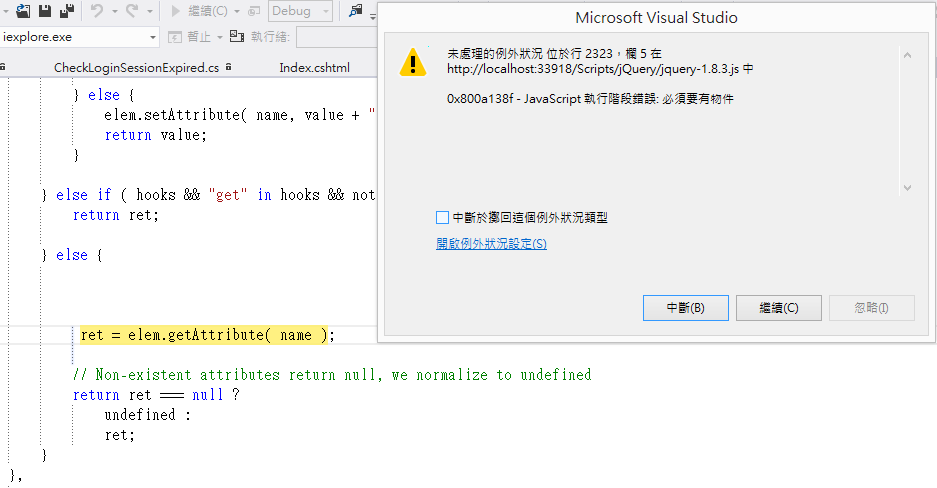
6.如果網站有使用bootstrap在IE9、IE10,當滑鼠游標移到上傳按鈕圖片上或點擊時,發生以下錯誤
JavaScript 執行階段錯誤:必須要有物件
是因為uploadify套件和bootstrap的某個功能的相衝,解法:
1.在頁面的<head>加入<meta http-equiv="X-UA-Compatible" content="IE=8" />強制IE使用IE8文件模式瀏覽,只是這樣會有破版可能
2.將uploadify嵌入iframe,該iframe是一個乾淨的頁面,沒有bootstrap的attribute綴詞
※如果用在編輯資料頁面,為了把原本圖片資料抓出來,可以利用iframe的src傳遞QueryString帶檔案名稱
2013.10.28
再分享幾個經驗,客戶的表單上有uploadify上傳檔案、ckeditor輸入欄位,當表單提交時
如果為了firefox掉Sesson問題而在Global.asax.cs寫下
if (HttpContext.Current.Request.Form[session_param_name] != null)
這段文字的話,ckeditor輸入的文字就會過不了ASP.net的輸入驗證
後來我的解決辦法:從Global.asax.cs拿掉那堆程式碼,firefox要掉Session就讓它掉,在上傳檔案的Action方法裡注意Filter和裡頭的程式碼不要存取Session,單純做上傳動作就皆大歡喜了
其他參考文章


