[ASP.net MVC 4 / jQuery] 別再alert()了,來試試jQuery Notification
前言
要跳出一個訊息框通知使用者,傳統方式可能使用javascript的window.alert()函數
對開發人員來說,程式碼短又簡單,學習容易
但對使用者來說,在使用者體驗上,會中斷目前的操作流程,如果有多則訊息要跳出來的話,使用者還得把先前的alert()按下確定,第2個alert()才會出現
有玩過x情公寓的人應該就能體會每做完一個操作就跳出一個alert()那種卡卡的感覺吧XD
像Window Azure或facebook網站愈來愈多開始使用Notification方式,除了達到告知使用者訊息外,也不影響使用者目前的操作流程
↑當Notification有多則時,也可以堆疊在畫面上一目了然
上網搜尋一下
發現幾個相關jQuery Plugin:
熱門:noty、Pines Notify
模仿樣式:A jQuery UI Growl/Ubuntu-like Notification Widget、Creating Facebook like Beeper Or Notification Alert Box using jQuery and CSS、willsteinmetz.net jQuery plug-ins notific8(Windows 8樣式)
其他介紹:20 Useful jQuery Notification Plugins and Tutorials、15 jQuery Notification Plugin Example、10 Great jQuery Notification Plugins and Tutorials
6 Best jQuery Notification Plugins jQuery By Example、6 jQuery growl-like notification systems webtoolkit4.me、notification box jQuery Plugins
本文以noty做介紹
※和另一個熱門的Pines Notify相比,兩者大同小異,noty雖然少了Pause鍵停駐Notification功能,但要控制它出現在畫面上的Position,參數設定相當容易,算是它很大特色
noty使用前置作業
1.引用jQuery核心函式庫1.6以上
至https://github.com/needim/noty下載zip檔,解壓後將以下檔案引入頁面
2.引入jquery.noty.js(主要javascript檔,順序要先引入jQuery核心函式庫再引入這個)、壓縮檔裡layouts資料夾裡自己依需求挑一個js、default.js(它的樣式都寫在javascript裡)
按鈕樣式則在demo資料夾裡的buttons.css
而如果第一步驟引用jQuery 1.5以下版本的話,則要再另外引用promise.js
可以設置的notification類型和layout位置
noty參數說明
設定button
所以簡單一點可以這樣用
Sample Code:
@{
Layout = null;
}
<!DOCTYPE html>
<html>
<head>
<meta name="viewport" content="width=device-width" />
<title>Index</title>
@*先引用jQuery核心函式庫*@
@Scripts.Render("~/Scripts/jquery.min.js")
@*Notification*@
@*再引用noty主要js檔*@
@Scripts.Render("~/Scripts/jquery.noty.js")
@*依需求notification要出現在哪些位置就引用哪些檔*@
@Scripts.Render("~/Scripts/bottomLeft.js")
@Scripts.Render("~/Scripts/bottom.js")
@Scripts.Render("~/Scripts/bottomCenter.js")
@*樣式js*@
@Scripts.Render("~/Scripts/default.js")
@*confirm類型的才有可能用到的按鈕樣式*@
@Styles.Render("~/Content/css/buttons.css")
<script type="text/javascript">
$(document).ready(init);
function init()
{
$("#btnAlert").click(function(){
mynoty("alert","這是alert",null);
});
$("#btnSuccess").click(function(){
mynoty("success","這是success",null);
});
$("#btnError").click(function(){
mynoty("error","<h1>這是error</h1>",null);
});
$("#btnWarning").click(function(){
mynoty("warning","這是warning",null);
});
$("#btnInformation").click(function(){
mynoty("information","這是information",null);
});
$("#btnConfirmation").click(function(){
mynoty("confirm", "確定刪除?", function () {
$.ajax({
url: "",
type: "post",
data: {},
async: true,
success: function (result) { },
error: function (xhr) {
mynoty("error", "發生錯誤:" + xhr.responseText, null);
}
});
});
});
}
//自己寫的function
function mynoty(type, msg, myFunc) {
var n;
//confirm類型的
if (type == "confirm") {
n = noty({
layout: 'bottom',//出現在畫面上的位置(必填,Notification才會出現)
type: 'confirm',//alert,warning,error,information,success,※注意官網中的alert和confirm兩個樣式是一樣的
text: msg,
closeWith: ['click'], // ['click', 'button', 'hover']
//加入button
buttons: [
{
addClass: 'btn btn-primary', text: '確定', onClick: function ($noty) {
// this = button element
// $noty = $noty element
$noty.close();
//執行function
myFunc();
}
},
{
addClass: 'btn btn-danger', text: '取消', onClick: function ($noty) {
$noty.close();
}
}
]
});
} else {
n = noty({
layout: 'bottom',//出現在畫面上的位置(必填,Notification才會出現)
type: type,//alert,warning,error,information,success,※注意官網中的alert和confirm兩個樣式是一樣的
text: msg,
closeWith: ['click'], // ['click', 'button', 'hover']
});
}
return n;
}
</script>
</head>
<body>
<input type="button" id="btnAlert" value="alert" />
<input type="button" id="btnSuccess" value="success" />
<input type="button" id="btnError" value="error" />
<input type="button" id="btnWarning" value="warning" />
<input type="button" id="btnInformation" value="information" />
<input type="button" id="btnConfirmation" value="confirm" />
</body>
</html>
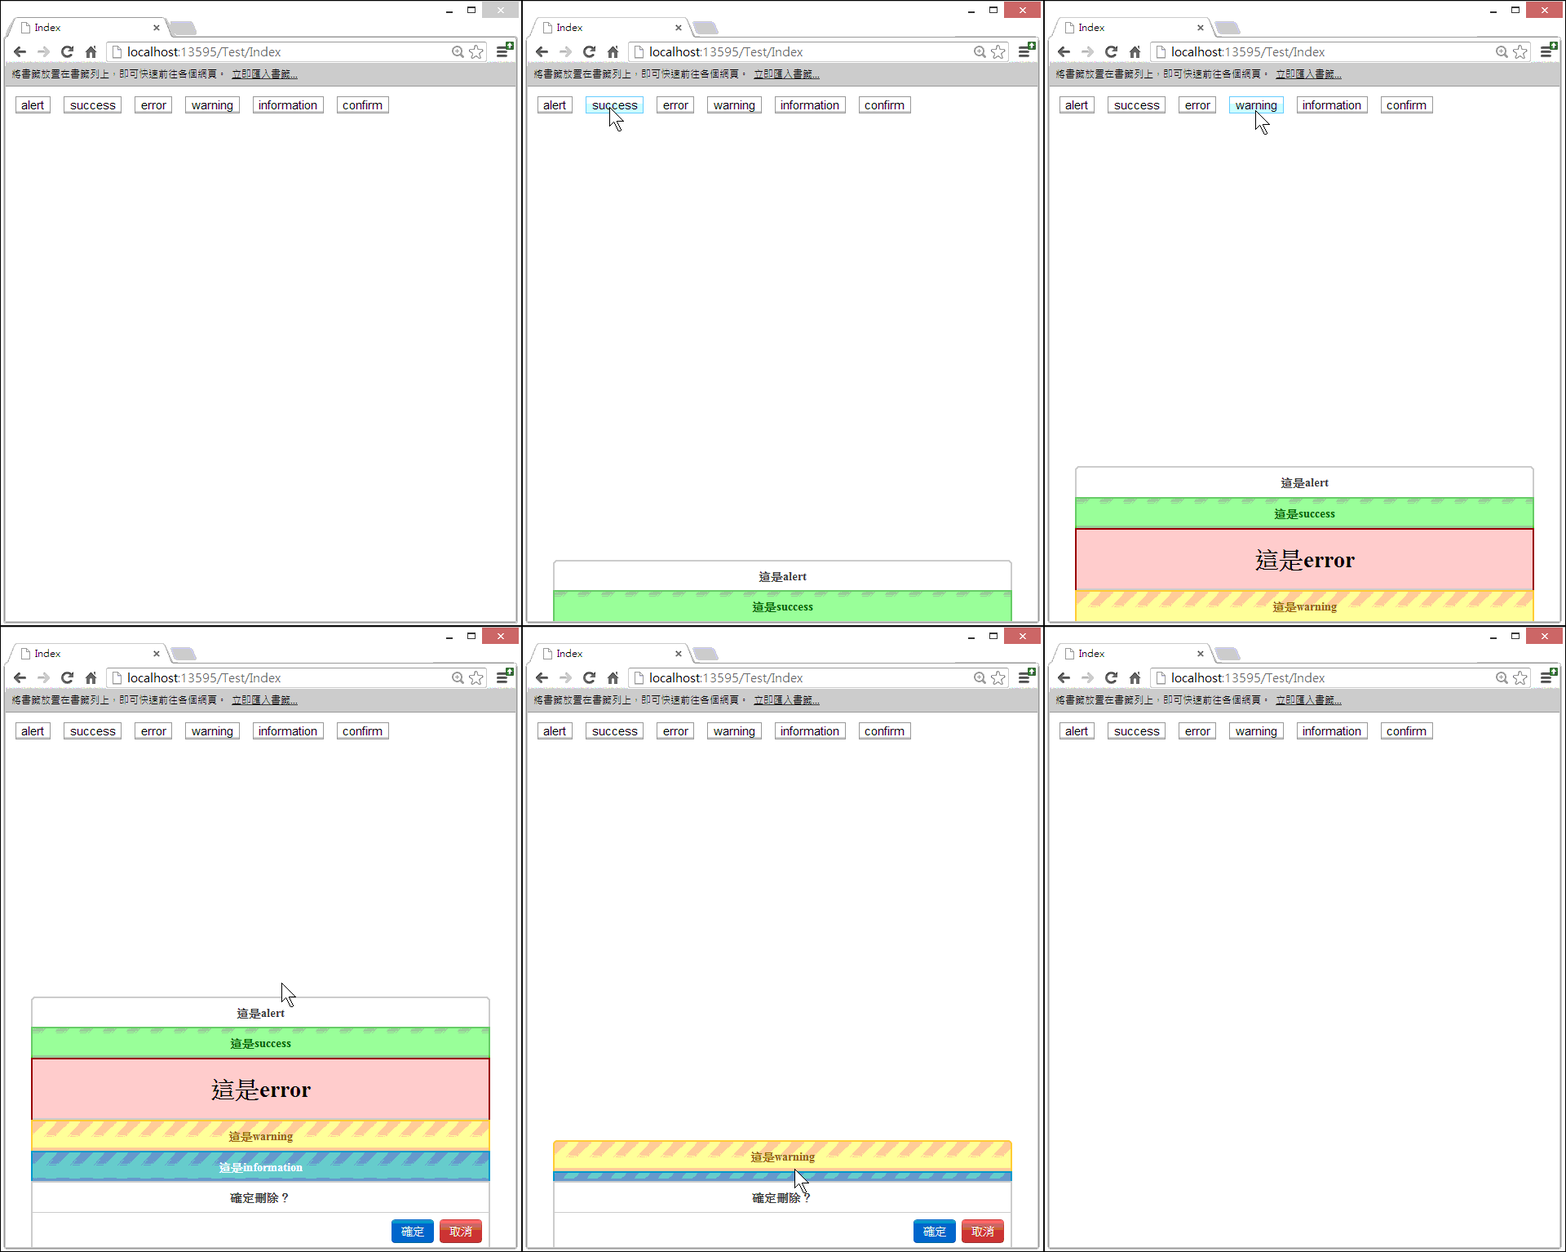
執行結果:
由於noty這個套件並未提供設置多久後Notification才自動消失
需要這個功能的話,請參考以下寫法
@{
Layout = null;
}
<!DOCTYPE html>
<html>
<head>
<meta name="viewport" content="width=device-width" />
<title>Index</title>
@Scripts.Render("~/Scripts/jquery.min.js")
@Scripts.Render("~/Scripts/jquery.noty.js")
@Scripts.Render("~/Scripts/bottomLeft.js")
@Scripts.Render("~/Scripts/bottom.js")
@Scripts.Render("~/Scripts/bottomCenter.js")
@Scripts.Render("~/Scripts/default.js")
@Styles.Render("~/Content/css/buttons.css")
<script type="text/javascript">
$(document).ready(init);
function init()
{
$("#btnAlert").click(function(){
mynoty("alert","這是alert",null);
});
$("#btnSuccess").click(function(){
mynoty("success","這是success",null);
});
$("#btnError").click(function(){
mynoty("error","<h1>這是error</h1>",null);
});
$("#btnWarning").click(function(){
mynoty("warning","這是warning",null);
});
$("#btnInformation").click(function(){
mynoty("information","這是information",null);
});
$("#btnConfirmation").click(function(){
mynoty("confirm", "確定刪除?", function () {
$.ajax({
url: "",
type: "post",
data: {},
async: true,
success: function (result) { },
error: function (xhr) {
mynoty("error", "發生錯誤:" + xhr.responseText, null);
}
});
});
});
}
function mynoty(type, msg, myFunc) {
var n;
if (type == "confirm") {
n = noty({
timeout:false,//設定不要timeout,待會自行呼叫close();
layout: 'bottom',
type: 'confirm',
text: msg,
closeWith: ['click'],
buttons: [
{
addClass: 'btn btn-primary', text: '確定', onClick: function ($noty) {
$noty.close();
myFunc();
}
},
{
addClass: 'btn btn-danger', text: '取消', onClick: function ($noty) {
$noty.close();
}
}
]
});
} else {
n = noty({
timeout: false,//設定不要timeout,待會自行呼叫close();
layout: 'bottom',
type: type,
text: msg,
closeWith: ['click'],
});
}
//三秒後關閉Notification
setTimeout(function () {
n.close();
},3000);
return n;
}
</script>
</head>
<body>
<input type="button" id="btnAlert" value="alert" />
<input type="button" id="btnSuccess" value="success" />
<input type="button" id="btnError" value="error" />
<input type="button" id="btnWarning" value="warning" />
<input type="button" id="btnInformation" value="information" />
<input type="button" id="btnConfirmation" value="confirm" />
</body>
</html>
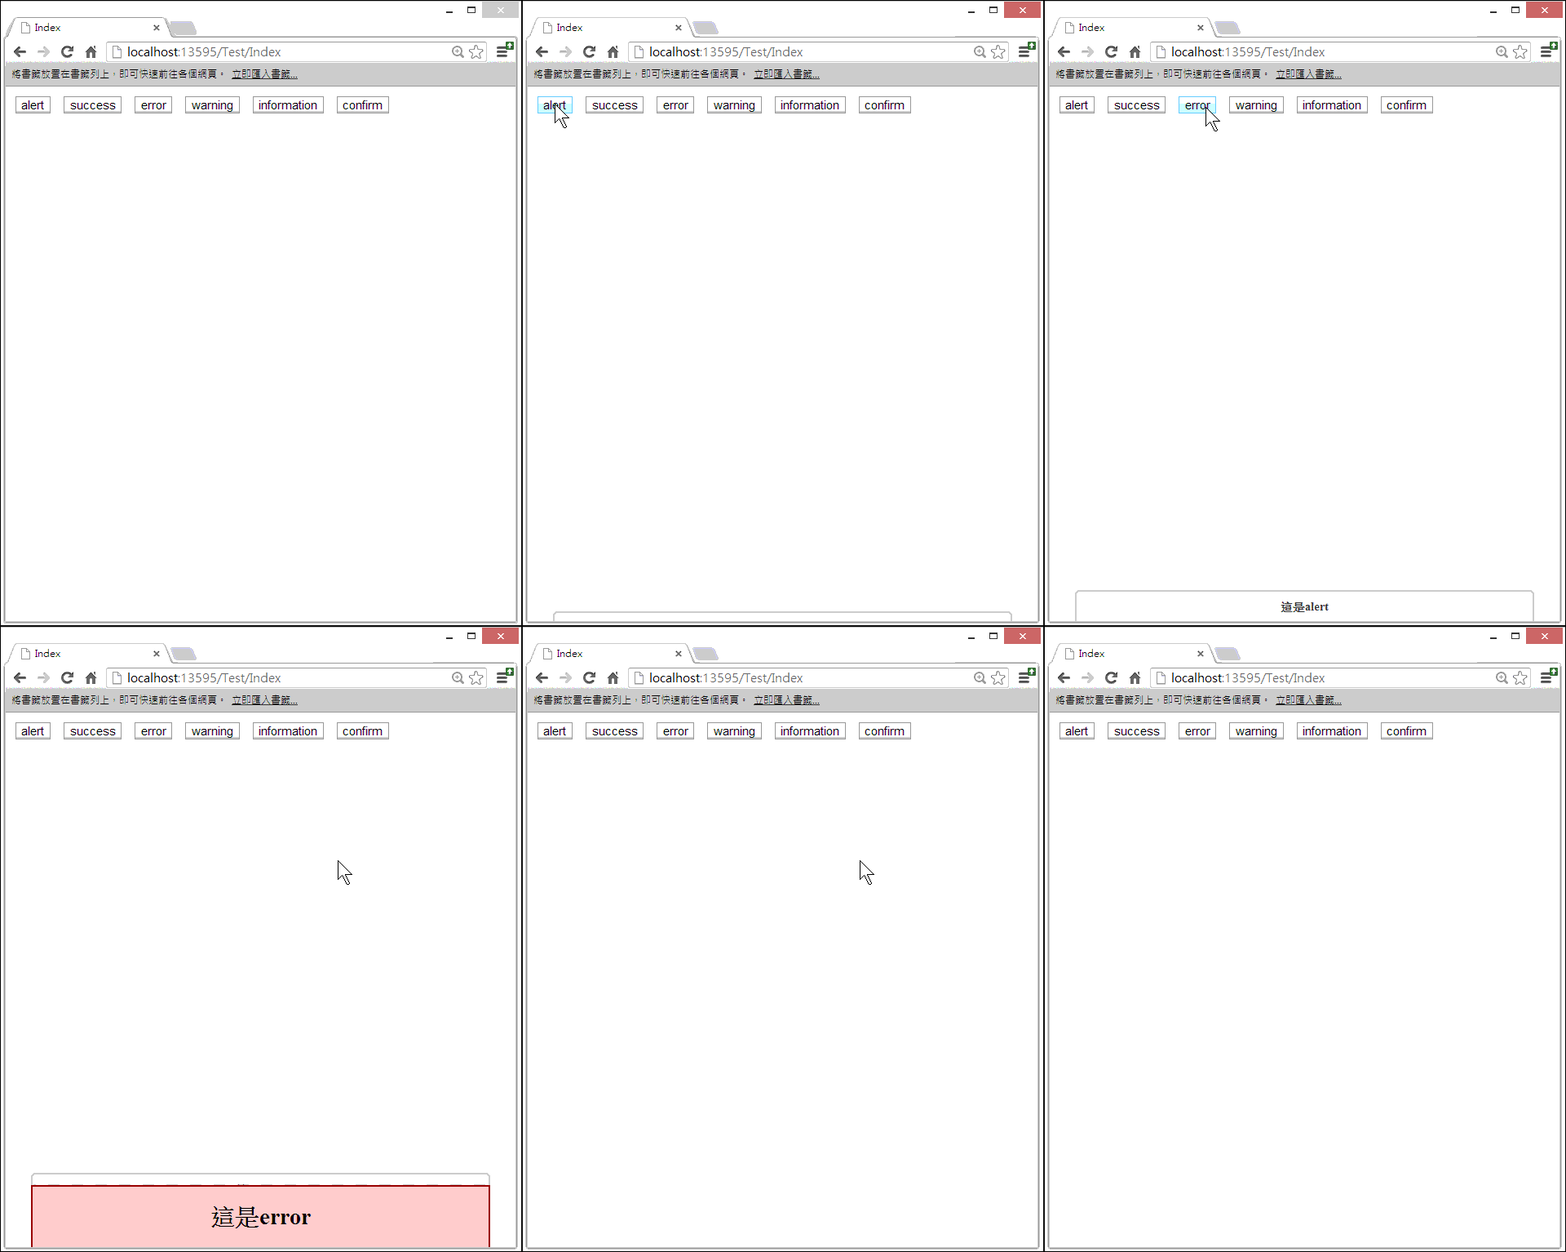
結果:
另,官網的Custom Container功能我試不出來,就不介紹用法了
結語
如果只是單純顯示訊息的話,可以改用Notification,使用者操作上會比較順暢
不過也有例外,如果想中斷使用者目前操作流程,讓使用者點選訊息框的確定後才能繼續下一步時,再使用原本的alert()語法
例如:alert(‘操作完成,導回清單頁’);window.location.href=’http://www.xxx.com’;


