//build 2018 看到微軟對於 Win32 程式 (WinForms/WPF) 增加新的 SDKs,讓我想起之前做 Desktop Bridge 的心得。
利用這篇介紹幾個例子,幫助大家熟悉怎麽在 WPF 使用 Windows 10 APIs。
Desktop Bridge 有三個大方向:
- 把既有的 Win32 installer 利用 Desktop App Convert tool 轉成 AppX Package;
- 讓既有的 Win32 application 支援 UWP APIs,例如:toast notification, update live tiles 等;
- 讓既有的 Win32 application 使用 UWP components,例如:background task;
[重要]
根據 Enhance your desktop application for Windows 10 介紹,在 WPF 專案中加入以下的參考才能使用 Windows 10 APIs:
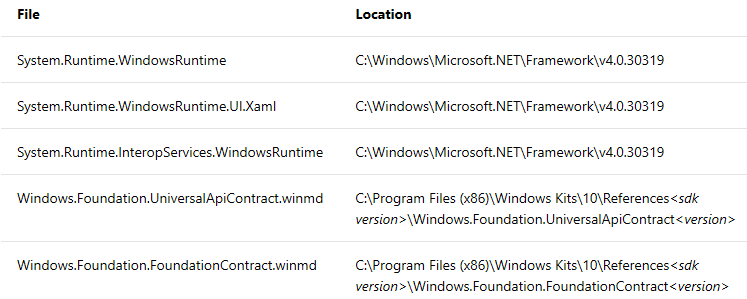
這些加入的參考,要記得把 Local Copy = false。
[注意]
如果遇到 Windows 相關 reference 找不到,直接加入 C:\Program Files (x86)\Windows Kits\10\UnionMetadata\Windows.winmd 與 C:\Program Files (x86)\Reference Assemblies\Microsoft\Framework\.NETCore\v4.5\*WindowsRuntime*.dll; 或者利用從 UwpDesktop 加入 Nuget。
如果是 C++ 專案可參考 Modify a Windows Desktop application project to add C++/WinRT support 的設定。
可以參考 UWP APIs available to a packaged desktop app 知道有那些 APIs 可以在 Desktop 下使用,也需注意 API contract 的限制,不同的 contract 會相依于加入參考使用的 Windows 10 版本。
如果遇到一些 API 使用時沒有反應,代表它只能用在擁有 Package identity information,此時就需要 WPF 包裝成 Packages。
封裝方式:
- 建立 Windows Application Packaging Project;

- 在 Packaging Project 加入要包裝的 WPF 專案;

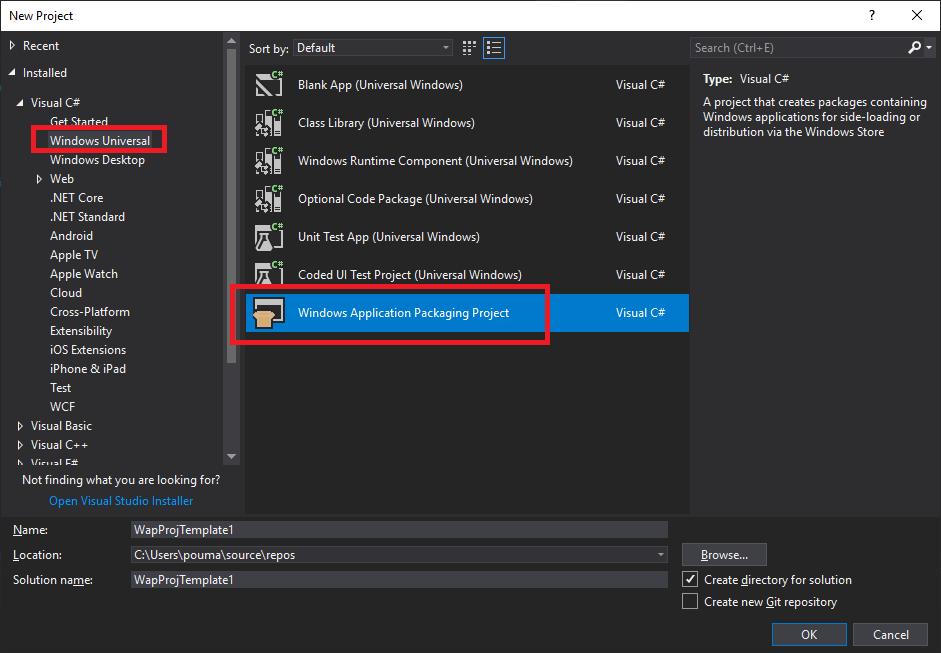
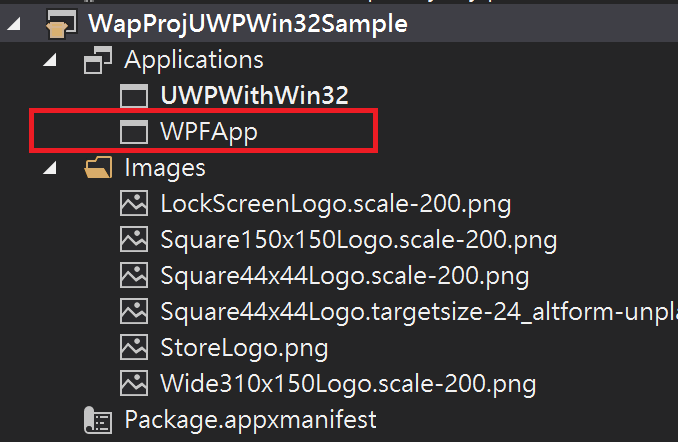
加入參考之後,舉幾個列子説明如何使用:
- 抓取坐標資訊:
可以參考 How to access the Windows 10 APIs from WPF。var locator = new Windows.Devices.Geolocation.Geolocator(); var location = await locator.GetGeopositionAsync(); var position = location.Coordinate.Point.Position; var latlong = string.Format("lat:{0}, long:{1}", position.Latitude, position.Longitude); var result = MessageBox.Show(latlong); - 發送 Toast:
由於寄送 Toast/Tile 需要 identify,所以要記得建立 Windows Application Packaging Project 搭配使用。 如何處理用戶點擊的 Toast 呢?參考 Send a local toast notification from desktop C# apps 來説明。private async void OnSendToastClick(object sender, RoutedEventArgs e) { string title = "featured picture of the day"; string content = "beautiful scenery"; string image = "https://picsum.photos/360/180?image=104"; string logo = "https://picsum.photos/64?image=883"; string xmlString = $@"<toast><visual> <binding template='ToastGeneric'> <text>{title}</text> <text>{content}</text> <image src='{image}'/> <image src='{logo}' placement='appLogoOverride' hint-crop='circle'/> </binding> </visual></toast>"; XmlDocument toastXml = new XmlDocument(); toastXml.LoadXml(xmlString); ToastNotification toast = new ToastNotification(toastXml); ToastNotificationManager.CreateToastNotifier().Show(toast); } - 建立 Tile:
根據 Create Secondary Tiles from your Desktop Application 介紹,需要利用 COM 的介面操作 Tile 的建立。如下:
// This interface definition is necessary because this is a non-universal // app and we have transfer the hwnd for the window to the WinRT object. [ComImport] [Guid("3E68D4BD-7135-4D10-8018-9FB6D9F33FA1")] [InterfaceType(ComInterfaceType.InterfaceIsIUnknown)] public interface IInitializeWithWindow { void Initialize(IntPtr hwnd); } private async Task PinToStart() { // Initialize the tile with required arguments SecondaryTile tile = new SecondaryTile("myTileId5391", "Display name", "myActivationArgs", new Uri("ms-appx:///Images/Square150x150Logo.png"), TileSize.Default); // Assign the window handle IInitializeWithWindow initWindow = (IInitializeWithWindow)(object)tile; initWindow.Initialize(System.Diagnostics.Process.GetCurrentProcess().MainWindowHandle); // Pin the tile bool isPinned = await tile.RequestCreateAsync(); } - 操作 SMTC:
要操作 SMTC 需要改用 MediaPlayer,並設定 MediaPlayer.CommandManager 來注冊按鈕事件與狀態。
更多關於 MediaPlayer 的操作可以參考 Integrate with the System Media Transport Controls。 如果您專案使用別的 Player 也希望能操作 SMTC 的話,可改用 BackgroundMediaPlayer 的方式來更新 SMTC 與注冊按鈕事件。// 建立 MediaPlayer 並注冊 MediaCommonManager 事件 Player = new MediaPlayer(); Player.CommandManager.IsEnabled = true; Player.CommandManager.PauseReceived += CommandManager_PauseReceived; Player.CommandManager.PlayReceived += CommandManager_PlayReceived; Player.CommandManager.NextReceived += CommandManager_NextReceived; Player.CommandManager.PreviousReceived += CommandManager_PreviousReceived; // 建立 MediaPlaybackList 利用每一個 Item 設定 MediaItemDisplayProperties 來更新 SMTC MediaPlaybackList = new MediaPlaybackList(); for (int i = 1; i < 5; i++) { MediaSource source = MediaSource.CreateFromUri(new Uri($"{Package.Current.InstalledLocation.Path}/WPFAndUWPSample/Assets/mp3/0{i}.mp3", UriKind.RelativeOrAbsolute)); MediaPlaybackItem item = new MediaPlaybackItem(source); // 設定為 Music 的相關屬性 MediaItemDisplayProperties displayProperty = item.GetDisplayProperties(); displayProperty.Type = MediaPlaybackType.Music; displayProperty.MusicProperties.Title = $"0{i}.mp3"; displayProperty.MusicProperties.AlbumArtist = "JJ"; displayProperty.Thumbnail = RandomAccessStreamReference.CreateFromUri(new Uri($"{Package.Current.InstalledLocation.Path}/WPFAndUWPSample/Assets/mp3/0{i}.jpg")); ; item.ApplyDisplayProperties(displayProperty); MediaPlaybackList.Items.Add(item); } Player.PlaybackList = MediaPlaybackList; Player.Play();private void UseBackgroundMediaPlayer() { BackgroundMediaPlayer.Current.SystemMediaTransportControls.ButtonPressed += Smtc_ButtonPressed; var updater = BackgroundMediaPlayer.Current.SystemMediaTransportControls.DisplayUpdater; updater.MusicProperties.Title = "song name"; updater.MusicProperties.AlbumArtist = "artsit and album"; updater.Update(); } private void Smtc_ButtonPressed(SystemMediaTransportControls sender, SystemMediaTransportControlsButtonPressedEventArgs args) { // 處理在 SMTC 操作的事件 }
上面介紹 Win32 程式怎麽使用 UWP APIs,接著參考 Packaging a UWP application with a Win32 component in the right way 與 Desktop Bridge – The Migrate phase: invoking a Win32 process from a UWP app 説明,補充 UWP app 怎麽與 Win32 程式互動。
UWP app 與 Win32 App 的互動中重點:
- 建立一個 Windows Application Packaging Project 並把 UWP app 與 Win32 App 加入 Applicaions 集合,設定 UWP app 為起始專案;
- 在 Package.appxmanifest 注冊: windows.appService 與 windows.fullTrustProces:
<Applications> <Application Id="App" Executable="$targetnametoken$.exe" EntryPoint="$targetentrypoint$"> <uap:VisualElements /> <Extensions> <uap:Extension Category="windows.appService"> <uap:AppService Name="com.pou.MyAppService" /> </uap:Extension> <desktop:Extension Category="windows.fullTrustProcess" Executable="WPFApp\WPFApp.exe" /> </Extensions> </Application> </Applications> <Capabilities> <Capability Name="internetClient" /> <rescap:Capability Name="runFullTrust" /> </Capabilities> - UWP app 建立處理 AppService 的邏輯,並爲了呼叫 FullTrustProcess 需要為 UWP app 加入 Windows Desktop Extensions for the UWP;
由於 App Service 在 UWP app 安裝時會一并被安裝到系統裏面,它與 BackgroundTask 不一樣需依賴 Trigger 的機制,而是讓呼叫端利用 PackageFamilyName 與 AppServiceName 來指定啓動它。因此,它很適合扮演傳遞的角色;更多關於 App Service 的介紹可參考 UWP - 介紹 App Service 與新功能。
那麽,要怎麽從 UWP app 呼叫 Win32 app 呢?如下:private AppServiceConnection appServiceConnection; private BackgroundTaskDeferral appServiceDeferral; /// AppService 在 Win10 Anniversary Update (1607) 開始支援 Sinle Process 的做法,利用 OnBackgroundActivated 來處理 AppService 的請求。 protected override void OnBackgroundActivated(BackgroundActivatedEventArgs args) { base.OnBackgroundActivated(args); AppServiceTriggerDetails appService = args.TaskInstance.TriggerDetails as AppServiceTriggerDetails; // appServiceDeferral 與 appServiceConnection 需要變成公用變數 // 因爲其他時間需要用到,已維持連線的一致性 appServiceDeferral = args.TaskInstance.GetDeferral(); appServiceConnection = appService.AppServiceConnection; appServiceConnection.RequestReceived += AppServiceConnection_RequestReceived; } private async void AppServiceConnection_RequestReceived(AppServiceConnection sender, AppServiceRequestReceivedEventArgs args) { // 當 App Service 收到請求時,該 method 就會被觸發 // 先要求取得 取得 deferral 拉長生命周期 var requestDeferral = args.GetDeferral(); ValueSet message = args.Request.Message; // 抓到從 Win32 App 送來的内容,顯示在 MainPage.xaml string name = message["name"] as string; if (string.IsNullOrEmpty(name) == false && Window.Current != null) { var rootFrame = Window.Current.Content as Frame; if (rootFrame != null && rootFrame.Content != null) { var mainPage = rootFrame.Content as MainPage; mainPage.SetResponse(name); } } // 建立回傳給 Win32 的訊息 ValueSet responseMsg = new ValueSet(); responseMsg.Add("response", "success"); await args.Request.SendResponseAsync(responseMsg); requestDeferral.Complete(); }
更多詳細内容可以參考:FullTrustProcessLauncher。private async void OnInvokeWin32AppClick(object sender, RoutedEventArgs e) { // 如需要傳遞參數到 Win32 app,FullTrustProcessLauncher 也有支援,不過要在 Package.appxmanifest 加入宣告 await Windows.ApplicationModel.FullTrustProcessLauncher.LaunchFullTrustProcessForCurrentAppAsync(); } - Win32 app 利用 AppService 利用 將參數送到 UWP app;
如果 UWP app 與 Win32 app 被封裝在同一個 Pakcage 裏面,在 Win32 app 使用 AppServiceConnection 時可用 Windows.ApplicationModel.Package.Current.Id.FamilyName 來抓取 PackageFamilyName。
private async void OnSendToUWPClick(object sender, RoutedEventArgs e)
{
    // 利用 Windows.ApplicationModel 的模組,要記得為 Win32 app 加入 Windows.winmd 與 Windows.Runtime 的參考
    AppServiceConnection connection = new AppServiceConnection();
    connection.AppServiceName = "com.pou.MyAppService";
    connection.PackageFamilyName = Windows.ApplicationModel.Package.Current.Id.FamilyName;

    var result = await connection.OpenAsync();
    if (result == AppServiceConnectionStatus.Success)
    {
        ValueSet valueSet = new ValueSet();
        valueSet.Add("name", txtUserName.Text);

        var response = await connection.SendMessageAsync(valueSet);
        if (response.Status == AppServiceResponseStatus.Success)
        {
            string responseMessage = response.Message["response"].ToString();
            if (responseMessage == "success")
            {
                this.Hide();
            }
        }
    }
}
[補充]
- UWP Desktop Extensions 裏面有一些相關的 APIs 可幫助 UWP 更多能力操作 Desktop 的功能;
- Desktop Bridge 讓 desktop application 有了 identify,藉由它就能存取 UWP APIs。有關準備怎麽封裝 desktop application 可以參考 Prepare to package a desktop application;
[範例程式]
======
篇目的介紹 WPF 怎麽使用 Windows 10 APIs,以及怎麽與 UWP 之間互動,最後利用 Packaging Project Template 把他們包裝起來。
另外可以參考 Add Windows 10 experiences 考慮那些功能是真的需要加入到 WPF 專案裏面的。
希望幫忙想要移植現有 WPF 或是 Win32 程式的開發人員能更快評估如何開發。
References:
- App Consult Team - Desktop Bridge
- Extend your desktop application with Windows 10 features using the new Visual Studio Application Packaging Project
- DesktopBridgeToUWP-Samples
- Package desktop applications (Desktop Bridge)
- Adding UWP Features to your Existing PC Software,” which goes into even more detail on the topic.
- Calling Windows 10 APIs From a Desktop Application
- Desktop Bridge – The Migrate phase: invoking a Win32 process from a UWP app (重要)
- WPF picture viewer with transition/migration/uninstallation
- Host UWP controls in WPF and Windows Forms applications
- Integrate with the System Media Transport Controls
- Global hotkey registration in UWP
- Package a UWP app with Visual Studio
- Extend your desktop application with modern UWP components
- 從傳統型應用程式釘選次要磚
- UWP APIs callable from desktop applications
- UWP with Desktop Extension – Part 1
- Play audio and video with MediaPlayer
- UWP APIs callable from a classic desktop app
- DualApiPartitionAttribute