[vue]如何進行component間的溝通,如何在現有專案使用EventBus做最簡單的狀態管理
前言
之前有發過一篇關於舊有網站直接開發的方式,但是其實如果我們一旦自訂了很多component的話,就免不了元件間的溝通了,雖然vue有很多種方式來達成component間的溝通,但這邊主要想講解比較正統的方式,也就是on(接收)和emit(往父層通知),接下來就把之前的範例改裝一下,可以回顧一下之前的文章(https://dotblogs.com.tw/kinanson/2017/05/19/120035),之前為了避免複雜化,有一個刪除的按鈕,並未放到component裡面去,這次就用這個例子來示例一下吧。
導覽
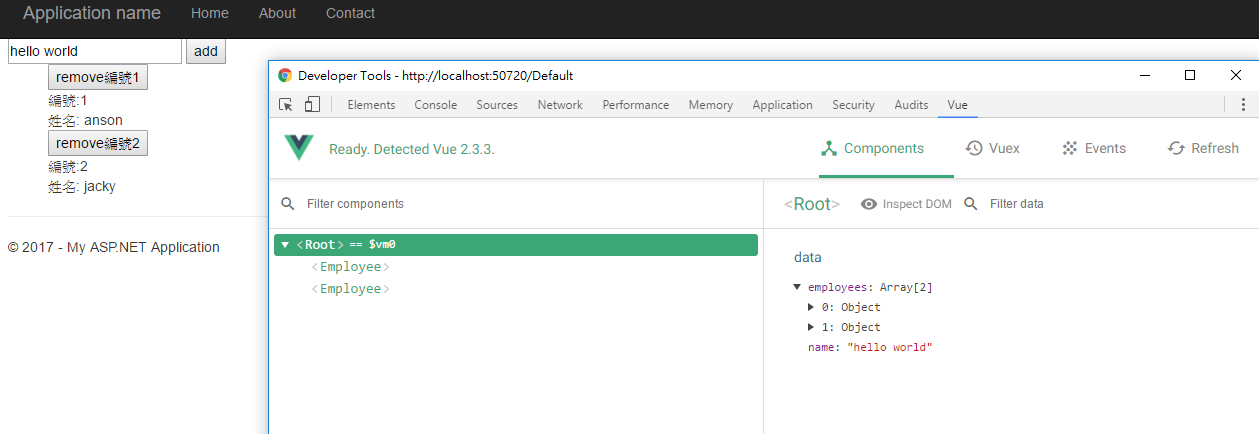
安裝chrome的extension vue devtools
即然我們真正的要使用vue了,安裝vue devtools是必備良藥,安裝了之後就會有包括了這個頁面用到的所有components,還有vuex(類似redux的狀態管理工具),還有另一個是Events,這個Events頁籤提供的功能是我們接下來重點部份,接下來就先來改造一下範例,示範一下如何讓頁面和component間做溝通。
先來看一下之前做到最後面的範例程式碼,特別注意一下remove按鈕的部份,應該也要放在employee的元件裡面
Default.aspx
<%@ Page Title="Home Page" Language="C#" MasterPageFile="~/Site.Master" AutoEventWireup="true" CodeBehind="Default.aspx.cs" Inherits="WebVue._Default" %>

<asp:Content ID="BodyContent" ContentPlaceHolderID="MainContent" runat="server">
    <style>
        li {
            list-style: none;
        }
    </style>
    <script src="app/services/employeeService.js"></script>
    <script src="app/components/EmployeeComponent.js"></script> <%--這裡加入component的file--%>
    <div id="app">
        <input type="text" name="name" v-model="name" />
        <input type="button" value="add" @click="add" /> <%--新增的按鈕--%>
        <ul>
            <li v-for="item in employees" :key="item.id">
                <input type="button" :value="`remove編號${item.id}`" @click="remove(item)" /> <%--這個應該也要放在employee裡面才合理  --%>
                <employee :item="item"></employee>    <%--這裡改成使用component的方式--%>
            </li>
        </ul>
    </div>

    <script>

        let app = new Vue({
            el: '#app',
            data: {
                name: 'hello world',
                employees: []
            },
            methods: {
                get: function () {
                    employeeService.get().then(employees=>this.employees = employees) //取得
                },
                add: function () { //對應新增的方法
                    let employee = {
                        id: 0,
                        name: this.name
                    }
                    employeeService.add(employee).then(id=>employee.id = id) //呼叫ajax並使用promise等待新增後的流水號
                    this.employees.push(employee)
                    this.name = null
                },
                remove: function (item) {
                    employeeService.remove(item.id).then(x=> {
                        this.employees = this.employees.filter(employee=>employee !== item)
                    })
                }
            },
            created: function () { //這個代表是vue的生命週期,有興趣可以去參考一下vue的lifecyle
                this.get()
            }
        })
    </script>
</asp:Content>
接著我們來修改一下吧,程式碼的註解我全部拿掉,只加上有修改程式碼後的註解,以便分辨要注意的程式碼有哪些
<%@ Page Title="Home Page" Language="C#" MasterPageFile="~/Site.Master" AutoEventWireup="true" CodeBehind="Default.aspx.cs" Inherits="WebVue._Default" %>

<asp:Content ID="BodyContent" ContentPlaceHolderID="MainContent" runat="server">
    <style>
        li {
            list-style: none;
        }
    </style>
    <script src="app/services/employeeService.js"></script>
    <script src="app/components/EmployeeComponent.js"></script>
    <div id="app">
        <input type="text" name="name" v-model="name" />
        <input type="button" value="add" @click="add" />
        <ul>
            <li v-for="item in employees" :key="item.id">
                <%--此行搬到employeeComponent裡面去了--%>
                <employee :item="item" @remove="remove"></employee>   <%--加上一個事件以便接受employee刪除後往上通知--%>
            </li>
        </ul>
    </div>

    <script>

        let app = new Vue({
            el: '#app',
            data: {
                name: 'hello world',
                employees: []
            },
            methods: {
                get: function () {
                    employeeService.get().then(employees=>this.employees = employees)
                },
                add: function () {
                    let employee = {
                        id: 0,
                        name: this.name
                    }
                    employeeService.add(employee).then(id=>employee.id = id)
                    this.employees.push(employee)
                    this.name = null
                },
                remove: function (item) { //刪除並沒有改變,邏輯一樣是放在這一層,遵守了one way flow的原則
                    employeeService.remove(item.id).then(x=> {
                        this.employees = this.employees.filter(employee=>employee !== item)
                    })
                }
            },
            created: function () {
                this.get()
            }
        })
    </script>
</asp:Content>
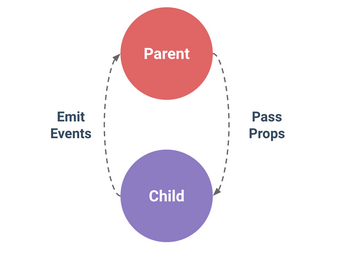
何謂one way flow呢?也就是所有數據應該是在最上層取得,然後把這些數據往下傳遞的概念,下面有任何動作也是只往上層發送通知,讓上層去處理數據的改變,數據改變之後子元件就會自動的去更新狀態,下面則是vue針對這個概念所描述的圖示,官方用很簡短的文字描述這個概念,props down events up,那遵守這樣的模式有什麼好處呢,最重要的是所有數據我們都可以從最上層開始追蹤,可預測數據可追查來源在維護程式碼甚至是維護其他人的程式碼這是非常重要的。
接下來看一下employeeComponent的程式碼吧
EmployeeComponent.html
<div>
    <input type="button" :value="`remove編號${item.id}`" @click="remove(item)" /> <!--已把原本的刪除按鈕移來至此-->
    <div>編號:{{item.id}}</div>
    <div>姓名: {{item.name}}</div>
</div>
EmployeeComponent.js
//這邊注意一下,筆者要分兩個是因為在visual studio裡面,針對js寫template工具支援性不好,請讀者自己視狀況選擇
Vue.component('employee', function (resolve) {
    $.get('app/components/EmployeeComponent.html', function (template) {
        resolve({
            props: ['item'],
            template: template,
            methods: {
                remove: function (item) {
                    this.$emit('remove', item) //往Default.aspx通知
                }
            }
        })
    })
})
結果
不知道讀者有沒有發現,我只是做一個最基本的組件溝通,Events的部份全部都會紀錄,而且還有說明是哪個component發出的事件,這個在快速了解整個頁面的設計時非常有幫助,當然在幫助追蹤程式的部份也是有很大的助益。
說到狀態管理,vue也有vuex,這個在筆者以前的文章就有討論過了,如果有興趣可以看一下筆者vue系列的文章,不過因為這篇是針對入門者,所以其實光eventbus就夠強大又簡單了,除非你的頁面有數十個component,而且是十幾個人在維護一個畫面,比如像faceboook那種頁面,畫面上會同時更新的數據非常多,互相影響的數據也非常多,而且還是都來自於不同人在開發,不然在vue的世界裡根本都不足以需要用到vuex,有時候要不要使用一種技術來開發,完全是視需求而定啊,在沒那種規模之下使用複雜的技術,就可以視為一種over design而已,接著我們再來把範例複雜化一點,再建立一個RemoveButtonComponent,把原本EmployeeComponent的remove button在建到下一層的元件裡面去。
Default.aspx要多拉參考連結RmoveButtonComponent.js,其餘不變
EmployeeComponent.html
<div>
    <remove-button @remove="remove" :item="item"></remove-button> <!--改成component了-->
    <div>編號:{{item.id}}</div>
    <div>姓名: {{item.name}}</div>
</div>
EmployeeComponent.js
Vue.component('employee', function (resolve) {
    $.get('app/components/EmployeeComponent.html', function (template) {
        resolve({
            props: ['item'],
            template: template,
            methods: {
                remove: function (item) {
                    this.$emit('remove', item)
                }
            }
        })
    })
})
RemoveButtonComponent.js
Vue.component('removeButton',{
    props: ['item'],
    template: '<input type="button" :value="`remove編號${item.id}`" @click="remove(item)" />',
    methods: {
        remove: function (item) {
            this.$emit('remove', item)
        }
    }
})
程式碼越來越多也分離得越來越開,從文章看起來越來越難以理解了,強烈建議讀者一定要動手做做看,甚至複製貼上測試才比較好理解,因為看文章和在ide操作的感受是差異非常大的,這邊就是因為把remove的button在建一個component出來,所以數據要再從employee往下丟,這倒是還ok,但往上傳遞竟然就變成要兩次了,那越多層不就越麻煩,從devtools的事件那邊可以看到,當我們按下刪除的時候,觸發了兩次remove,首先是RemoveButton再來是Employee。
接下來示例一下event bus的使用方式吧,其實概念上很簡單,也不過就是再實體化一個Vue,然後透過這個Vue來傳遞事件通知,接下來很簡單就是再new一個vue的實體,然後透過這個實體來做事件的溝通,接著要修改的程式碼比較多,我都會在修改的部份註解說明
Default.aspx
<%@ Page Title="Home Page" Language="C#" MasterPageFile="~/Site.Master" AutoEventWireup="true" CodeBehind="Default.aspx.cs" Inherits="WebVue._Default" %>

<asp:Content ID="BodyContent" ContentPlaceHolderID="MainContent" runat="server">
    <style>
        li {
            list-style: none;
        }
    </style>
    <script src="app/services/employeeService.js"></script>
    <script src="app/components/EmployeeComponent.js"></script>
    <script src="app/components/RemoveButtonComponent.js"></script>
    <div id="app">
        <input type="text" name="name" v-model="name" />
        <input type="button" value="add" @click="add" />
        <ul>
            <li v-for="item in employees" :key="item.id">
                <%--<employee :item="item" @remove="remove"></employee>--%>
               <employee :item="item"></employee> <%--這邊的remove去掉了--%>
            </li>
        </ul>
    </div>

    <script>
        let bus = new Vue() //新增一個Vue的實體,來達成eventbus的溝通

        let app = new Vue({
            el: '#app',
            data: {
                name: 'hello world',
                employees: []
            },
            methods: {
                get: function () {
                    employeeService.get().then(employees=>this.employees = employees)
                },
                add: function () {
                    let employee = {
                        id: 0,
                        name: this.name
                    }
                    employeeService.add(employee).then(id=>employee.id = id)
                    this.employees.push(employee)
                    this.name = null
                }
                //remove: function (item) { 這邊不需要了,改用bus來接收
                //    employeeService.remove(item.id).then(x=> {
                //        this.employees = this.employees.filter(employee=>employee !== item)
                //    })
                //}
            },
            created: function () {
                this.get(),
                bus.$on('removeButtonRemove', function (item) { //bus接受最底下的removeButton發送的通知
                    employeeService.remove(item.id).then(x=> {
                        //下面要特別注意一下,這邊不能用this,因為這邊的this是指向eventBus這個Vue的實體,所以我們必須明確呼叫app這個實體
                        app.employees = app.employees.filter(employee=>employee !== item)
                    })
                })
            }
        })
    </script>
</asp:Content>
EmployeeComponent.html
<div>
    <!--<remove-button @remove="remove" :item="item"></remove-button> 舊程式-->
    <remove-button :item="item"></remove-button> <!--把原本的remove刪掉了-->
    <div>編號:{{item.id}}</div>
    <div>姓名: {{item.name}}</div>
</div>
EmployeeComponent.js
Vue.component('employee', function (resolve) {
    $.get('app/components/EmployeeComponent.html', function (template) {
        resolve({
            props: ['item'],
            template: template
            //methods: { 這邊的通知不用了
            //    remove: function (item) {
            //        this.$emit('remove', item)
            //    }
            //}
        })
    })
})
RemoveButtonComponent.js
Vue.component('removeButton', {
    props: ['item'],
    template: '<input type="button" :value="`remove編號${item.id}`" @click="remove(item)" />',
    methods: {
        remove: function (item) {
            //this.$emit('remove', item) 不需要再透過原本的方式向上層溝通

            //下面透過我們實例的bus來傳遞事件了,這邊要特別注意一下一定要是以元件加動作的方式來命名
            //以免用到不同的component都有remove的時候,會造成無法預期的狀況
            //因為我們完全無法預期每個頁面會重覆使用到什麼樣的component,如果不明確命名一定會造成撞名的狀況
            //雖然可以透過devtools來追查出原因,但是可以預期的狀況我們不如盡早做好預防
            bus.$emit('removeButtonRemove', item)
        }
    }
})
做到這邊最主要改動就是把每層的html接收還有js的發送通知都移除了,只剩最父層接收通知,還有要發送的component去emit,這種時候如果我們沒有devtools來協助的話,就有可能造成我們不知道狀態是從哪邊去改變的,可以看一下demo如下
但是我們可以看到因為我們使用了全局的eventbus,所以發送事件的時候就像redux一樣,只是知道發了哪個action,,但是不會知道是哪個component觸發的,這種時候我們必須要很清楚的定義好名稱,以便我們可以很快追蹤到定位。
其員元件間的溝通不外乎就是父子間的溝通,但其實有另一種狀況是兄弟間的溝通,當遇到兄弟間的溝通如果沒有使用狀態管理就會非常麻煩,但vue有簡單的eventbus的概念,也可以很簡單的達成兄弟間的溝通

其實如果讀者夠用功的話,希望可以再自行模擬兄弟間的溝通,另外建立一個RemoveMessageComponent,然後一樣放在Default.aspx上面,當最底下的RemoveButtonComponent按下去的時候,RemoveMessageComponent必須顯示在畫面(刪除成功:刪除編號是?),這種時候你在現有範例如何去達成呢?
其實這種狀態管理,就是在協調不同js間的狀態溝通,雖然我們有vuex或者也有redux,但在不適當的時機使用過於麻煩或複雜的技術,只是一種over design而已,筆者這篇講的在官網查文件都很簡單也很好理解,但我發覺很多初學這種前端框架的時候,其實很難理解官網所寫的任何一個名詞,到底是要用在什麼情境或為何要搞的那麼複雜,其實很多狀況下只是你沒遇到,所以你會覺得這樣做很複雜而已,但也千萬不要一眛跟著潮流走,好像人家說現在什麼紅就一定要去用,我很贊同有什麼紅的技術就試著去了解,並且動手玩玩看,但最重要的是理解每個技術要解決的問題是什麼,你現在有遇到這種問題需要用這種方式去解決嗎?不然真的只是把工作搞得更複雜和糟糕而已,如果你的工作沒有寫到很多javascript的話,繼續用jquery真的就夠了,但不代表你可以不學習這些前端框架,因為如果你什麼都不懂的時候,你怎麼能分辨在什麼狀況,可以用什麼工具來讓你的工作更順利呢?畢竟學習任何新技術不就是為了更好的完成工作目標嗎?最好都能準時甚至早點完成,永遠都不會有面臨加班的那一天,那才是學習任何東西的目標啊。
筆者寫這篇雖然感覺有點複雜,其實更重要的目的,是想要讓大家從最簡單的狀況,然後漸漸的複雜化,然後再適當的把這些東西帶進來使用,以便讓入門的人感覺遇到這種比較麻煩的狀況下,我們可以使用何種方式來解決,這樣子之後要使用的話就可以直接去官網,看一下相對應的api怎麼使用,而不用看這篇囉嗦的文章。
寫完這篇文章才發現只要程式碼越來越多,程式越拆越開的時候,真的很難用文章解釋得讓讀者可以很清楚,所以我試圖把所有程式碼全顯示出來,並透過註解的方式知道每次異動都改了什麼,希望可以讓讀者好理解一點,至少在每段程式碼的變動,到底是異動了什麼,最後我也放上這個範例在我的github,如果有安裝visual studio的話,讀者可以下載下來試玩一下,最後如果覺得有任錯誤或更好的意見,再請多多給筆者建議。
github位置:https://github.com/kinanson/vue-with-web-form-example
