WEB API-實現登入Token驗証
前言
之前我曾經寫過一篇如何用web api然後使用session來做驗證登入的方式,但其實web api應該都是要搭配token來做驗證登入,也就是在使用者登入之後,伺服器會發給一組guid的碼給客戶端,然後再由各自的裝置去實做,在每次要做任何一個動作,都需要把此token發給伺服器端來做確認是哪個帳號,那接下來我就開始實作吧,先打開ApplicationUser,然後新增下面的method
 public async Task<ClaimsIdentity> GenerateUserIdentityAsync(UserManager<ApplicationUser> manager, string authenticationType)
        {
            var userIdentity = await manager.CreateIdentityAsync(this, authenticationType);
            // Add custom user claims here
            return userIdentity;
        }
接著新增一個Providers資料夾,新增如下類別,此類別也就是自訂Oauth的
using Microsoft.AspNet.Identity.EntityFramework;
using Microsoft.Owin.Security.OAuth;
using System;
using System.Collections.Generic;
using System.Linq;
using System.Security.Claims;
using System.Threading.Tasks;
using System.Web;
using System.Net;
using Microsoft.AspNet.Identity.Owin;
using Microsoft.Owin.Security;
using identityDemo.Infrastructure;

namespace identityDemo.Provider
{
    public class AuthorizationServerProvider : OAuthAuthorizationServerProvider
    {
        public override Task ValidateClientAuthentication(OAuthValidateClientAuthenticationContext context)
        {
            context.Validated();
            return Task.FromResult<object>(null);
        }

        public override async Task GrantResourceOwnerCredentials(OAuthGrantResourceOwnerCredentialsContext context)
        {
            context.OwinContext.Response.Headers.Add("Access-Control-Allow-Origin", new[] { "*" });
            var userManager = context.OwinContext.GetUserManager<ApplicationUserManager>();

            ApplicationUser user = await userManager.FindAsync(context.UserName, context.Password);
            if (user == null)
            {
                context.SetError("invalid_grant", "登入帳號或密碼錯誤");
                return;
            }
            if (!user.EmailConfirmed)
            {
                context.SetError("invalid_grant", "User did not confirm email.");
                return;
            }
            ClaimsIdentity oAuthIdentity = await user.GenerateUserIdentityAsync(userManager, "JWT");
            var ticket = new AuthenticationTicket(oAuthIdentity, null);
            context.Validated(ticket);
        }
    }
}
打開Startup.cs改成如下
using identityDemo.App_Start;
using identityDemo.Infrastructure;
using identityDemo.Provider;
using Microsoft.Owin;
using Microsoft.Owin.Security.OAuth;
using Newtonsoft.Json.Serialization;
using Owin;
using System;
using System.Collections.Generic;
using System.Linq;
using System.Net.Http.Formatting;
using System.Web;
using System.Web.Http;

namespace identityDemo
{
    public class Startup
    {

        public void Configuration(IAppBuilder app)
        {
            HttpConfiguration httpConfig = new HttpConfiguration();
            ConfigureOAuthTokenGeneration(app);
            WebApiConfig.Register(httpConfig);
            app.UseCors(Microsoft.Owin.Cors.CorsOptions.AllowAll);
            app.UseWebApi(httpConfig);
        }

        public void ConfigureOAuthTokenGeneration(IAppBuilder app)
        {
            app.CreatePerOwinContext(ApplicationDbContext.Create);
            app.CreatePerOwinContext<ApplicationUserManager>(ApplicationUserManager.Create);
            OAuthAuthorizationServerOptions OAuthServerOptions = new OAuthAuthorizationServerOptions()
            {
                AllowInsecureHttp = true,
                TokenEndpointPath = new PathString("/oauth/token"),
                AccessTokenExpireTimeSpan = TimeSpan.FromDays(1),
                Provider = new AuthorizationServerProvider()
            };

            // Token Generation
            app.UseOAuthAuthorizationServer(OAuthServerOptions);
            app.UseOAuthBearerAuthentication(new OAuthBearerAuthenticationOptions());
        }
    }
}
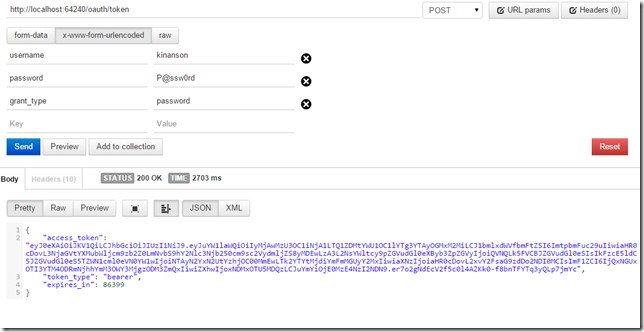
然後就可以開啟postman試著登入試試看,可以取得一個token,之後就可以用這個token去登入認證了。

接著我們到controllers底下的AccountsController加入驗證attribute,除了新增使用者還有驗證mail,其餘全部都要驗證,下面是AccountsController的程式碼
using identityDemo.Infrastructure;
using identityDemo.Models;
using Microsoft.AspNet.Identity;
using System;
using System.Collections.Generic;
using System.Linq;
using System.Threading.Tasks;
using System.Web;
using System.Web.Http;

namespace identityDemo.Controllers
{
    [RoutePrefix("api/accounts")]
    public class AccountsController : BaseApiController
    {
        [Authorize]
        [Route("users")]
        public IHttpActionResult GetUsers()
        {
            return Ok(this.AppUserManager.Users.ToList().Select(u => this.TheModelFactory.Create(u)));
        }

        [Authorize]
        [Route("user/{id:guid}", Name = "GetUserById")]
        public async Task<IHttpActionResult> GetUser(string Id)
        {
            var user = await this.AppUserManager.FindByIdAsync(Id);
            if (user != null)
            {
                return Ok(this.TheModelFactory.Create(user));
            }
            return NotFound();
        }

        [Authorize]
        [Route("user/{username}")]
        public async Task<IHttpActionResult> GetUserByName(string username)
        {
            var user = await this.AppUserManager.FindByNameAsync(username);
            if (user != null)
            {
                return Ok(this.TheModelFactory.Create(user));
            }
            return NotFound();
        }

        [AllowAnonymous]
        [Route("create")]
        public async Task<IHttpActionResult> CreateUser(CreateUserBindingModel createUserModel)
        {
            if (!ModelState.IsValid)
            {
                return BadRequest(ModelState);
            }
            var user = new ApplicationUser()
            {
                UserName = createUserModel.Username,
                Email = createUserModel.Email,
                FirstName = createUserModel.FirstName,
                LastName = createUserModel.LastName,
                Level = 3,
                JoinDate = DateTime.Now.Date,
            };
            IdentityResult addUserResult = await this.AppUserManager.CreateAsync(user, createUserModel.Password);
            if (!addUserResult.Succeeded)
            {
                return GetErrorResult(addUserResult);
            }
            //下面是為了發出email確認新增的片段
            string code = await this.AppUserManager.GenerateEmailConfirmationTokenAsync(user.Id);
            var callbackUrl = new Uri(Url.Link("ConfirmEmailRoute", new { userId = user.Id, code = code }));
            await this.AppUserManager.SendEmailAsync(user.Id, "Confirm your account", "Please confirm your account by clicking <a href=\"" + callbackUrl + "\">here</a>");
            Uri locationHeader = new Uri(Url.Link("GetUserById", new { id = user.Id }));
            //------------------
            return Created(locationHeader, TheModelFactory.Create(user));
        }

        [AllowAnonymous]
        [HttpGet]
        [Route("ConfirmEmail", Name = "ConfirmEmailRoute")]
        public async Task<IHttpActionResult> ConfirmEmail(string userId = "", string code = "")
        {
            if (string.IsNullOrWhiteSpace(userId) || string.IsNullOrWhiteSpace(code))
            {
                ModelState.AddModelError("", "User Id and Code are required");
                return BadRequest(ModelState);
            }

            IdentityResult result = await this.AppUserManager.ConfirmEmailAsync(userId, code);

            if (result.Succeeded)
            {
                return Ok();
            }
            else
            {
                return GetErrorResult(result);
            }
        }

        [Authorize]
        [Route("ChangePassword")]
        public async Task<IHttpActionResult> ChangePassword(ChangePasswordBindingModel model)
        {
            if (!ModelState.IsValid)
            {
                return BadRequest(ModelState);
            }
            IdentityResult result = await this.AppUserManager.ChangePasswordAsync(User.Identity.GetUserId(), model.OldPassword, model.NewPassword);
            if (!result.Succeeded)
            {
                return GetErrorResult(result);
            }
            return Ok();
        }

        [Authorize]
        [Route("user/{id:guid}")]
        public async Task<IHttpActionResult> DeleteUser(string id)
        {
            var appUser = await this.AppUserManager.FindByIdAsync(id);
            if (appUser != null)
            {
                IdentityResult result = await this.AppUserManager.DeleteAsync(appUser);
                if (!result.Succeeded)
                {
                    return GetErrorResult(result);
                }
                return Ok();
            }
            return NotFound();
        }
    }
}
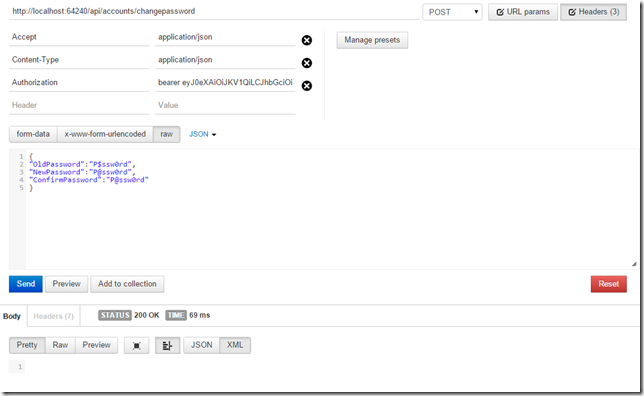
最後我們在嘗試修改密碼,可以試著如果不加入token的話,會是回傳401的。

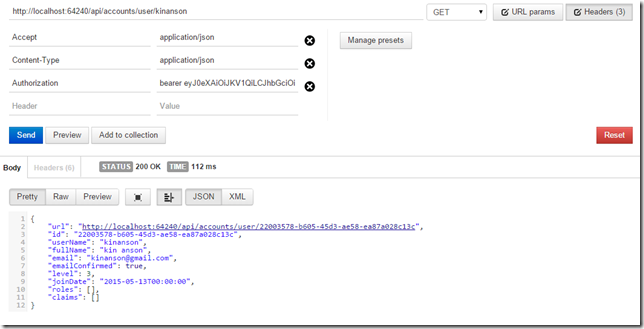
試著取得user的資訊,也可以順利回傳

以上再請各位多多指教。
