WebApi-Identity AccountsManagement
前言
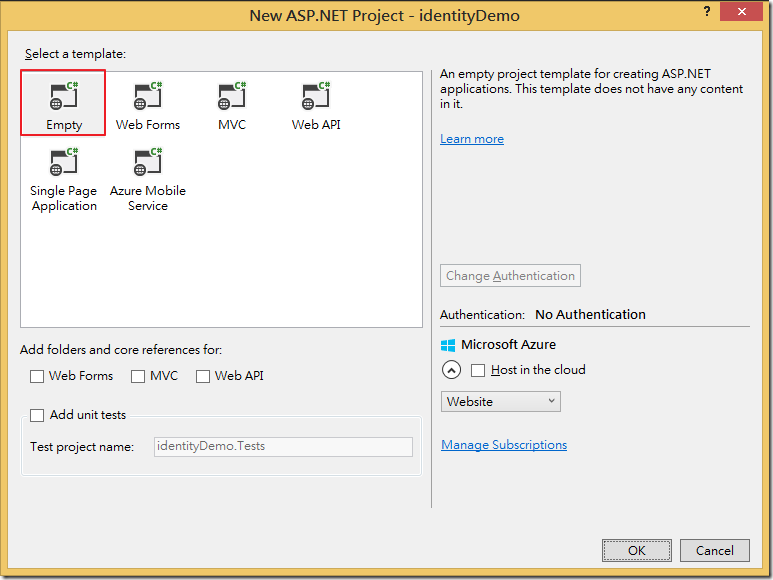
最近其實一直在研究identity的議題,希望也對此議題有興趣的人,可以有點幫助,因為我參考的文章是從無到有自己開發,所以我就邊看邊實作,成功了就順便記錄一下,廢話不多說,就先建立一個空白專案吧

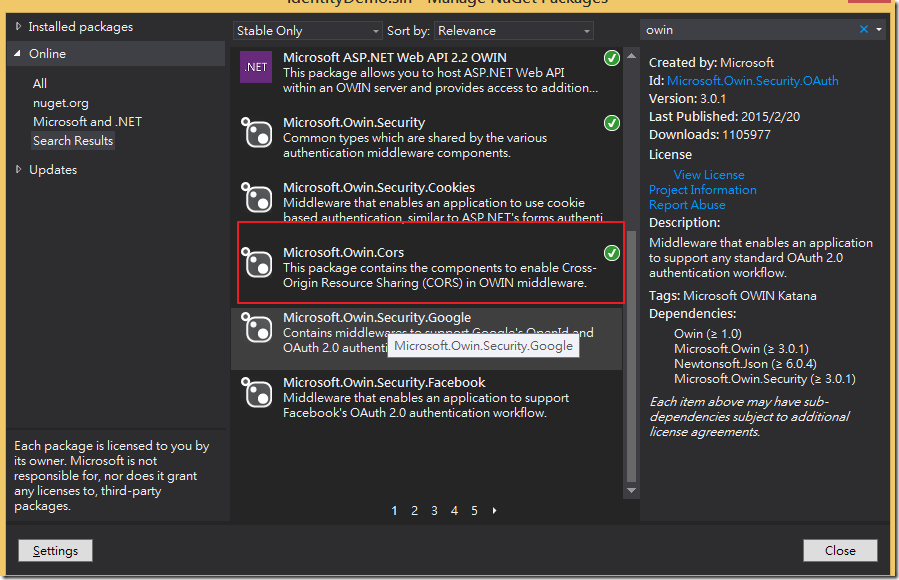
接著打開nuget console輸入下面的指令,安裝起必要元件,紅框起來的都是要下載的


也可以直接用主控台的方式新增,我個人比較喜好這種方式,以下是所有需要下載的
Install-Package Microsoft.AspNet.Identity.Owin
Install-Package Microsoft.AspNet.Identity.EntityFramework
Install-Package Microsoft.Owin.Host.SystemWeb
Install-Package Microsoft.AspNet.WebApi.Owin
Install-Package Microsoft.Owin.Security.Oauth
Install-Package Microsoft.Owin.Cors
接著新增Infrastructure資料夾,然後新增如下類別,此類別是我們想擴增user的欄位
using Microsoft.AspNet.Identity.EntityFramework;
using System;
using System.Collections.Generic;
using System.ComponentModel.DataAnnotations;
using System.Linq;
using System.Web;

namespace identityDemo.Infrastructure
{
    public class ApplicationUser : IdentityUser
    {
        [Required]
        [MaxLength(100)]
        public string FirstName { get; set; }

        [Required]
        [MaxLength(100)]
        public string LastName { get; set; }

        [Required]
        public byte Level { get; set; }

        [Required]
        public DateTime JoinDate { get; set; }

    }
}
在Infrastructure裡新增以下類別
using Microsoft.AspNet.Identity.EntityFramework;
using System;
using System.Collections.Generic;
using System.Linq;
using System.Web;

namespace identityDemo.Infrastructure
{
    public class ApplicationDbContext : IdentityDbContext<ApplicationUser>
    {
        public ApplicationDbContext()
            : base("DefaultConnection", throwIfV1Schema: false)
        {
            Configuration.ProxyCreationEnabled = false;
            Configuration.LazyLoadingEnabled = false;
        }

        public static ApplicationDbContext Create()
        {
            return new ApplicationDbContext();
        }
    }
}
接著在web.config新增連線字串
<connectionStrings>
    <add name="DefaultConnection" connectionString="Data Source=(localdb)\v11.0;Initial Catalog=Identitydb;Integrated Security=SSPI;" providerName="System.Data.SqlClient" />
  </connectionStrings>
接著就是在nuget package打以下的指令,準備建立資料庫
enable-migrations
 add-migration init
然後打開自動建立的Migrations>Configuration,新增一些預設資料
namespace identityDemo.Migrations
{
    using identityDemo.Infrastructure;
    using Microsoft.AspNet.Identity;
    using Microsoft.AspNet.Identity.EntityFramework;
    using System;
    using System.Data.Entity;
    using System.Data.Entity.Migrations;
    using System.Linq;

    internal sealed class Configuration : DbMigrationsConfiguration<identityDemo.Infrastructure.ApplicationDbContext>
    {
        public Configuration()
        {
            AutomaticMigrationsEnabled = false;
        }

        protected override void Seed(identityDemo.Infrastructure.ApplicationDbContext context)
        {
            //  This method will be called after migrating to the latest version.

            var manager = new UserManager<ApplicationUser>(new UserStore<ApplicationUser>(new ApplicationDbContext()));

            var user = new ApplicationUser()
            {
                UserName = "SuperPowerUser",
                Email = "taiseer.joudeh@mymail.com",
                EmailConfirmed = true,
                FirstName = "Taiseer",
                LastName = "Joudeh",
                Level = 1,
                JoinDate = DateTime.Now.AddYears(-3)
            };

            manager.Create(user, "MySuperP@ssword!");
        }
    }
}
接著輸入下面指令,把db建立起來
update-database
UserManager提供的方法
| 方法 | 說明 |
| FindByIdAsync(id) | 用id找user類別 |
| Users | 得到全部user |
| FindByNameAsync(Username) | 用使用者名稱找user |
| CreateAsync(User, Password) | 新增使用者 |
| GenerateEmailConfirmationTokenAsync(Id) | 產生email token讓user驗証 |
| SendEmailAsync(Id, Subject, Body) | 寄送email去給user |
| ConfirmEmailAsync(Id, token) |
確認email使用者有收到token |
| ChangePasswordAsync(Id, OldPassword, NewPassword) |
改變密碼 |
| DeleteAsync(User) |
刪除user |
| IsInRole(Username, Rolename) |
確認user是此角色 |
| AddToRoleAsync(Username, RoleName) | 新增user去這個角色 |
| RemoveFromRoleAsync(Username, RoleName | 移除user從這個角色 |
接著在Infrastucture底下新增下面類別
using Microsoft.AspNet.Identity;
using Microsoft.AspNet.Identity.EntityFramework;
using Microsoft.AspNet.Identity.Owin;
using Microsoft.Owin;
using System;
using System.Collections.Generic;
using System.Linq;
using System.Web;

namespace identityDemo.Infrastructure
{
    public class ApplicationUserManager : UserManager<ApplicationUser>
    {
        public ApplicationUserManager(IUserStore<ApplicationUser> store)
            : base(store)
        {
        }

        public static ApplicationUserManager Create(IdentityFactoryOptions<ApplicationUserManager> options, IOwinContext context)
        {
            var appDbContext = context.Get<ApplicationDbContext>();
            var appUserManager = new ApplicationUserManager(new UserStore<ApplicationUser>(appDbContext));
            return appUserManager;
        }
    }
}
新增一個App_Start,然後自行新增WebApiConfig.cs,新增如下程式碼
using Newtonsoft.Json.Serialization;
using System.Linq;
using System.Net.Http.Formatting;
using System.Web.Http;

public static class WebApiConfig
{
    public static void Register(HttpConfiguration config)
    {
        config.MapHttpAttributeRoutes();
        config.Routes.MapHttpRoute(
           "DefaultApi",
           "api/{controller}/{id}",
           new { id = RouteParameter.Optional });
        var jsonFormatter = config.Formatters.OfType<JsonMediaTypeFormatter>().First();
        jsonFormatter.SerializerSettings.ContractResolver = new CamelCasePropertyNamesContractResolver();
    }
}
接著在根目錄下,直接新增一支Startup.cs,在web api要求之前,皆會先從此開始
using identityDemo.App_Start;
using identityDemo.Infrastructure;
using Newtonsoft.Json.Serialization;
using Owin;
using System;
using System.Collections.Generic;
using System.Linq;
using System.Net.Http.Formatting;
using System.Web;
using System.Web.Http;

namespace identityDemo
{
    public class Startup
    {

        public void Configuration(IAppBuilder app)
        {
            HttpConfiguration httpConfig = new HttpConfiguration();
            ConfigureOAuthTokenGeneration(app);
            WebApiConfig.Register(httpConfig);
            app.UseCors(Microsoft.Owin.Cors.CorsOptions.AllowAll);
            app.UseWebApi(httpConfig);
        }

        private void ConfigureOAuthTokenGeneration(IAppBuilder app)
        {
            // 配置此db context 和 user manager去使用single instance per request
            app.CreatePerOwinContext(ApplicationDbContext.Create);
            app.CreatePerOwinContext<ApplicationUserManager>(ApplicationUserManager.Create);
            // Plugin the OAuth Token產生和消耗將在此
        }
    }
}
接著新增一個Models的資料夾,先新增一支專門回應給前端的類別
using identityDemo.Infrastructure;
using System;
using System.Collections.Generic;
using System.Linq;
using System.Net.Http;
using System.Web;
using System.Web.Http.Routing;

namespace identityDemo.Models
{
    public class ModelFactory
    {
        private UrlHelper _UrlHelper;
        private ApplicationUserManager _AppUserManager;

        public ModelFactory(HttpRequestMessage request, ApplicationUserManager appUserManager)
        {
            _UrlHelper = new UrlHelper(request);
            _AppUserManager = appUserManager;
        }

        public UserReturnModel Create(ApplicationUser appUser)
        {
            return new UserReturnModel
            {
                Url = _UrlHelper.Link("GetUserById", new { id = appUser.Id }),
                Id = appUser.Id,
                UserName = appUser.UserName,
                FullName = string.Format("{0} {1}", appUser.FirstName, appUser.LastName),
                Email = appUser.Email,
                EmailConfirmed = appUser.EmailConfirmed,
                Level = appUser.Level,
                JoinDate = appUser.JoinDate,
                Roles = _AppUserManager.GetRolesAsync(appUser.Id).Result,
                Claims = _AppUserManager.GetClaimsAsync(appUser.Id).Result
            };
        }
    }

    public class UserReturnModel
    {
        public string Url { get; set; }
        public string Id { get; set; }
        public string UserName { get; set; }
        public string FullName { get; set; }
        public string Email { get; set; }
        public bool EmailConfirmed { get; set; }
        public int Level { get; set; }
        public DateTime JoinDate { get; set; }
        public IList<string> Roles { get; set; }
        public IList<System.Security.Claims.Claim> Claims { get; set; }
    }
}
WebApi部份
先新增一個Controllers的資料夾,然後新增一個父類別,此後新增的web api都會繼承此父類別
using identityDemo.Infrastructure;
using identityDemo.Models;
using Microsoft.AspNet.Identity;
using System;
using System.Collections.Generic;
using System.Linq;
using System.Web;
using System.Web.Http;
using System.Net.Http;
using Microsoft.AspNet.Identity.Owin;

namespace identityDemo.Controllers
{
    public class BaseApiController : ApiController
    {

        private ModelFactory _modelFactory;
        private ApplicationUserManager _AppUserManager = null;

        protected ApplicationUserManager AppUserManager
        {
            get
            {
                return _AppUserManager ?? Request.GetOwinContext().GetUserManager<ApplicationUserManager>();
            }
        }

        public BaseApiController()
        {
        }

        protected ModelFactory TheModelFactory
        {
            get
            {
                if (_modelFactory == null)
                {
                    _modelFactory = new ModelFactory(this.Request, this.AppUserManager);
                }
                return _modelFactory;
            }
        }

        protected IHttpActionResult GetErrorResult(IdentityResult result)
        {
            if (result == null)
            {
                return InternalServerError();
            }
            if (!result.Succeeded)
            {
                if (result.Errors != null)
                {
                    foreach (string error in result.Errors)
                    {
                        ModelState.AddModelError("", error);
                    }
                }
                if (ModelState.IsValid)
                {
                    return BadRequest();
                }
                return BadRequest(ModelState);
            }
            return null;
        }
    }
}
再新增一個專門管理Account的web api
using System;
using System.Collections.Generic;
using System.Linq;
using System.Threading.Tasks;
using System.Web;
using System.Web.Http;

namespace identityDemo.Controllers
{
    [RoutePrefix("api/accounts")]
    public class AccountsController : BaseApiController
    {

        [Route("users")]
        public IHttpActionResult GetUsers()
        {
            return Ok(this.AppUserManager.Users.ToList().Select(u => this.TheModelFactory.Create(u)));
        }

        [Route("user/{id:guid}", Name = "GetUserById")]
        public async Task<IHttpActionResult> GetUser(string Id)
        {
            var user = await this.AppUserManager.FindByIdAsync(Id);

            if (user != null)
            {
                return Ok(this.TheModelFactory.Create(user));
            }

            return NotFound();

        }

        [Route("user/{username}")]
        public async Task<IHttpActionResult> GetUserByName(string username)
        {
            var user = await this.AppUserManager.FindByNameAsync(username);

            if (user != null)
            {
                return Ok(this.TheModelFactory.Create(user));
            }

            return NotFound();

        }
    }
}
接著在Models底下新增類別,這類別是要在新增使用者所傳進的內容
using System;
using System.Collections.Generic;
using System.ComponentModel.DataAnnotations;
using System.Linq;
using System.Web;

namespace identityDemo.Models
{
    public class CreateUserBindingModel
    {
        [Required]
        [EmailAddress]
        [Display(Name = "Email")]
        public string Email { get; set; }

        [Required]
        [Display(Name = "Username")]
        public string Username { get; set; }

        [Required]
        [Display(Name = "First Name")]
        public string FirstName { get; set; }

        [Required]
        [Display(Name = "Last Name")]
        public string LastName { get; set; }

        [Display(Name = "Role Name")]
        public string RoleName { get; set; }

        [Required]
        [StringLength(100, ErrorMessage = "The {0} must be at least {2} characters long.", MinimumLength = 6)]
        [DataType(DataType.Password)]
        [Display(Name = "Password")]
        public string Password { get; set; }

        [Required]
        [DataType(DataType.Password)]
        [Display(Name = "Confirm password")]
        [Compare("Password", ErrorMessage = "The password and confirmation password do not match.")]
        public string ConfirmPassword { get; set; }
    }
}
接著在已建立的AccountController.cs新增下面程式碼
[Route("create")]
        public async Task<IHttpActionResult> CreateUser(CreateUserBindingModel createUserModel)
        {
            if (!ModelState.IsValid)
            {
                return BadRequest(ModelState);
            }
            var user = new ApplicationUser()
            {
                UserName = createUserModel.Username,
                Email = createUserModel.Email,
                FirstName = createUserModel.FirstName,
                LastName = createUserModel.LastName,
                Level = 3,
                JoinDate = DateTime.Now.Date,
            };
            IdentityResult addUserResult = await this.AppUserManager.CreateAsync(user, createUserModel.Password);
            if (!addUserResult.Succeeded)
            {
                return GetErrorResult(addUserResult);
            }
            Uri locationHeader = new Uri(Url.Link("GetUserById", new { id = user.Id }));
            return Created(locationHeader, TheModelFactory.Create(user));
        }
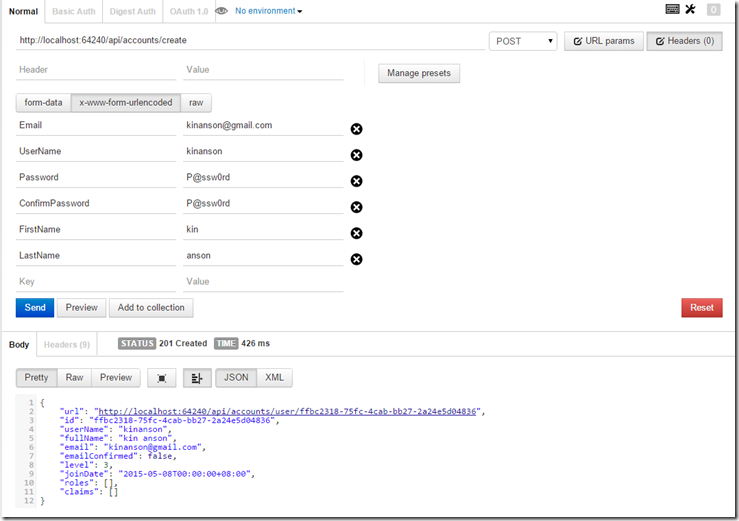
接著我還是用PostMan來發一個create新增一位使用者,如下圖

以上再請大家多多指教。
