[itextsharp][006]加入image到pdf(add image to pdf)
加入image到pdf有3個方式:
1.透過paragraph將圖片加入到pdf中:
利用iTextSharp.text.Image.GetInstance()取得圖片之後,再加入到Paragraph物件,然後就可以加入到pdf中了。利用Paragraph加入的好處就是,可以一行一行像是排版文字一樣,幫圖片排版。而這時候如果要設定圖片align left or right or center的話,需利用iTextSharp.text.Image.Alignment屬性來做設定。而如果還要對圖片做縮放大小的話,只要利用iTextSharp.text.Image.ScalePercent()即可。
Document doc = new Document(PageSize.A5);
PdfWriter writer = PdfWriter.GetInstance(doc, new FileStream("AddImage.pdf", FileMode.Create));
doc.Open();
string imageFileName = "D:\\temp\\g_20159.png";
Paragraph para = new Paragraph();
para.Leading = 15;
//將圖片加入到paragraph中
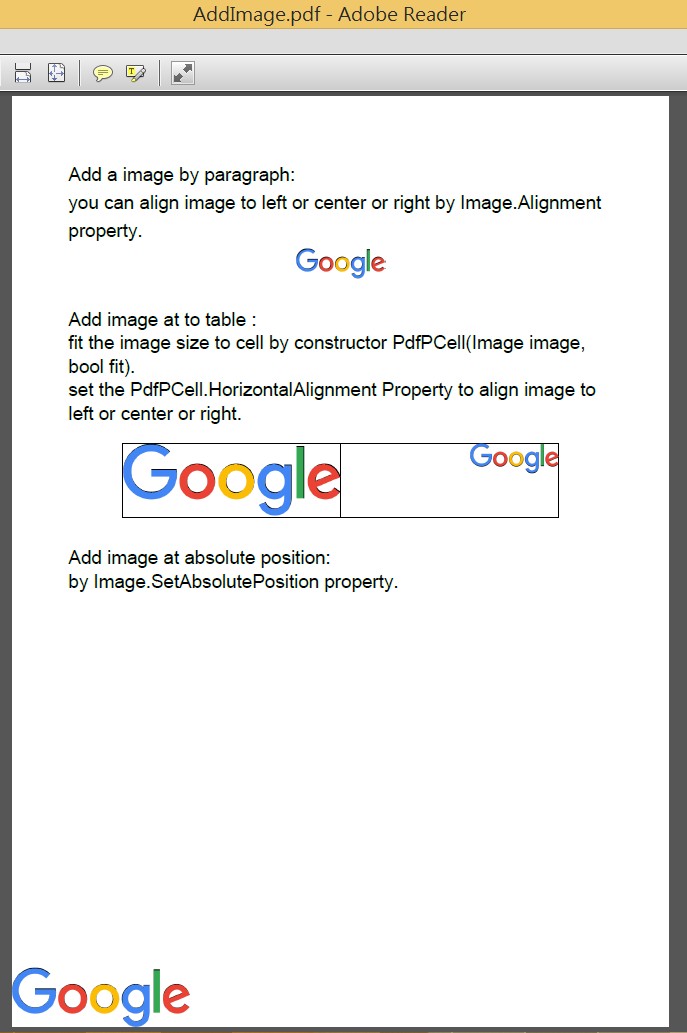
para.Add(new Paragraph("Add a image by paragraph:\n"));
para.Add(new Paragraph("you can align image to left or center or right by Image.Alignment property.\n"));
iTextSharp.text.Image googleJPG = iTextSharp.text.Image.GetInstance(imageFileName);
//調整圖片大小
googleJPG.ScalePercent(50f);
googleJPG.Alignment = Element.ALIGN_CENTER;//Image在paragraph中的話,可以設定left, center, right
para.Add(googleJPG);
para.Add("\n");
2.透過Table將圖片加入到pdf中:
可以透過constructor PdfPCell cell1 = new PdfPCell(googleJPG,true)的寫法,將圖片加入到PdfPCell之中,然後PdfPCell就可以加入到PdfPTable了,注意的是,如果在construtor中若是設定第二個參數為true,則表示要fit image to cell size。在這裡如果要設定圖片在cell裡面的alignment,可透過PdfPCell.HorizontalAlignment屬性。
//將image加入到table中
para.Add("Add image at to table :\n");
para.Add("fit the image size to cell by constructor PdfPCell(Image image, bool fit).\n");
para.Add("set the PdfPCell.HorizontalAlignment Property to align image to left or center or right.\n");
PdfPTable table = new PdfPTable(2);
PdfPCell cell1 = new PdfPCell(googleJPG,true);
googleJPG.ScalePercent(10f);
PdfPCell cell2 = new PdfPCell(googleJPG);
cell2.HorizontalAlignment = Element.ALIGN_RIGHT;
table.AddCell(cell1);
table.AddCell(cell2);
para.Add(table);
para.Add("\n");
3.將圖片加入到pdf的某個座標位置absolute position:
利用iTextSharp.text.Image.SetAbsolutePosition(x,y)就可以設定圖片的座標囉,設定完畢之後,直接利用Document.add(iTextSharp.text.Image)即可將此圖片加入到某個座標位置囉。
//將圖片加入到某個座標位置absolute position
para.Add("Add image at absolute position:\n");
para.Add("by Image.SetAbsolutePosition property. \n");
iTextSharp.text.Image googleJPG1 = iTextSharp.text.Image.GetInstance(imageFileName);
//調整圖片大小
googleJPG1.ScalePercent(20f);
googleJPG1.SetAbsolutePosition(0, 0);
doc.Add(para);
doc.Add(googleJPG1);

doc.Close();
產出pdf結果:
完整程式碼:
Document doc = new Document(PageSize.A5);
PdfWriter writer = PdfWriter.GetInstance(doc, new FileStream("AddImage.pdf", FileMode.Create));
doc.Open();

string imageFileName = "D:\\temp\\g_20159.png";
Paragraph para = new Paragraph();
para.Leading = 15;

//將圖片加入到paragraph中
para.Add(new Paragraph("Add a image by paragraph:\n"));
para.Add(new Paragraph("you can align image to left or center or right by Image.Alignment property.\n"));
iTextSharp.text.Image googleJPG = iTextSharp.text.Image.GetInstance(imageFileName);
//調整圖片大小
googleJPG.ScalePercent(50f);
googleJPG.Alignment = Element.ALIGN_CENTER;//Image在paragraph中的話,可以設定left, center, right
para.Add(googleJPG);
para.Add("\n");

//將image加入到table中
para.Add("Add image at to table :\n");
para.Add("fit the image size to cell by constructor PdfPCell(Image image, bool fit).\n");
para.Add("set the PdfPCell.HorizontalAlignment Property to align image to left or center or right.\n");
PdfPTable table = new PdfPTable(2);
PdfPCell cell1 = new PdfPCell(googleJPG,true);
googleJPG.ScalePercent(10f);
PdfPCell cell2 = new PdfPCell(googleJPG);
cell2.HorizontalAlignment = Element.ALIGN_RIGHT;
table.AddCell(cell1);
table.AddCell(cell2);
para.Add(table);
para.Add("\n");

//將圖片加入到某個座標位置absolute position
para.Add("Add image at absolute position:\n");
para.Add("by Image.SetAbsolutePosition property. \n");
iTextSharp.text.Image googleJPG1 = iTextSharp.text.Image.GetInstance(imageFileName);
//調整圖片大小
googleJPG1.ScalePercent(20f);
googleJPG1.SetAbsolutePosition(0, 0);
doc.Add(para);
doc.Add(googleJPG1);

doc.Close();
本文使用iTextSharp版本:5.5.8。
iTextSharp 4.1.6測試結果:
程式碼無須修改,可得到跟version 5.5.8一樣的結果。
這篇大概是這樣。。。