上個星期五,我們學會了使用 Prism MVVM Framework 的 NavigationService 在兩個頁面之間切換,今天就來學習在切換到新頁面時,在新頁面上顯示一些東西。好吧!就學習使用 ListView 表列出先前實作的 ASP.NET Core Web API 所 Get 取得的地址資料。
ListView
首先在 MyFirstPage.xaml 的 ContentPage 加入 ListView 加入後程式碼如下:
<?xml version="1.0" encoding="utf-8" ?>
<ContentPage xmlns="http://xamarin.com/schemas/2014/forms"
             xmlns:x="http://schemas.microsoft.com/winfx/2009/xaml"
             xmlns:prism="clr-namespace:Prism.Mvvm;assembly=Prism.Forms"
             prism:ViewModelLocator.AutowireViewModel="True"
             x:Class="Demae.App.Views.MyFirstPage"
             Title="第一頁">

    <ListView RowHeight="90" ItemsSource="{Binding Addresses}">
        <ListView.ItemTemplate>
            <DataTemplate>
                <ViewCell>
                    <StackLayout Padding="5, 5, 0, 5"
                                 Spacing="10">
                        <Label Text="{Binding AreaCityName}" />
                        <Label Text="{Binding AreaName}" />
                        <Label Text="{Binding Address}" />
                    </StackLayout>
                </ViewCell>
            </DataTemplate>
        </ListView.ItemTemplate>
    </ListView>

</ContentPage>
初看程式可能會因有點不熟悉,而感到恐懼,但是接著會由外往內一層一層地解釋,應該會覺得,其實用 XAML 比用 C# 來做視覺元件排版更容易且一目瞭然。
指定在 ListView 內的用來展一個項目的高度是 90 而項目的資料來源是繫結對應 ViewModel 內的 Addresses 屬性:
<ListView RowHeight="90" ItemsSource="{Binding Addresses}">
  ......
  ......
  ......
</ListView>
在 ListView 內,每一個項目(一筆 Data )排版的樣版。
<ListView.ItemTemplate>
    <DataTemplate>
        ......
        ......
        ......
    </DataTemplate>
</ListView.ItemTemplate>
實際的排版,以 StackLayout 排列(內訂是由上而下,也可指定由左而右)排列一個項目內的各個屬性,目前是以 Label 其文字分別繫結:AreaCityName、AreaName、Address 等字串屬性:
<ViewCell>
    <StackLayout Padding="5, 5, 0, 5"
                 Spacing="10">
        <Label Text="{Binding AreaCityName}" />
        <Label Text="{Binding AreaName}" />
        <Label Text="{Binding Address}" />
    </StackLayout>
</ViewCell>
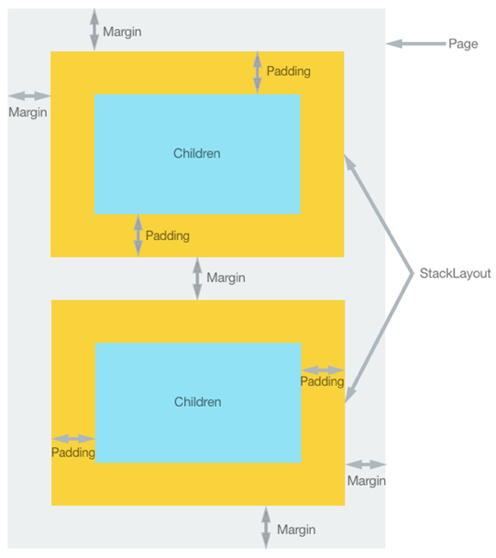
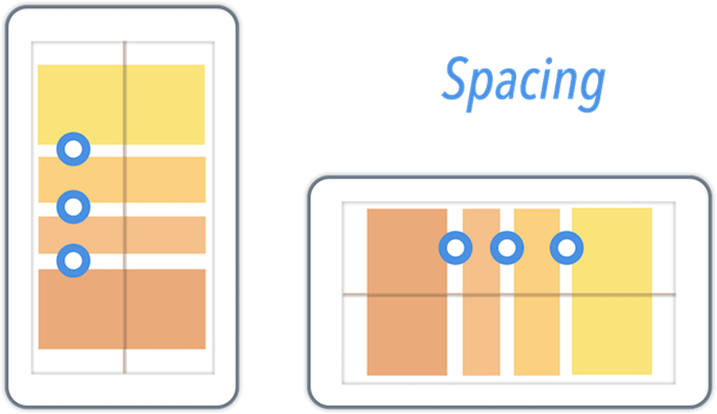
有關 StackLayout 有關留邊、間隔等 Margin、Padding、Spacing 等說明,一言難盡,請看如下的圖示說明:
Model
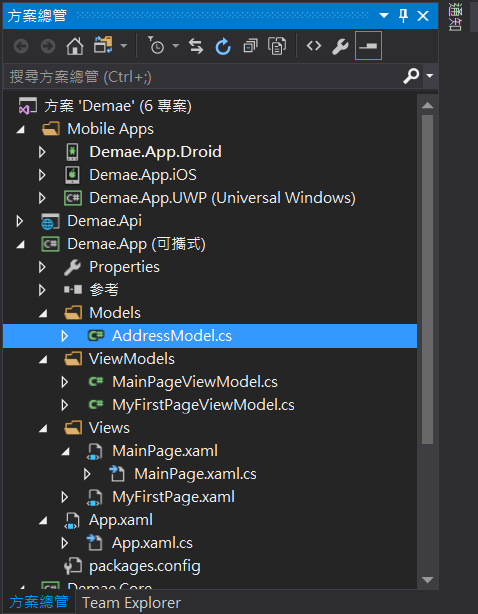
接著在 Demae.App 專案加入 Models 資料夾,並加入命名為 AddressModel.cs 的類別:
類別實作如下:
namespace Demae.App.Models
{
    public class AddressModel
    {
        public int Id { get; set; }
        public string AreaCityName { get; set; }
        public string AreaName { get; set; }
        public string Address { get; set; }
    }
}
如果有一直持續關注系列文意的讀者,可能會發現在 Demae.Core 專案內的 Models 資料夾內也有一個完全一模一樣的 AddressModel。沒錯!確實是重複寫,阿源哥哥原本也是想只寫一次,然後就能夠在 Demae.Api 和 Demae.App 兩個專案中都能使用。但是 Demae.Core 的專案類型是 .NET Standard 1.4 目前還沒支援,或許降低 .NET Standard 版本還是改用可攜式類別庫。目前就先暫時這樣,等阿源哥哥找到更好的方法再寫篇文章分享。
Navigation Aware
不知道該怎麼翻譯 Navigation Aware 這句話,這姑且稱為《導覽查覺》吧!還記得,在文章開頭,我們說要在切換到新頁面時要展示讀取進來的資料嗎?應用程式怎麼知道被切換到新頁面了呢? INavigationAware 就是負責查覺的工作。
在 MyFirstPageViewModel 加入 INavigationAware 介面的實作:
namespace Demae.App.ViewModels
{
    public class MyFirstPageViewModel : BindableBase, INavigationAware
    {
        .....
        .....
        .....

        public void OnNavigatedFrom(NavigationParameters parameters)
        {

        }

        public void OnNavigatedTo(NavigationParameters parameters)
        {

        }


        public void OnNavigatingTo(NavigationParameters parameters)
        {


        }
    }
}
還記得(才在前面幾段講過,忘記了請趕快滾上去看)ListView 的項目的資料來源是繫結對應 ViewModel 內的 Addresses 屬性,所以先實作該 Addresses 屬性,至於什麼是 ObservableCollection<T> 往後有機會會再深入說明:
namespace Demae.App.ViewModels
{
    public class MyFirstPageViewModel : BindableBase, INavigationAware
    {
        private ObservableCollection<AddressModel> _address;
        public ObservableCollection<AddressModel> Addresses
        {
            get { return _address; }
            set { SetProperty(ref _address, value); }
        }

        .....
        .....
        .....
    }
}
讀取資料
接著在 OnNavigatedTo() 方法,也就是頁面一被導入完成後就要執行的方法內加入 Addresses 屬性的初始化,其中的 GetAddress() 為讀取地址資料的方法。
public void OnNavigatedTo(NavigationParameters parameters)
{
   if(Addresses == null)
   {
       Addresses = new ObservableCollection<AddressModel>(GetAddress());
   }
}
接著實作 GetAddress() 方法,雖然應該是要使用 HttpClient 直接讀取 Web API 的資料才對,但是本《鹹魚翻身作戰計畫》系列文章,希望都能控制在 30 分鐘內完成,所以暫時先 Hard Coding 這些資料,明天再來學使用 HttpClient Get 資料:
private IEnumerable<AddressModel> GetAddress()
{
    var model = new List<AddressModel>();
    model.Add(new AddressModel {
        Id = 1,
        AreaCityName = "高雄市",
        AreaName = "鳥松區",
        Address = "高雄市鳥松區大埤路力行巷100號9樓"
    });
    model.Add(new AddressModel
    {
        Id = 2,
        AreaCityName = "高雄市",
        AreaName = "三民區",
        Address = "高雄市三民區漢口街202號"
    });
    model.Add(new AddressModel
    {
        Id = 3,
        AreaCityName = "台北市",
        AreaName = "松山區",
        Address = "台北市松山區復興北路99號15樓"
    });

    return model;
}
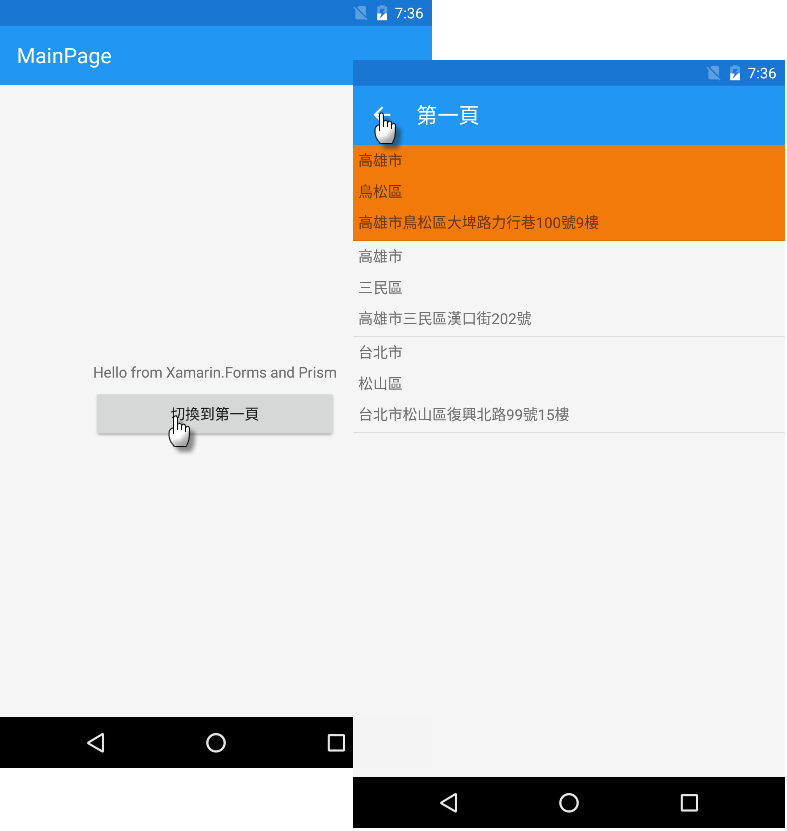
實際執行看看,成功了:
好吧!今天就暫時先學到這裡,明天再繼續吧!