[30天快速上手TDD][Day 30]TDD 實戰練習 END
前言
TDD 實戰練習第一篇,介紹了:
- 如何從 PO 的描述中,定義出 user story 與 acceptance test cases 。
- 如何建立 BDD 相關的 feature 與 scenario 。
- 如何透過 Selenium 來設計驗收測試程式。
- 如何結合 BDD的 steps 與 Selenium.WebDriver 。
TDD 實戰練習第二篇則介紹了:
- 如何迅速的通過驗收測試
- 如何在有測試保護的情況下重構
- 如何運用前面的重構九式來重構程式
- 如何從 acceptance testing drill down 到 integration testing
- 如何透過 BDD 來建立物件的 scenario 與測試案例
TDD 實戰練習第三篇則介紹了:
- 在測試的保護下,完成更符合需求本質的商業邏輯內容
- 從整合測試的開發過程,依照職責分出相關物件
- 建立相關物件的單元測試
- 完成相關物件的內容以通過單元測試
- 依據 DIP, IoC 的設計,降低物件之間的相依性
接下來這一篇文章,將建立 Authentication 的單元測試,來保護當「相依物件的實作細節或相關需求改變」時, Authentication 物件的商業邏輯,仍能被正常測試到。而 context 端也會套用 strategy pattern 與 factory pattern 。
當全部重構完成後,我們一整個 ATDD/BDD/TDD 的流程也就告一段落了。
雖然已經 30 天了,最後筆者會再整理一篇,當作是整個系列的目錄以及補充一些不錯的參考資料。
目前的程式碼
Authentication 的scenario 如下所示:
@Authentication
Feature: Authentication
	In order to 驗證登入資訊是否合法
	As a 呼叫端物件
	I want to 取得存放資料,驗證登入資訊是否吻合


Scenario: 驗證成功:當Id為1234時,輸入密碼為91時,回傳true
	Given id為"1234"
	And password為"91"
	When 呼叫Verify
	Then 回傳"true"

Scenario: 驗證失敗:當Id為1234時,輸入密碼為1234時,回傳false
	Given id為"1234"
	And password為"1234"
	When 呼叫Verify
	Then 回傳"false"
Authentication 測試程式,程式碼如下所示:
    [Binding]
    public class AuthenticationSteps
    {
        private static Authentication target;

        [BeforeScenario("Authentication")]
        public static void BeforeFeatureAuthentication()
        {
            target = new Authentication(new MyHash(), new CardDao());
            ScenarioContext.Current.Clear();
        }

        [AfterScenario("Authentication")]
        public static void AfterFeatureAuthentication()
        {
            ScenarioContext.Current.Clear();
        }

        [Given(@"id為""(.*)""")]
        public void GivenId為(string id)
        {
            ScenarioContext.Current.Add("id", id);
        }

        [Given(@"password為""(.*)""")]
        public void GivenPassword為(string password)
        {
            ScenarioContext.Current.Add("password", password);
        }

        [When(@"呼叫Verify")]
        public void When呼叫Verify()
        {
            var id = ScenarioContext.Current["id"].ToString();
            var password = ScenarioContext.Current["password"].ToString();

            var result = target.Verify(id, password);
            ScenarioContext.Current.Add("result", result);
        }

        [Then(@"回傳""(.*)""")]
        public void Then回傳(string result)
        {
            var isValid = Convert.ToBoolean(result);
            var actual = Convert.ToBoolean(ScenarioContext.Current["result"]);
            Assert.AreEqual(isValid, actual);
        }
    }
這是屬於整合測試的部份,因為測試目標 Authentication ,是直接使用 MyHash 與 CardDao 。
Authentication 的 production code ,程式碼如下:
    public class Authentication
    {
        private IHash _hash;
        private ICardDao _cardDao;

        public Authentication(IHash hash, ICardDao cardDao)
        {
            this._hash = hash;
            this._cardDao = cardDao;
        }

        public bool Verify(string id, string password)
        {
            string passwordFromDao = this.GetPasswordFromCardDao(id);

            string passwordAfterHash = this.GetHash(password);

            var isValid = passwordFromDao == passwordAfterHash;

            return isValid;
        }

        private string GetHash(string password)
        {
            var result = this._hash.GetHash(password);

            return result;
        }

        private string GetPasswordFromCardDao(string id)
        {
            var password = this._cardDao.GetPassword(id);

            return password;
        }
    }
建立 Authentication 的單元測試
雖然 Authentication 已經有整合測試保護了,但以 Business Object 來說,還是有為其建立單元測試的必要性。
一來這樣才能有單元測試的好處,二來粒度越細的測試程式越穩定,也越能發揮迴歸測試的效果。
只要我們幫 Authentication 建立了單元測試,那麼要驗證 Verify 的商業邏輯是否符合預期與使用者的需求,就完全不需要考慮到 MyHash 與 CardDao 的實作內容,甚至沒有這兩個物件,單元測試仍能運作。
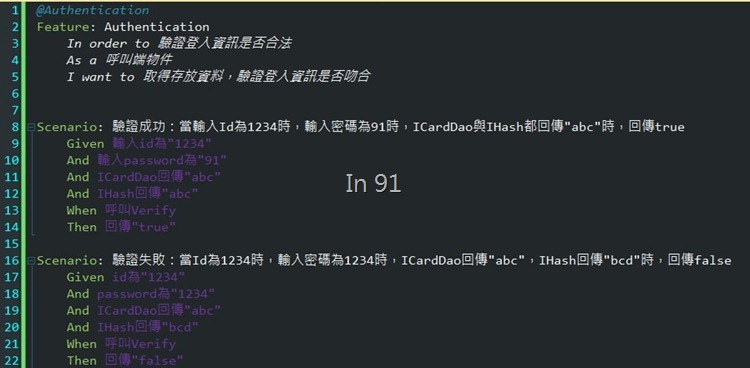
首先,我們先建立一個單元測試的 project ,並新增一個 Authentication 的 feature 檔,並加入對應的 scenario 。如下圖所示:
這邊要注意一點,在 scenario 上,我們加上了幾個原本整合測試上沒有的東西:
- 定義 IHash 回傳的值
- 定義 ICardDao 回傳的值
這也是單元測試被稱為白箱測試的原因,在測試一個行為時,除了物件本身的邏輯以外,任何外部相依的部份,都應該被模擬物件隔開,以達到單元測試目標物件的獨立性。
以這例子來說, ICardDao 的實作,資料來源從哪來,怎麼存取, Authentication 根本不在意。 IHash 怎麼取得 Hash 運算之後的結果,透過什麼演算法來運作, Authentication 根本不在意。
Authentication在意的只有一點:Verify 本身的邏輯內容,是否符合使用這個物件的預期。
接下來,依據 scenario ,自動產生 step 檔案後,來撰寫我們的單元測試程式碼。這邊會運用到前面文章所提及的 stub 技巧,細節部分讀者可以參考前面的文章: [30天快速上手TDD][Day 7]Unit Test - Stub, Mock, Fake 簡介
程式碼如下:
    [Binding]
    public class AuthenticationSteps
    {
        private static Authentication target;
        private static IHash hashStub;
        private static ICardDao cardDaoStub;

        [BeforeScenario("Authentication")]
        public static void BeforeScenarioAuthentication()
        {
            hashStub = MockRepository.GenerateStub<IHash>();
            cardDaoStub = MockRepository.GenerateStub<ICardDao>();

            target = new Authentication(hashStub, cardDaoStub);
            ScenarioContext.Current.Clear();
        }

        [AfterScenario("Authentication")]
        public static void AfterScenarioAuthentication()
        {
            hashStub = null;
            cardDaoStub = null;
            ScenarioContext.Current.Clear();
        }

        [Given(@"輸入id為""(.*)""")]
        public void Given輸入Id為(string id)
        {
            ScenarioContext.Current.Add("id", id);
        }

        [Given(@"輸入password為""(.*)""")]
        public void Given輸入Password為(string password)
        {
            ScenarioContext.Current.Add("password", password);
        }

        [Given(@"ICardDao回傳""(.*)""")]
        public void GivenICardDao回傳(string password)
        {
            cardDaoStub.Stub(x => x.GetPassword(Arg<string>.Is.Anything)).Return(password);
        }

        [Given(@"IHash回傳""(.*)""")]
        public void GivenIHash回傳(string hashResult)
        {
            hashStub.Stub(x => x.GetHash(Arg<string>.Is.Anything)).Return(hashResult);
        }

        [When(@"呼叫Verify")]
        public void When呼叫Verify()
        {
            var id = ScenarioContext.Current["id"].ToString();
            var password = ScenarioContext.Current["password"].ToString();
            var result = target.Verify(id, password);
            ScenarioContext.Current.Add("result", result);
        }

        [Then(@"回傳""(.*)""")]
        public void Then回傳(string expected)
        {
            var isValid = Convert.ToBoolean(expected);
            var actual = Convert.ToBoolean(ScenarioContext.Current["result"]);

            Assert.AreEqual(isValid, actual);
        }
    }
值得留意的就是透過 RhinoMocks 來產生 Stub 的部份。
一樣依照 scenario 中的描述,來給定預期的回傳值。
跑一下測試結果,全數通過測試,如下圖所示:
單元測試與整合測試的先後順序
這邊先提醒讀者一下,其實依照筆者的開發順序,依照這個 Authentication 的例子,其實筆者會先完成 Authentication 的單元測試後,才接著完成 CardDao 與 MyHash 兩個物件的 TDD 流程。
但這已經是有過相關經驗之後, tuning 完流程的結果,原因是,當需要一個物件時,完成物件中 context 的商業邏輯後,就要能夠通過測試,而不必考慮其相依物件。
anyway, 讀者如果開始使用 TDD 一段時間後,大概就能體會每個物件可以獨立測試的樂趣,以及開發人員的協同合作,只需要透過介面溝通,就可以平行開發的快感。
Strategy Pattern 與 Factory Pattern 的運用
接下來,我們快速的把 Login.aspx.cs 透過 DIP 的原則,相依於 Authentication 的介面,並將生成物件的動作,交給 factory 類別來負責。
有興趣了解細節的讀者,請參考前面的文章:
- [30天快速上手TDD][Day 17]Refactoring - Strategy Pattern
- [30天快速上手TDD][Day 18]Refactoring - Factory Pattern
第一步,改成相依於 Authentication 介面
一樣,只是把宣告的部份,換成 interface 。程式碼如下:
    protected void btnLogin_Click(object sender, EventArgs e)
    {
        var id = this.txtCardId.Text.Trim();
        var password = this.txtPassword.Text;

        IAuthentication authentication = new Authentication(new MyHash(), new CardDao());
        bool isValid = authentication.Verify(id, password);

        if (isValid)
        {
            LoginSuccess();
        }
        else
        {
            LoginFailed();
        }
    }
第二步,工廠物件的 TDD
一樣先用簡單工廠,先把 context 改成相依於工廠類別,程式碼如下:
    protected void btnLogin_Click(object sender, EventArgs e)
    {
        var id = this.txtCardId.Text.Trim();
        var password = this.txtPassword.Text;

        //IAuthentication authentication = new Authentication(new MyHash(), new CardDao());
        IAuthentication authentication = RepositoryFactory.GetIAuthentication();

        bool isValid = authentication.Verify(id, password);

        if (isValid)
        {
            LoginSuccess();
        }
        else
        {
            LoginFailed();
        }
    }
筆者的習慣,工廠類別我是直接建立單元測試,而沒有透過 scenario 來建立測試程式。
RepositoryFactory 測試程式碼如下:
        [TestMethod()]
        public void GetIAuthenticationTest()
        {
            IAuthentication expected = new Authentication(null, null);
            IAuthentication actual;
            actual = RepositoryFactory.GetIAuthentication();
            Assert.AreEqual(expected.GetType(), actual.GetType());
        }
因為工廠內容還沒有實作,所以現在是紅燈。
接下來實作工廠內容,並通過測試。程式碼如下:
    public class RepositoryFactory
    {
        public static Interface.BLL.IAuthentication GetIAuthentication()
        {
            ICardDao cardDao = GetCardDao();
            IHash hash = GetHash();

            return new Authentication(hash, cardDao);
        }

        private static IHash GetHash()
        {
            return new MyHash();
        }

        private static ICardDao GetCardDao()
        {
            return new CardDao();
        }
    }
目前完成所有程式了,執行所有測試,確保每一種層級的測試都是綠燈。如下圖所示:
完成的程式碼
Login.aspx.cs 程式碼如下:
    protected void btnLogin_Click(object sender, EventArgs e)
    {
        var id = this.txtCardId.Text.Trim();
        var password = this.txtPassword.Text;

        IAuthentication authentication = RepositoryFactory.GetIAuthentication();

        bool isValid = authentication.Verify(id, password);

        if (isValid)
        {
            LoginSuccess();
        }
        else
        {
            LoginFailed();
        }
    }

    /// <summary>
    /// 密碼驗證錯誤
    /// </summary>
    private void LoginFailed()
    {
        this.Message.Text = @"密碼輸入錯誤";
    }

    /// <summary>
    /// 密碼驗證成功
    /// </summary>
    private void LoginSuccess()
    {
        Response.Redirect("index.aspx");
    }
Authentication 程式碼如下:
    public class Authentication : IAuthentication
    {
        private IHash _hash;
        private ICardDao _cardDao;

        public Authentication(IHash hash, ICardDao cardDao)
        {
            this._hash = hash;
            this._cardDao = cardDao;
        }

        public bool Verify(string id, string password)
        {
            string passwordFromDao = this.GetPasswordFromCardDao(id);

            string passwordAfterHash = this.GetHash(password);

            var isValid = passwordFromDao == passwordAfterHash;

            return isValid;
        }

        private string GetHash(string password)
        {
            var result = this._hash.GetHash(password);

            return result;
        }

        private string GetPasswordFromCardDao(string id)
        {
            var password = this._cardDao.GetPassword(id);

            return password;
        }
    }
CardDao 與 MyHash 就不需要特地列上來了,因為那只是實作細節。
工廠的部份,上一段已經有完整的程式碼,這邊也不列出來。
接下來是測試案例的部份。
測試案例
Login 的 Feature 檔如下:
@WebBank
Feature: 登入功能
	In order to 驗證身份,避免非法使用者使用系統
	As a 線上使用者
	I want to 驗證使用者身份

Scenario: 當提款卡Id為1234時,輸入密碼為91時,驗證成功,導到index
	Given 在登入頁面
	And 提款卡Id輸入"1234"
	And 密碼輸入"91"
	When 按下確認按鈕
	Then 頁面url為"index.aspx"

Scenario: 當提款卡Id為1234時,輸入密碼為1234時,驗證失敗,出現密碼錯誤
	Given 在登入頁面
	And 提款卡Id輸入"1234"
	And 密碼輸入"1234"
	When 按下確認按鈕
	Then 呈現訊息為"密碼輸入錯誤"
Authentication 的整合測試的 Feature 檔,如下:
@Authentication
Feature: Authentication
	In order to 驗證登入資訊是否合法
	As a 呼叫端物件
	I want to 取得存放資料,驗證登入資訊是否吻合


Scenario: 驗證成功:當Id為1234時,輸入密碼為91時,回傳true
	Given id為"1234"
	And password為"91"
	When 呼叫Verify
	Then 回傳"true"

Scenario: 驗證失敗:當Id為1234時,輸入密碼為1234時,回傳false
	Given id為"1234"
	And password為"1234"
	When 呼叫Verify
	Then 回傳"false"
Authentication 的單元測試 Feature 檔如下:
@Authentication
Feature: Authentication
	In order to 驗證登入資訊是否合法
	As a 呼叫端物件
	I want to 取得存放資料,驗證登入資訊是否吻合


Scenario: 驗證成功:當輸入Id為1234時,輸入密碼為91時,ICardDao與IHash都回傳"abc"時,回傳true
	Given 輸入id為"1234"
	And 輸入password為"91"
	And ICardDao回傳"abc"
	And IHash回傳"abc"
	When 呼叫Verify
	Then 回傳"true"

Scenario: 驗證失敗:當Id為1234時,輸入密碼為1234時,ICardDao回傳"abc",IHash回傳"bcd"時,回傳false
	Given 輸入id為"1234"
	And 輸入password為"1234"
	And ICardDao回傳"abc"
	And IHash回傳"bcd"
	When 呼叫Verify
	Then 回傳"false"
MyHash 的 Feature 檔如下:
@MyHash
Feature: MyHash
	In order to 避免密碼明碼外洩
	As a Authentication物件
	I want to 取得密碼hash之後的結果

Scenario: 輸入為"91",應回傳"2VHCS0uee3jJTDJM3Prw7L8PrW+PuuyjTWTBUhkC6LHq+OM/AIYX+OGY6Hot9+nCw2R4vMU52uZ96O/DDbB/Ig=="
	Given 輸入字串為"91"
	When 呼叫GetHash方法
	Then 回傳Hash結果為"2VHCS0uee3jJTDJM3Prw7L8PrW+PuuyjTWTBUhkC6LHq+OM/AIYX+OGY6Hot9+nCw2R4vMU52uZ96O/DDbB/Ig=="
CardDao 的 Feature 檔如下:
@CardDao
Feature: CardDao
	In order to 存取Card的相關資料
	As a Authentictaion物件
	I want to 存取Card的相關資料

Scenario: 取得id為"1234",對應的密碼應為"2VHCS0uee3jJTDJM3Prw7L8PrW+PuuyjTWTBUhkC6LHq+OM/AIYX+OGY6Hot9+nCw2R4vMU52uZ96O/DDbB/Ig=="
	Given 使用者id為"1234"
	When 呼叫GetPassword的方法
	Then 回傳對應密碼為"2VHCS0uee3jJTDJM3Prw7L8PrW+PuuyjTWTBUhkC6LHq+OM/AIYX+OGY6Hot9+nCw2R4vMU52uZ96O/DDbB/Ig=="
程式碼涵蓋率
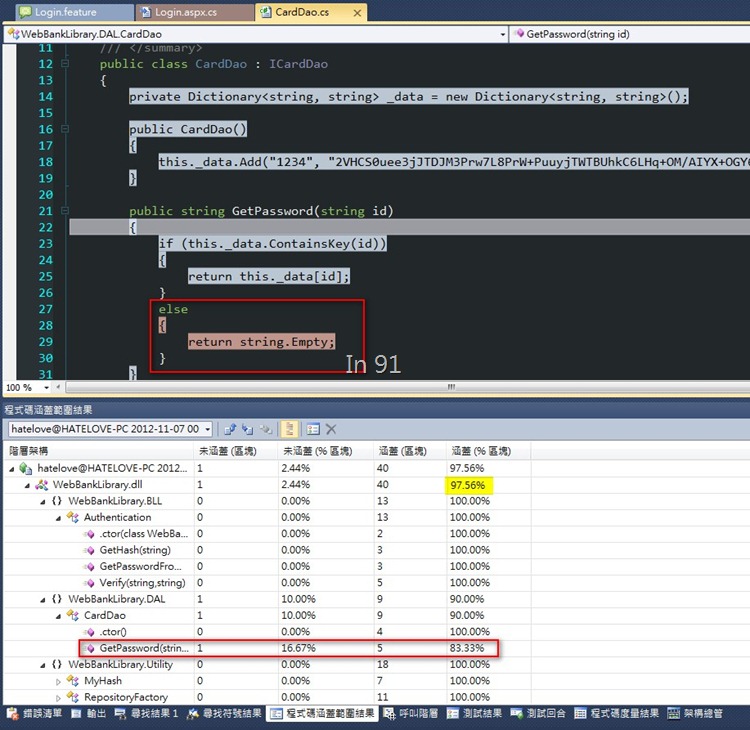
TDD 實戰練習的例子,所測出來的 code coverage ,如下圖所示:
除了一個防呆,是我們在測試案例中沒有描述到的情況,這時候就應該去思考,是測試案例少了必要的 scenario ,還是 production code 多了不必要的程式碼。
測試程式碼涵蓋率高達 97.56% ,很誇張的高吧...別再說這是不可能的事囉。
結論
有了這些活著的測試案例,並且是透過 DSL 方式描述的 feature 以及 scenario ,不管是使用者、測試人員、開發人員,甚至是未來的維護人員,都可以透過這樣的測試案例,來了解:
- 系統有什麼樣的功能
- 這些功能用什麼樣的方式在運作
- 這些功能用什麼樣的方式在運作
- 系統、模組、物件,該如何使用
最後的成品,則有下列特色:
- 是一個每個物件都可以抽換其相依物件的物件導向設計的系統。
- 幾乎每一行 code 都有其存在的意義。
- 幾乎每一行 code 都有被測試涵蓋到。
- 未來任何需求異動或是 defect ,測試程式與測試案例都可以有迴歸測試的保護效果。
在TDD實戰練習中的一些實作細節,都可以從前面介紹每一塊拼圖的文章中了解。而整個流程的意義與回顧,則可以參考前面的文章: [30天快速上手TDD][Day 26]User Story/ATDD/BDD/TDD - 總結,這篇已經介紹的相當完整。
最後,希望這一個系列,可以讓讀者朋友們真的體會到 TDD 的 total solution 。
透過每一塊拼圖的解說,透過實戰演練的完整例子,可以讓大家更有感覺,這不是一個烏托邦的世界,這樣的設計方式真的沒這麼難。如同重構系列中,每一篇文章都只是一個3分鐘就能學會的技巧,動動腦,動動手,您們也絕對可以 TDD !
Sample Code
blog 與課程更新內容,請前往新站位置:http://tdd.best/


