[修煉營 ASP.NET]網頁檢視物件資訊
前言
通常程式開發完畢到要進行SIT或UAT的階段時,
往往會出現一些「非crush」的錯誤,例如Session的轉換、流程的轉換出了問題,
或是某些物件的值、資料出現了與預期不符合的情況。
這個時候通常前方戰線的測試小組會發問題單給開發團隊來修改bug,
但是在大後方的開發團隊卻缺乏相關的資訊來還原現場,
很常出現家裡是好的,前線戰場的結果卻是錯的。
Solution
以前言裡面的情況來說,原因跟可以做的應對措施有很多,
通常都是藉由log來記錄與判斷到底是哪邊出了錯。
如果只是單純的Session或Request值,則只需要將aspx上的Trace設定為True即可。
但是若Session裡存放的是「物件」,或是不希望讓線上的User發現正在debug這支程式,
那就不適合用Trace,只能透過log或是隱藏的區塊來得知物件資訊。
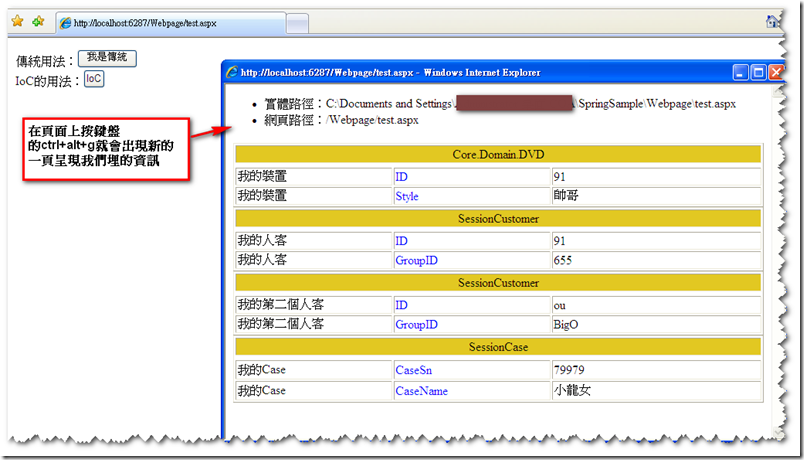
這邊要介紹的,就是期望給開發人員可以埋入想要查詢的物件資訊,透過組合鍵,讓測試小組可以把相關資訊直接呈現在網頁上,
並將這些資訊附加於問題單上,降低開發團隊修正bug的難度。
在一般開發過程中,也由於之前系統使用Spring,往往都是透過Interface在操作物件,
在Visual Studio裡面移至定義只能移到interface,透過這個方式,我們也可以檢視,到底最後從Spring config上讀取實際注入的物件為何。
有了namespace,要找到該物件的類別檔案就方便很多了。
Play it
基本想法,就是在MasterPage埋一個容器,在Debug mode的時候,在網頁上按下組合鍵,可以顯示出開發人員想要得知的資訊。
而開發人員在自己撰寫的頁面上,只需要一行,就可以將要顯示的物件資訊記錄於頁面中。
使用到的技巧,只有幾個小撇步:
- client端的顯示、隱藏與動態註冊javascript偵測組合鍵
- 判斷webconfig裡面debug=true的判斷式
- 動態新增controls
- System.Reflection將整個物件屬性攤平
- BasePage上寫共用的method供頁面使用
接著我們一步接著一步,快樂地把它做出來吧。
首先,先在我們的MasterPage上加上一個要顯示資訊的區塊。
這邊container的ID我就先定死了,如果有需要修正,請搭配js一起修正。
還有就是因為要註冊的事件是body的onkeydown,所以我們需要把body加上id以及runat=”server”的標記。
.master
<body id="body" runat="server">
</body>
        <asp:UpdatePanel ID="UpdatePanel1" runat="server">
            <ContentTemplate>
                <div id="91" style="display: none;">

                    <asp:Panel ID="FP_Status" runat="server" ScrollBars="Auto">
                    </asp:Panel>
                </div>
            </ContentTemplate>
        </asp:UpdatePanel>
接著在.master.cs的Page_PreRender事件,加上我們要註冊的javascript,當DEBUG為true時才作這件事。
在我的例子裡,javascript偵測的組合鍵是「ctrl+alt+g」
.master.cs
protected void Page_PreRender(object sender, EventArgs e)
    {


        #if(DEBUG)
        string js = @"
        function OpenprojectInfo() {
            document.getElementById('ctl00_FP_Status').style.display = '';
            document.getElementById('91').style.display = '';

            var strHtml = document.getElementById('91').outerHTML;
            document.getElementById('91').style.display = 'none';

            faux = window.open('', 'OpenprojectInfo', 'dependent,resizable,top=0,left=0,width=0px,height=0px,z-look=no,scrollbars=yes');
            var fd = faux.document;
            fd.open();
            fd.write('<html>');
            fd.write('<body onLoad=""this.focus()"" >');

            fd.write(strHtml);

            fd.write('</body></html>');
            fd.close();

            return false;

        }

        function LockNewWindow() {
            if ((event.ctrlKey) && (event.altKey) && (event.keyCode == 71)) {

                OpenprojectInfo();
            };
        };";
        ScriptManager.RegisterClientScriptBlock(this.Page, this.Page.GetType(), "showSession", js, true);

        this.body.Attributes.Add("onkeydown", "LockNewWindow();");

        #endif

    }
接著就是最麻煩的動態繪製表格的部分,
一點都不難,只是真的太囉唆了。
這邊我們設計在BasePage裡的一個Protected的void,讓繼承BasePage的頁面都可以使用這個方法,
將我們動態繪製表格html的部分加入至MasterPage的容器裡。
由於之前只想到要呈現Session裡物件的屬性資訊,所以名字就命成WriteSession,要用記得要改漂亮一點的名稱。
為了讓開發人員方便區隔同樣的物件型別,不同的instance,所以我加上了第二個參數,
可以讓開發人員自行命名這個物件要呈現的資訊名稱。
BasePage.cs
 protected void WriteSession( object targetObj,string mylogName)
    {
        #if(DEBUG)

        StringBuilder strHtml = new StringBuilder();

        strHtml.Append("<table border=\"1\" style=\"width:100%;\">");
        Type type = targetObj.GetType();
        PropertyInfo[] properties = type.GetProperties();
        StringBuilder ColName = new StringBuilder();
        strHtml.Append("<tr>");
        strHtml.Append("<td colspan=\"3\" align=\"center\" style=\"background-color:#E2C822\" > " + type.ToString());
        strHtml.Append("</td>");
        strHtml.Append("</tr>");
        strHtml.Append("<tr>");
        strHtml.Append("<td colspan=\"3\" align=\"center\"> ");
        strHtml.Append("</tr>");
        foreach (PropertyInfo property in properties)
        {

            strHtml.Append("<tr>");
            strHtml.Append("<td style=\"width:30%\">");
            strHtml.Append(mylogName);
            strHtml.Append("</td>");
            strHtml.Append("<td style=\"color:blue;width:30%\"  >");
            strHtml.Append(property.Name);
            strHtml.Append("</td>");
            strHtml.Append("<td style=\"width:40%\" style=\"table-layout: fixed;WORD-BREAK: break-all; WORD-WRAP: break-word\">");

            if (targetObj != null && property.GetValue(targetObj, null) != null)
            { strHtml.Append(property.GetValue(targetObj, null).ToString()); }

            strHtml.Append("</td>");
            strHtml.Append("</tr>");
        }
        strHtml.Append("</table>");

        Label theResult = new Label();
        theResult.Text = strHtml.ToString();
        SetPanelValue("FP_Status", theResult);
#endif
    }
這一段的重點在
Type type = targetObj.GetType();
PropertyInfo[] properties = type.GetProperties();
foreach (PropertyInfo property in properties){}
這三行,也就是將參數裡的物件,透過System.Reflection裡面的GetType()與type.GetProperties(),得到PropertyInfo[]。
另外就只是找MasterPage上的容器,加上我們想要給開發團隊的資訊,(這邊我的例子是呈現檔案實體路徑以及網頁路徑)
用Controls.add把我們剛剛繪製的html加進去Panel裡。
    public void SetPanelValue(string vstrPanelName, System.Web.UI.Control vobjControl)
    {

        Panel objPanel = GetPanelObject(vstrPanelName);
        if (objPanel != null)
        {

            if (objPanel.Controls.Count==1)
            {
                StringBuilder strHtml = new StringBuilder();
                strHtml.Append("<ul><li>實體路徑:" + Request.PhysicalPath + "</li><li>網頁路徑:" + Request.Path + "</li></ul>");
                Label header = new Label();
                header.Text = strHtml.ToString();
                objPanel.Controls.Add(header);
            }
            objPanel.Controls.Add(vobjControl);
        }

    }
    private Panel GetPanelObject(string vstrPanelName)
    {
        if ((this.Master != null))
        {
            if (typeof(Panel).IsInstanceOfType(this.Page.Master.FindControl(vstrPanelName)))
            {
                return (Panel)this.Page.Master.FindControl(vstrPanelName);
            }
        }
        return null;
    }
就這樣,大功告成了。
接下來就是我們的頁面要怎麼使用,
也相當簡單,
- 要套用我們的MasterPage
- 要繼承我們的BasePage
使用方式,這邊舉個例子,在Page_Load()裡面讀取Session物件,
(請注意我這邊的範例是偷吃步的,正常應該透過Get Session跟轉型才是我們存放在Session裡的物件)
也順便拿我們在上一篇IoC裡面的myDevice來當例子。
test.aspx.cs
    protected void Page_Load(object sender, EventArgs e)
    {
        SessionCustomer customer = new SessionCustomer();
            customer.ID = "91";
            customer.GroupID = "655";

            SessionCustomer customer2 = new SessionCustomer();
            customer2.ID = "ou";
            customer2.GroupID = "BigO";

            SessionCase caseSession = new SessionCase();
            caseSession.CaseSn = "79979";
            caseSession.CaseName = "小龍女";
            SessionProcess.SetSession(SessionProcess.enuSessionType.Customer, customer);
            SessionProcess.SetSession(SessionProcess.enuSessionType.Case, caseSession);

            myDevice = (Core.Domain.Interface.IDevice)Core.WebUtility.Repository.Domain("Device");
            myDevice.ID = "91";
            myDevice.Style = "帥哥";
    #if(DEBUG)
        WriteSession(myDevice, "我的裝置");
        WriteSession(customer,"我的人客");
        WriteSession(customer2,"我的第二個人客");
        WriteSession(caseSession,"我的Case");
    #endif
    }
}
要使用就這麼簡單一行
WriteSession(物件, “給人看的辨別資訊”);
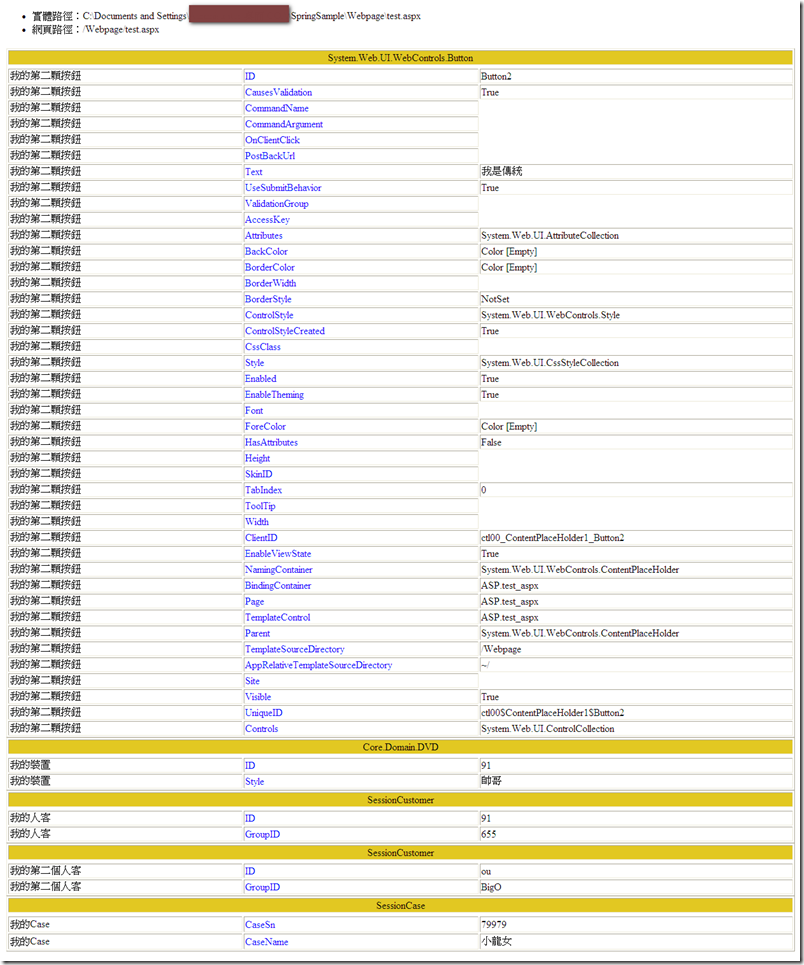
接著我們來看畫面:
這樣子其實算是埋後門的方式,被User知道的話,可能會跳腳,
所以我們才會加上判斷Debug的條件。
只要改一個地方,這些功能就都會消失,畫面也不會有問題。
web.config
<compilation debug="true">只要將debug的true改為false即可。(通常release後都是設定為false)
[補充]Control也能丟進去唷,效果就像網頁版的監看式
[註2]2009/10/9,偵測Debug是否為True的部分,可透過蹂躪大這篇文章:[C#]Effective C# 條款四: 使用ConditionalAttribute替代#if條件編譯
加上參考using System.Diagnostics;且在method上加[Conditional("DEBUG")],即可把#if(DEBUG)移掉,效率也會比較好。
blog 與課程更新內容,請前往新站位置:http://tdd.best/


