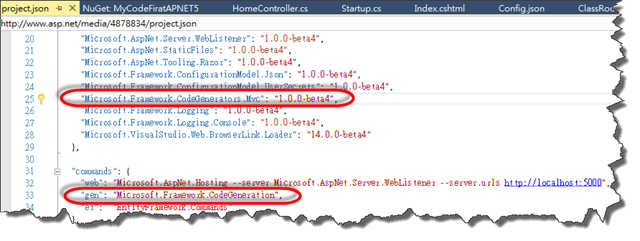
其實在 ASP.NET 5 中,除了有強大的 Yeoman 可以產生整個 Web 網站外,原先的 Scafolding 也有移轉過來,它是定義在 Microsoft.Framework.CodeGeneration 這一顆 DLL 中,如果要使用它,得在 project.json 中的 dependencies 區段先將 "Microsoft.Framework.CodeGenerators.Mvc", "EntityFramework.Command" 引入
前言
在 Visual Studio 2015 中,在開發 ASP.NET 5 的 MVC6 應用程式時,並不像以前使用 Visual Studio 2013 在撰寫 MVC5 時,可以在 IDE 工具上,在 Controller 的 Action 上按滑鼠右鍵,就有可以產生 View 的選項,或是可以透過新增項目,以 T4 樣板來產生 CRUD 的檢視表。
其實在 ASP.NET 5 中,除了有強大的 Yeoman 可以產生整個 Web 網站外,原先的 Scafolding 也有移轉過來,它是定義在 Microsoft.Framework.CodeGeneration 這一顆 DLL 中,如果要使用它,得在 project.json 中的 dependencies 區段先將 "Microsoft.Framework.CodeGenerators.Mvc", "EntityFramework.Command" 引入
它會連帶地幫您參考 "Microsoft.Framework.CodeGeneration" 這一顆 DLL 進來。
在 ASP.NET 5 裡使用 Code-First
如要在 ASP.NET 5 裡面使用 Code-First 與原本的作法並不會差異太多,同樣我們得先引入 EntityFramework.SqlServer 套件,接著撰寫繼承 DbContext 的類別 (包含 DbSet<Entity>),並定義好 config.json 內的連線字串,那麼我們就可以使用 migration 方式建立資料庫,並同步欄位資訊。
詳細作法可順著如下步驟:
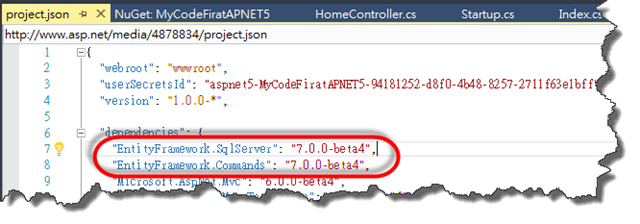
1. 引入 EntityFramework.SqlServer 套件
2. 撰寫繼承 DbContext 的類別 與 Entity 類別
ClassRoomContext 類別:
1: using Microsoft.Data.Entity;
2:
3: namespace MyCodeFiratAPNET5.Models
4: {
5: public class ClassRoomContext : DbContext
6: {
7: public DbSet<ClassRoom> ClassRooms { get; set; }
8:
9: protected override void OnConfiguring(DbContextOptionsBuilder optionsBuilder)
10: {
11: optionsBuilder.UseSqlServer(Startup.Configuration.Get("Data:DefaultConnection:ConnectionString"));
12: }
13:
14: protected override void OnModelCreating(ModelBuilder modelBuilder)
15: {
16: base.OnModelCreating(modelBuilder);
17: }
18: }
19: }
在 OnConfiguring(DbContextBuilder optionsBuilder) 中,是複寫設定 DbContext 連線設定的方法,這裡除了告訴他要使用 SqlServer 之外,並要從 config.json 裡取得嫌線字串,所以這裡的 "Data:DefaultConnection:ConnectionString" 需與下面第 3 步驟的 config.json 要相互輝映。
ClassRoom 模型類別:
1: using System;
2: using System.Collections.Generic;
3: using System.ComponentModel.DataAnnotations;
4: using System.Linq;
5:
6: namespace MyCodeFiratAPNET5.Models
7: {
8: /// <summary>
9: /// 教室
10: /// </summary>
11: public class ClassRoom
12: {
13: /// <summary>
14: /// 流水號
15: /// </summary>
16: [Key]
17: public int id { get; set; }
18: /// <summary>
19: /// 教室編號
20: /// </summary>
21: [Required]
22: [StringLength(10)]
23: public string ClassRoomId { get; set; }
24: /// <summary>
25: /// 教室名稱
26: /// </summary>
27: [Required]
28: [StringLength(200)]
29: public string ClassRoomName { get; set; }
30: /// <summary>
31: /// 教室樓層
32: /// </summary>
33: [Required]
34: public virtual int ClassFloor { get; set; }
35: /// <summary>
36: /// 人數
37: /// </summary>
38: [Required]
39: public int NumOfPeoples { get; set; }
40: /// <summary>
41: /// 參考的大樓流水號
42: /// </summary>
43: [Required]
44: public int BuildingId { get; set; }
45: }
46: }
3. 設定 config.json 資料庫連線字串
1: {
2: "Data": {
3: "DefaultConnection": {
4: "ConnectionString": "Server=(localdb)\\MSSQLLocalDB;Database=aspnet5-MyCodeFiratAPNET5;Trusted_Connection=True;;MultipleActiveResultSets=true"
5: }
6: },
7: "EntityFramework": {
8: "ClassRoomContext": {
9: "ConnectionStringKey": "Data:DefaultConnection:ConnectionString"
10: }
11: }
12:
13: }
注意:
這邊需要注意的是,一定要定義 "ClassRoomContext" 的 "ConnectionStringKey",並與第 2 步驟的 Startup.Configuration.Get("Data:DefaultConnection:ConnectionString") 的 Key 內容須相同,才取的到連線字串。
4. 進行 migration 作業
透過命令列切換到專案資料夾中,使用 dnx 執行環境命令列工具,執行如下命令:
dnx . ef migration add NewCustomer
dnx . ef migration apply
注意:
若 config.json 設定錯誤,執行 ef migration 時就會失敗。
成功後,會產生兩個檔案:
第二道命令會 apply 到 DB 裡,所以會真的建立該資料庫,可以使用 SSMS 登入 LocalDB 的執行個體查看是否有成功建立資料庫。
產生的 20150529092642_NewCustomer.cs 內容如下:
1: using System.Collections.Generic;
2: using Microsoft.Data.Entity.Relational.Migrations;
3: using Microsoft.Data.Entity.Relational.Migrations.Builders;
4: using Microsoft.Data.Entity.Relational.Migrations.Operations;
5:
6: namespace MyCodeFiratAPNET5.Migrations
7: {
8: public partial class NewCustomer : Migration
9: {
10: public override void Up(MigrationBuilder migration)
11: {
12: migration.CreateSequence(
13: name: "DefaultSequence",
14: type: "bigint",
15: startWith: 1L,
16: incrementBy: 10);
17: migration.CreateTable(
18: name: "ClassRoom",
19: columns: table => new
20: {
21: BuildingId = table.Column(type: "int", nullable: false),
22: ClassFloor = table.Column(type: "int", nullable: false),
23: ClassRoomId = table.Column(type: "nvarchar(max)", nullable: true),
24: ClassRoomName = table.Column(type: "nvarchar(max)", nullable: true),
25: NumOfPeoples = table.Column(type: "int", nullable: false),
26: id = table.Column(type: "int", nullable: false)
27: },
28: constraints: table =>
29: {
30: table.PrimaryKey("PK_ClassRoom", x => x.id);
31: });
32: }
33:
34: public override void Down(MigrationBuilder migration)
35: {
36: migration.DropSequence("DefaultSequence");
37: migration.DropTable("ClassRoom");
38: }
39: }
40: }
與 EntityFramework 5.x/6.x 幾近相同的 Up()、Down() 方法,實作 CreateTable 與 DropTable 方法。
ClassRoomContextModelSnapshot.cs 內容如下:
1: using System;
2: using Microsoft.Data.Entity;
3: using Microsoft.Data.Entity.Metadata;
4: using Microsoft.Data.Entity.Metadata.Builders;
5: using Microsoft.Data.Entity.Relational.Migrations.Infrastructure;
6: using MyCodeFiratAPNET5.Models;
7:
8: namespace MyCodeFiratAPNET5.Migrations
9: {
10: [ContextType(typeof(ClassRoomContext))]
11: partial class ClassRoomContextModelSnapshot : ModelSnapshot
12: {
13: public override IModel Model
14: {
15: get
16: {
17: var builder = new BasicModelBuilder()
18: .Annotation("SqlServer:ValueGeneration", "Sequence");
19:
20: builder.Entity("MyCodeFiratAPNET5.Models.ClassRoom", b =>
21: {
22: b.Property<int>("BuildingId")
23: .Annotation("OriginalValueIndex", 0);
24: b.Property<int>("ClassFloor")
25: .Annotation("OriginalValueIndex", 1);
26: b.Property<string>("ClassRoomId")
27: .Annotation("OriginalValueIndex", 2);
28: b.Property<string>("ClassRoomName")
29: .Annotation("OriginalValueIndex", 3);
30: b.Property<int>("NumOfPeoples")
31: .Annotation("OriginalValueIndex", 4);
32: b.Property<int>("id")
33: .GenerateValueOnAdd()
34: .Annotation("OriginalValueIndex", 5)
35: .Annotation("SqlServer:ValueGeneration", "Default");
36: b.Key("id");
37: });
38:
39: return builder.Model;
40: }
41: }
42: }
43: }
這是 EntityFramework 7 新功能模型快照檔,可追蹤在 POCO Entity 上所做過的修改。
相關資訊可參考:
https://msdn.microsoft.com/en-us/library/vstudio/dd456848(v=vs.100).aspx
5. 建立 ClassRoomController 與 Views (CRUD)
建立 MVC 的 Controller 一樣可使用執行環境命令列工具 dnx,命令如下:
dnx . gen controller -name ClassRoomController --dataContext ClassRoomContext --model ClassRoom
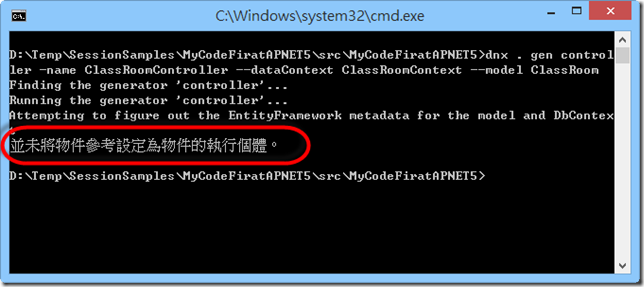
不過初次執行時,卻得到如下的錯誤訊息。
後來研究了一下,發現因為我在 ClassRoomDbContext 類別中,在複寫的 OnConfiguring 方法中,直接將 Startup 的 Configuration 屬性設為 static 好讓ClassRoomDbContext 類別可以使用,但是因為程式並不是由 Host 起始,所以 Startup.cs 並不會被執行,所以 Startup.Configuration 永遠為 null,所以才引發 null reference 的問題。因為 dnx 只會產生 ClassRoomDbContext 的實體。
所以解決方式也很簡單,就是在複寫的 OnConfiguring 方法中,自己讀取 config.json 的內容,如下:
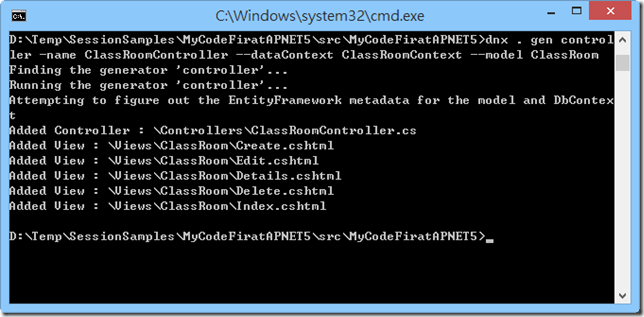
這時,我們再從新執行一次命令,發現馬上就成功了。
與原本 MVC5 的 Scaffolding 一樣,參考 DbContext 產生出具備 CRUD 的 Controller 與相關的 Views。
結語
所以 Scaffolding 在 ASP.NET 5 中一樣可以使用,只是目前得透過 dnx 命令列工具來產生,為什麼會如此呢?就像筆者之前在課上所說的,VS 本來許多動作在背後也是叫用命令列工具,比如編譯,後面也是叫用 csc.exe 編譯器來進行。所以,也就是說,如果要跨平台,編譯器相關的命令列工具得先跨平台,只是新的編譯器叫 Roslyn ,而後 Runtime 要能夠跨平台程式才能夠運作在不同的平台,只不過新的 Runtime 命令工具叫做 dnx 而已,所以微軟得先搞定不同平台的 dnx,也才可能有不同平台的 Visual Studio。
未來,我想 Visual Studio 2015 應該也會將這些 Scaffolding 動作加入到 IDE 的滑鼠右鍵中點選來產生,就像 MVC5一樣,以後正式版出來,應該不會每次都要輸入這些命令吧。
參考資料
http://www.codeproject.com/Tips/988624/MVC-Controller-Scaffolding-in-Command-Line
http://forums.asp.net/t/2021847.aspx?EF+7+and+Scaffolding
http://blogs.msdn.com/b/webdev/archive/2014/08/21/command-line-scaffolding-for-asp-net-vnext.aspx
http://chad.tolkien.id.au/asp-net-vnext-mvc6-ground-up-4-crud-in-mvc/
http://forums.asp.net/t/1999143.aspx?How+to+configure+connection+string+in+MVC+6+in+ASP+NET+vNext
http://stackoverflow.com/questions/27164011/asp-net-vnext-ef7-dbcontext-issues
簽名:
學習是一趟奇妙的旅程
這當中,有辛苦、有心酸、也有成果。有時也會有瓶頸。要能夠繼續勇往直前就必須保有一顆最熱誠的心。
軟體開發之路(FB 社團):https://www.facebook.com/groups/361804473860062/
Gelis 程式設計訓練營(粉絲團):https://www.facebook.com/gelis.dev.learning/
如果文章對您有用,幫我點一下讚,或是點一下『我要推薦』,這會讓我更有動力的為各位讀者撰寫下一篇文章。
非常謝謝各位的支持與愛護,小弟在此位各位說聲謝謝!!! ^_^


