CodeSmith Studio 真的可以說是筆者從未接觸的主題,其實CodeSmith Studio早在市場上行之有年了,只是筆者一直都是過其門而不入,在星期天抽個3小時稍微的Survey一下,做了些小小的應用,也是日常開發上常常會遇到的,下面就是這3個小時的成果,在這裡分享一下。
CodeSmith Studio 真的可以說是筆者從未接觸的主題,其實CodeSmith Studio早在市場上行之有年了,只是筆者一直都是過其門而不入,也沒拿它來做一些應用,一則先前公的公司並未採用,二則以往開發上著重在自家設計的Design Pattern與分散式應用開發等上頭。主要原因當然也是CodeSmith Studio是要錢的,因此公司在開發考量上認為此產品對當時開發重要性不大,所以筆者也一直未接觸此產品。因為在當時甚至Code Generate 這種工具也是自行開發的。而最近筆者的同事對於CodeSmith Studio相當的熟悉,看他拿來做一些應用很感興趣,於是在星期天抽個3小時稍微的Survey一下,做了些小小的應用,也是日常開發上常常會遇到的,下面就是這3個小時的成果,在這裡分享一下。
目前最新版為5.1版,須注意的是:
- 最新的5.1可與Visual Studio 2010整合,使用.NET Runtime 2.0,[C# Compiler 3.5 ]
- 先前的5.0只能與Visual Studio 2008整合,使用.NET Runtime 2.0,[C# Compiler 2.0 ]
首先下載Code Smith Studio 可到(官方網站)下面網址下載:
http://www.codesmithtools.com/
也可以到SOFTPEDIA 下載5.1版,下載速度比較快。
http://www.softpedia.com/progDownload/CodeSmith-Download-144002.html
下載安裝完成後,主化面會提示您必須申請一個Trial Key 才能夠試用30天。序號會寄至您下載時輸入的EMail 位址,如下筆者於前天輸入序號,因此目前剩28天,如下圖:
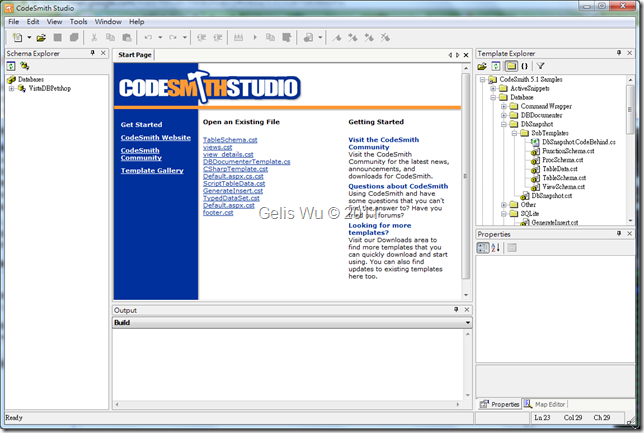
啟動後的畫面如下,在右邊的Template Explorer 可以看見許多的範例檔。Target有HTML、C#、Text、ASPX,也有.SQL的Store Procedure,拿它來產出文字檔案可說非常的方便,主要原因為CodeSmith Studio 可以直接連資料庫,經由實際的DB Schema來大量批次的產出您所需要的各種文字檔案,可說非常的方便。如下畫面所示:
且IDE工具的開發上支援 Intellisense
而初次看見CodeSmith Studio ,筆者的經驗即覺得它一定自己開發了一個Parser,您可以想像成C# Compiler的載入器,您切換到Code Smith Studio 的資料夾下面就可以看見該載入器 cs.exe 如下:
在Console下執行 cs.exe /? 可以看見相關的參數
由此可見CodeSmith Studio也是在背後呼叫這隻cs.exe程式,我想整個CodeSmith Studio 最核心的應該也在此,筆者很隨興的拿出ILSpy 來看看這隻cs.exe ,果然它底下的Class 幾乎都經過模糊化的處理 :D
而且Runtime 還是為2.0,並不是4.0,雖然5.1可與Visual Studio 2010 整合。不過可以確定的是5.1使用的C# Compiler 是3.5,因此您可以在 CodeTemplate 裡使用如 var 關鍵字、或是使用LINQ,筆者測試過沒有問題。這在5.0是沒有辦法做到的,很棒吧 :D
下圖範例、LINQ運算式:
且CodeSmith Studio也可以把您撰寫而成的Code Template 檔案編譯成 DLL Assembly。您只要執行工具列的 [Tools]—>[Compile to Assembly] 即可。
在星期天3個鐘頭的Study,筆者學習到如何使用SourceTable從資料庫取出欄位,並產生一個C# Class定義。首先建立一個空的C# Template,如下:
1: <%--
2: Name:
3: Author:
4: Description:
5: --%>
6: <%@ CodeTemplate Language="C#" TargetLanguage="Text" Src="" Inherits="" Debug="False" CompilerVersion="v3.5" Description="Template description here." %>
7: <%@ Property Name="SampleStringProperty" Type="System.String" Default="SomeValue" Optional="True" Category="Strings" Description="This is a sample string property." %>
8: <%@ Property Name="SampleBooleanProperty" Type="System.Boolean" Default="True" Optional="False" Category="Booleans" Description="This is a sample boolean property." %>
9: My static content here.
10: My dynamic content here: "<%= SampleStringProperty %>"
11: Call a script method: <%= SampleMethod() %>
12: <% if (SampleBooleanProperty) { %>
13: My conditional content here.
14: <% } %>
15: <script runat="template">
16: // My methods here.
17:
18: public string SampleMethod()
19: {
20: return "Method output.";
21: }
22: </script>
上面的Template 我們還需要做一些修改,首先是把 TargetLanguage 改為"C#",因為我們要輸出C#的檔案。接著加入一個SourceTable 的 Property,詳細的Template Director 指示詞稍後說明。由於Property可以指定Type ,而該Type 也就是在這個Code Template 中引入的SchemaExplorer 這個Assembly 所提供的,因此筆者整個程式是這樣寫:
1: <%--
2: Name:
3: Author:
4: Description:
5: --%>
6: <%@ CodeTemplate Language="C#" TargetLanguage="C#" Src="" Inherits="" Debug="False" CompilerVersion="v3.5" Description="Template description here." %>
7: <%@ Property Name="SourceTable" Type="SchemaExplorer.TableSchema" Category="Context" Description="Table that the documentation should be based on." %>
8: <%@ Property Name="SampleClassName" Type="System.String" Default="Employees" Optional="True" Category="Strings" Description="This is a sample string property." %>
9: <%@ Assembly Name="SchemaExplorer" %>
10: <%@ Assembly Name="System.Design" %>
11: <%@ Import Namespace="SchemaExplorer" %>
12:
13: using System;
14: using System.Data;
15: using System.Xml;
16:
17: //My C# Class here.
18: //My dynamic Class Name here: "<%= SampleClassName %>"
19: //My <%= SourceTable.Name %> Class content here.
20: public class <%= SampleClassName %>
21: {
22: <% foreach(var column in SourceTable.Columns) { %>
23: public <%= column.SystemType %> <%= column.Name %> {get; set;}
24: <% } %>
25: }
而 SourceTable 的部分必須在 CodeSmith Studio 的屬性視窗上作設定,因為舉凡來說,只要在 CodeTemplate 上宣告的 Property 都會出現在屬性視窗中。只是SourceTable 會被歸類在 Context 的分類中而已。而如果要從資料庫中取得欄位定義資料,必須設定好SourceTable。設定方式也很容易,點選屬性視窗的 SourceTable 的按鈕,會出現如下視窗:
接著,如果您使用 MS SQL Server ProviderType請選擇SqlSchemaProvider,設定方式與一般資料來源相同,筆者就不再多加著墨。
相關Code Template 的Driector (指示詞)說明:
- CodeTemplate : 整個CodeTemplate檔案一開始必須要有的定義。
- Property : 相當於 CodeTemplate 變數。
- Assembly : 要參照的組件。如同Reference。
- Import : 撰寫CodeTemplate時需要使用的Namespace的引用,如同一般我們在撰寫C# 的 Using 相同意思。
上面程式會抓取Northwind 的Employees 資料表,並以該資料表的欄位輸出一個C# Class ,如下:
1: using System;
2: using System.Data;
3: using System.Xml;
4:
5: //My C# Class here.
6: //My dynamic Class Name here: "SomeValue"
7: //My Employees Class content here.
8: public class SomeValue
9: {
10: public System.Int32 EmployeeID {get; set;}
11: public System.String LastName {get; set;}
12: public System.String FirstName {get; set;}
13: public System.String Title {get; set;}
14: public System.String TitleOfCourtesy {get; set;}
15: public System.DateTime BirthDate {get; set;}
16: public System.DateTime HireDate {get; set;}
17: public System.String Address {get; set;}
18: public System.String City {get; set;}
19: public System.String Region {get; set;}
20: public System.String PostalCode {get; set;}
21: public System.String Country {get; set;}
22: public System.String HomePhone {get; set;}
23: public System.String Extension {get; set;}
24: public System.Byte[] Photo {get; set;}
25: public System.String Notes {get; set;}
26: public System.Int32 ReportsTo {get; set;}
27: public System.String PhotoPath {get; set;}
28: }
如何?是不是非常的簡單、方便呢?
下次見 :D
簽名:
學習是一趟奇妙的旅程
這當中,有辛苦、有心酸、也有成果。有時也會有瓶頸。要能夠繼續勇往直前就必須保有一顆最熱誠的心。
軟體開發之路(FB 社團):https://www.facebook.com/groups/361804473860062/
Gelis 程式設計訓練營(粉絲團):https://www.facebook.com/gelis.dev.learning/
如果文章對您有用,幫我點一下讚,或是點一下『我要推薦』,這會讓我更有動力的為各位讀者撰寫下一篇文章。
非常謝謝各位的支持與愛護,小弟在此位各位說聲謝謝!!! ^_^


