Windows 10 Xbox GameBar widget with UWP
Windows 10 最近比較加入很多不是很明顯讓使用者感受到的功能,今天要來介紹的是 GameBar SDK!這個APP是整合在Windows 10跟遊戲資訊相關的應用~ 讓我們先看張圖片了解一下基本的Xbox GameBar app應用
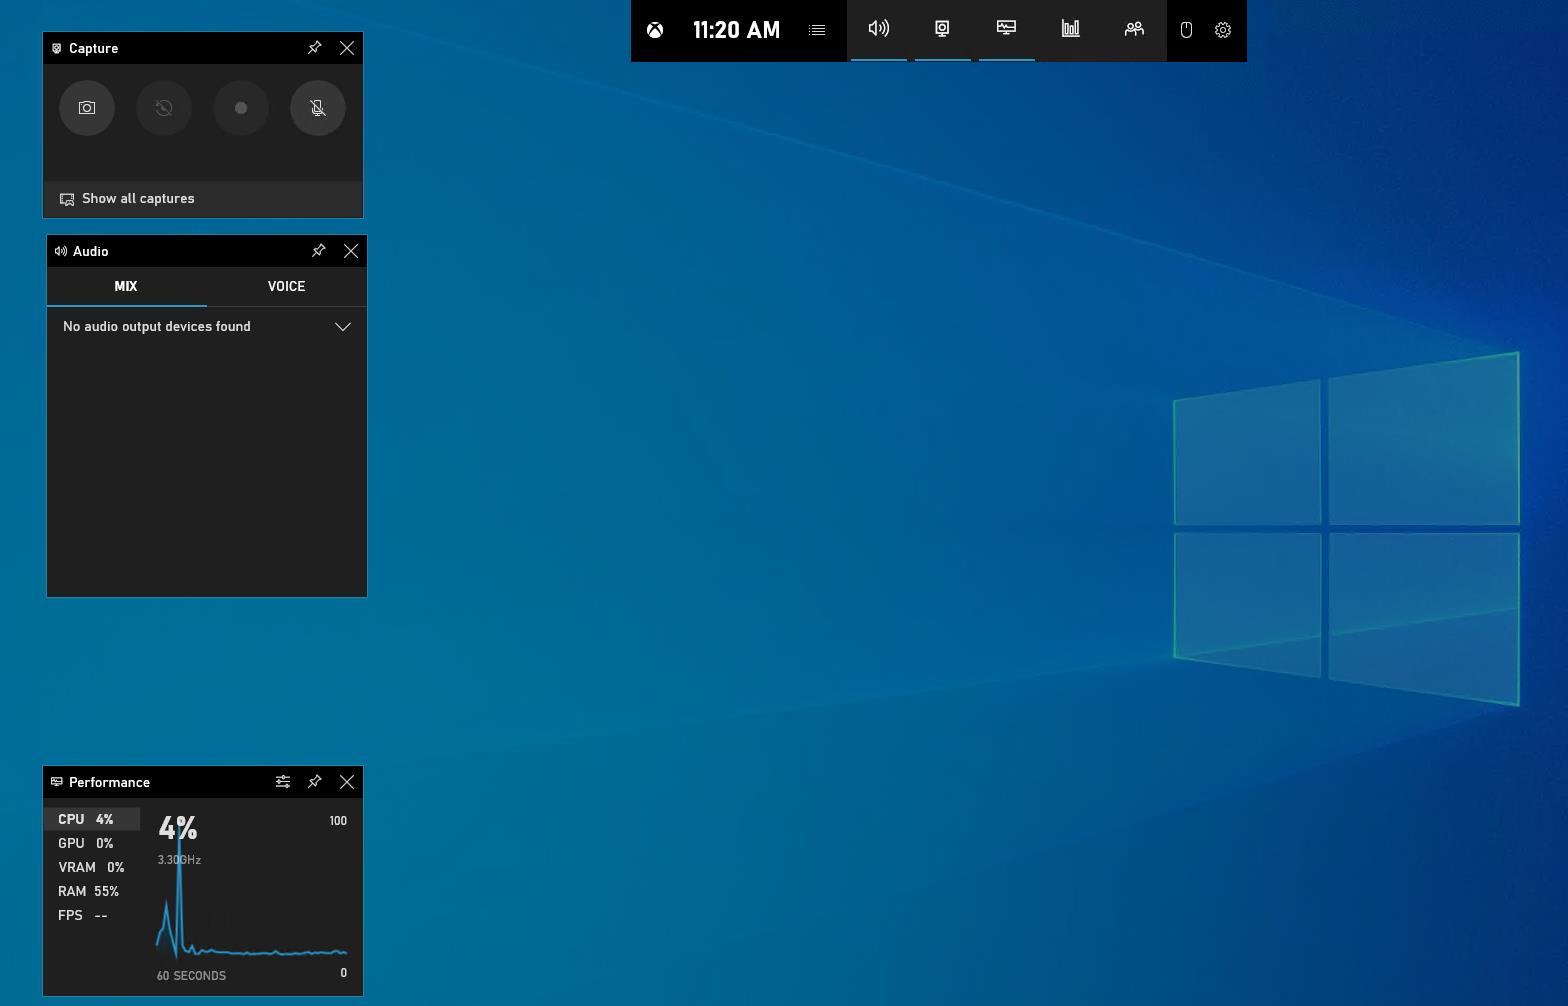 這張圖片就是 GameBar app 啟動後
基本上是個 overlay 的控制介面,內建已經整合一些朝用的功能(螢幕錄影、混音程式、系統資訊、FPS、系統資源、Xbox 社群... 等)
最近看到 Microsofft Docs 開始有關於 Xbox GameBar 的Widget 相關文章了! 讓我們進入主題八
開發環境:
- Windows 10 2004 update (Build 19041) or upper
- Visual studio 2019 or upper
- Windows 10 SDK (Build 19041)
- Xbox Game Bar version 5.420.11102.0 or upper
目前建議的開發環境大概是這樣!使用 Windows 10 Insider Channel 也是可以,但是使用Insider 基本上也是可以。
基礎概念
接者我們來開始對 Xbox GameBar SDK做個瞭解八,先看以下的圖片
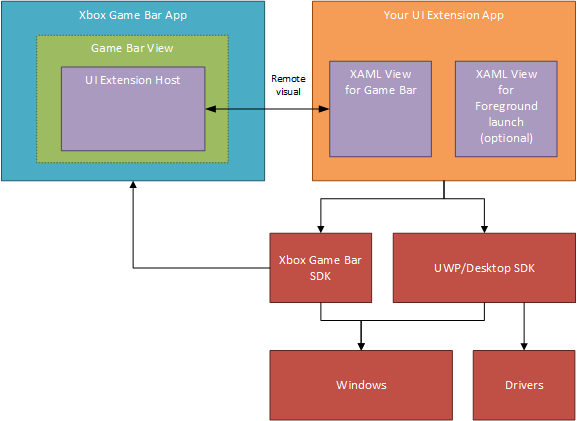 ( 擷取自 Microsoft Docs => Game Bar Widget Overview | Microsoft Docs )
這邊會發現 Xbox Game Bar app 可以支援掛載其他應用程式就很像延伸應用(Extensions)的形式! 而在該圖片的部分顯示可以透過 UWP/Desktop SDK 跟 Drivers進行溝通!因為Windows10的Driver分成傳統Driver和 UWD( Universal Windows Driver ) UWD基本上就是開放給UWP APP對硬體做更直接操作。
接者我們直接來看實際要如何撰寫一個 Xbox GameBar Extension/ Widget 使用C#和XAML做開發。
先是建立一個Blank App 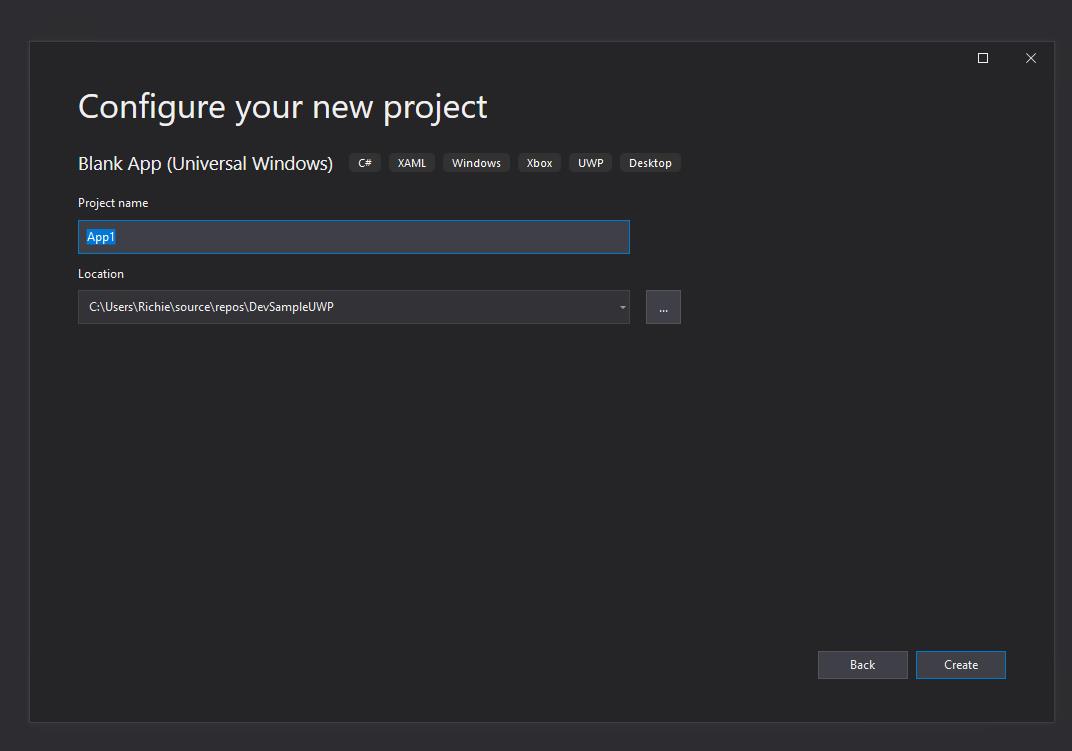
然後去Nuget package 尋找 Microsoft.Gaming.XboxGameBar 並安裝 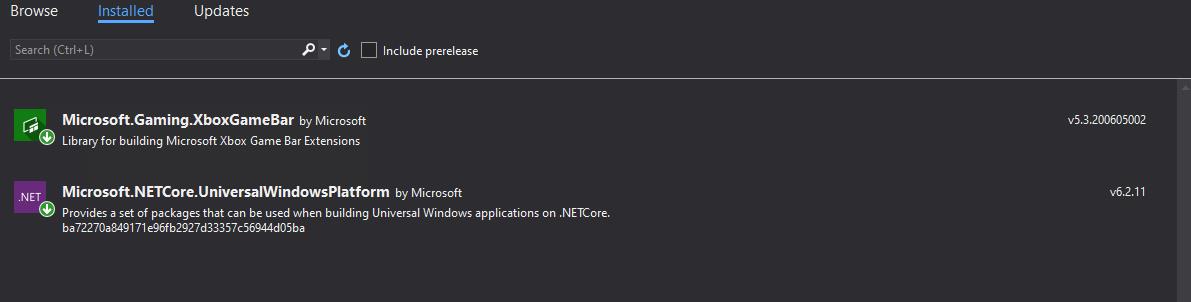
然後再修改 Package.manifest 檔案
<Package
  xmlns="http://schemas.microsoft.com/appx/manifest/foundation/windows10"
  xmlns:mp="http://schemas.microsoft.com/appx/2014/phone/manifest"
  xmlns:uap="http://schemas.microsoft.com/appx/manifest/uap/windows10"
  xmlns:uap3="http://schemas.microsoft.com/appx/manifest/uap/windows10/3"
  IgnorableNamespaces="uap mp uap3">
先加入 UAP3 的 namespace!然後再Application 裡面加入 Extensions,並使用 windows.appExtension 的Category
<Extensions>
				<uap3:Extension Category="windows.appExtension">
					<uap3:AppExtension Name="microsoft.gameBarUIExtension"
									   Id="JustADemo"
									   Description="DemoGameBarApp"
									   DisplayName="JustADemo"
									   PublicFolder="GameBar\Ext1">
						<uap3:Properties>
							<GameBarWidget Type="Standard">
								<HomeMenuVisible>true</HomeMenuVisible>
								<PinningSupported>true</PinningSupported>
								<Window>
									<Size>
										<Height>300</Height>
										<Width>400</Width>
										<MinHeight>150</MinHeight>
										<MinWidth>200</MinWidth>
										<MaxHeight>350</MaxHeight>
										<MaxWidth>450</MaxWidth>
									</Size>
									<ResizeSupported>
										<Horizontal>true</Horizontal>
										<Vertical>true</Vertical>
									</ResizeSupported>
								</Window>
							</GameBarWidget>
						</uap3:Properties>
					</uap3:AppExtension>
				</uap3:Extension>
			</Extensions>
然後把 uap3:AppExtension 的名稱固定為 microsoft.gameBarUIExtension並且定義 uap3:Properties的相關屬性。
必要元素
| XML 元素名稱 | XML 屬性名稱 | XML 值 | 說明 |
| GameBarWidget | Type | Standard | 一般應用程式類型 |
| GameBarWidget | Type | Setting | 該應用程式之設定 |
選用屬性
- HomeMenuVisible 可以決定是否要顯示在 GameBar的Menu上,可以是 true \ false
- PinningSupported 可以讓使用這釘選在 overlay上,可以是 true \ false
- SettingsSupported 讓該Widget可以整合Settings選單在 Widget titlebar 上,AppExtensionId 必須要和Widget的ID符合 (也就是 uap3:ApplicationExtension 元素內的 Id 屬性 )
- Window 元素 可以在該元素下對 Widget app做相關的 Window設定
- Size元素 可以放置Widget的Window相關大小限制 可以放 Height, Width, MinHeight, MinWidth, MaAcHeight, MaxWidth
- ResizeSupported 元素 決定是否讓 Widget可以支援調整視窗大小 ( 就算不放依然可以在程式碼中做大小調整 )
- Horizontal 能夠調整水平大小,可以是 true \ false
- Vertical 能夠調整垂直大小,可以是 true \ false
- ActiveAfterInstall 讓安裝好的Widget自動啟動當啟用GameBar overlay的時候,可以是 true \ false
然後建議宣告成部會顯示在 app list 上,如下程式碼調整
<Application Id="App"
		  Executable="$targetnametoken$.exe"
		  EntryPoint="DevSampleUWP.GameBarApp.App">
			<uap:VisualElements
			  DisplayName="DevSampleUWP.GameBarApp"
			  Square150x150Logo="Assets\Square150x150Logo.png"
			  Square44x44Logo="Assets\Square44x44Logo.png"
			  Description="DevSampleUWP.GameBarApp"
			  BackgroundColor="transparent"
			  AppListEntry="none">
				<uap:DefaultTile Wide310x150Logo="Assets\Wide310x150Logo.png"/>
				<uap:SplashScreen Image="Assets\SplashScreen.png" />
			</uap:VisualElements>
把AppListEntry設定為 none就可以。
最後在 Applications 的元素外面加入Extensions如下
<Extensions>
    <!-- Enlighten COM on where to find Metadata Based Marshaling (MBM) data for the Game Bar private types
       <Path> is a required element (by VS) and has to point to a binary in the package, but it's not used when the class id is 00000355-0000-0000-C000-000000000046 (MBM). Due to that we just put the Microsoft.Gaming.XboxGameBar.winmd here. -->
    <Extension Category="windows.activatableClass.proxyStub">
      <ProxyStub ClassId="00000355-0000-0000-C000-000000000046">
        <Path>Microsoft.Gaming.XboxGameBar.winmd</Path>

        <!-- include when using SDK version 5.1+-->
        <Interface Name="Microsoft.Gaming.XboxGameBar.Private.IXboxGameBarWidgetAuthHost" InterfaceId="DC263529-B12F-469E-BB35-B94069F5B15A" />
        <Interface Name="Microsoft.Gaming.XboxGameBar.Private.IXboxGameBarWidgetControlHost" InterfaceId="C309CAC7-8435-4082-8F37-784523747047" />
        <Interface Name="Microsoft.Gaming.XboxGameBar.Private.IXboxGameBarNavigationKeyCombo" InterfaceId="5EEA3DBF-09BB-42A5-B491-CF561E33C172" />
        <Interface Name="Microsoft.Gaming.XboxGameBar.Private.IXboxGameBarWidgetActivatedEventArgsPrivate" InterfaceId="782535A7-9407-4572-BFCB-316B4086F102" />
        <Interface Name="Microsoft.Gaming.XboxGameBar.Private.IXboxGameBarWidgetHost" InterfaceId="5D12BC93-212B-4B9F-9091-76B73BF56525" />
        <Interface Name="Microsoft.Gaming.XboxGameBar.Private.IXboxGameBarWidgetPrivate" InterfaceId="22ABA97F-FB0F-4439-9BDD-2C67B2D5AA8F" />

        <!-- include when using SDK version 5.3+-->
        <Interface Name="Microsoft.Gaming.XboxGameBar.Private.IXboxGameBarWidgetHost2" InterfaceId="28717C8B-D8E8-47A8-AF47-A1D5263BAE9B" />
        <Interface Name="Microsoft.Gaming.XboxGameBar.Private.IXboxGameBarWidgetPrivate2" InterfaceId="B2F7DB8C-7540-48DA-9B46-4E60CE0D9DEB" />

      </ProxyStub>
    </Extension>
  </Extensions>
到這邊就已經算是把Manifest設定完成了! 接下來準備開始修改程式碼的部分(只要調整一點點就好!)
開啟 App.xaml.cs 檔案,並加入 Microsoft.Gaming.XboxGameBar 命名空間
using Microsoft.Gaming.XboxGameBar;
然後需要 override Application提供的 OnActived(IActivatedEventArgs args) 方法
private XboxGameBarWidget widget = null;
protected override void OnActivated(IActivatedEventArgs args)
		{
			XboxGameBarWidgetActivatedEventArgs widgetArgs = null;

			if (args.Kind == ActivationKind.Protocol && args is IProtocolActivatedEventArgs protoArg && protoArg.Uri.Scheme.Equals("ms-gamebarwidget"))
			{
				widgetArgs = args as XboxGameBarWidgetActivatedEventArgs;
			}

			if (widgetArgs != null)
			{
				if (widgetArgs.IsLaunchActivation)
				{
					var rootFrame = new Frame();
					rootFrame.NavigationFailed += OnNavigationFailed;
					Window.Current.Content = rootFrame;
					widget = new XboxGameBarWidget(widgetArgs, Window.Current.CoreWindow, rootFrame);
					rootFrame.Navigate(typeof(WidgetPage));
					Window.Current.Closed += WidgetWindow_Closed;
					Window.Current.Activate();
				}
				else
				{

				}
			}
		}

private void WidgetWindow_Closed(object sender, Windows.UI.Core.CoreWindowEventArgs e)
		{
			widget = null;
			Window.Current.Closed -= WidgetWindow_Closed;
		}
這邊說明一下,啟動Widget的方式會是使用 protocol去抓取protocol 的URI Scheme如果是 ms-gamebarwidget 。
然後可以從 IsLaunchActivation的屬性來決定是否要建立Frame,這邊跟一班UWP啟動會是由 OnLaunched並抓取Window.Current.Content 是否為 Frame物件不同! 這些調整完之後就可以部屬到系統上執行,部屬成功後就可以在 GameBar menu的 Wdiget 列表中顯示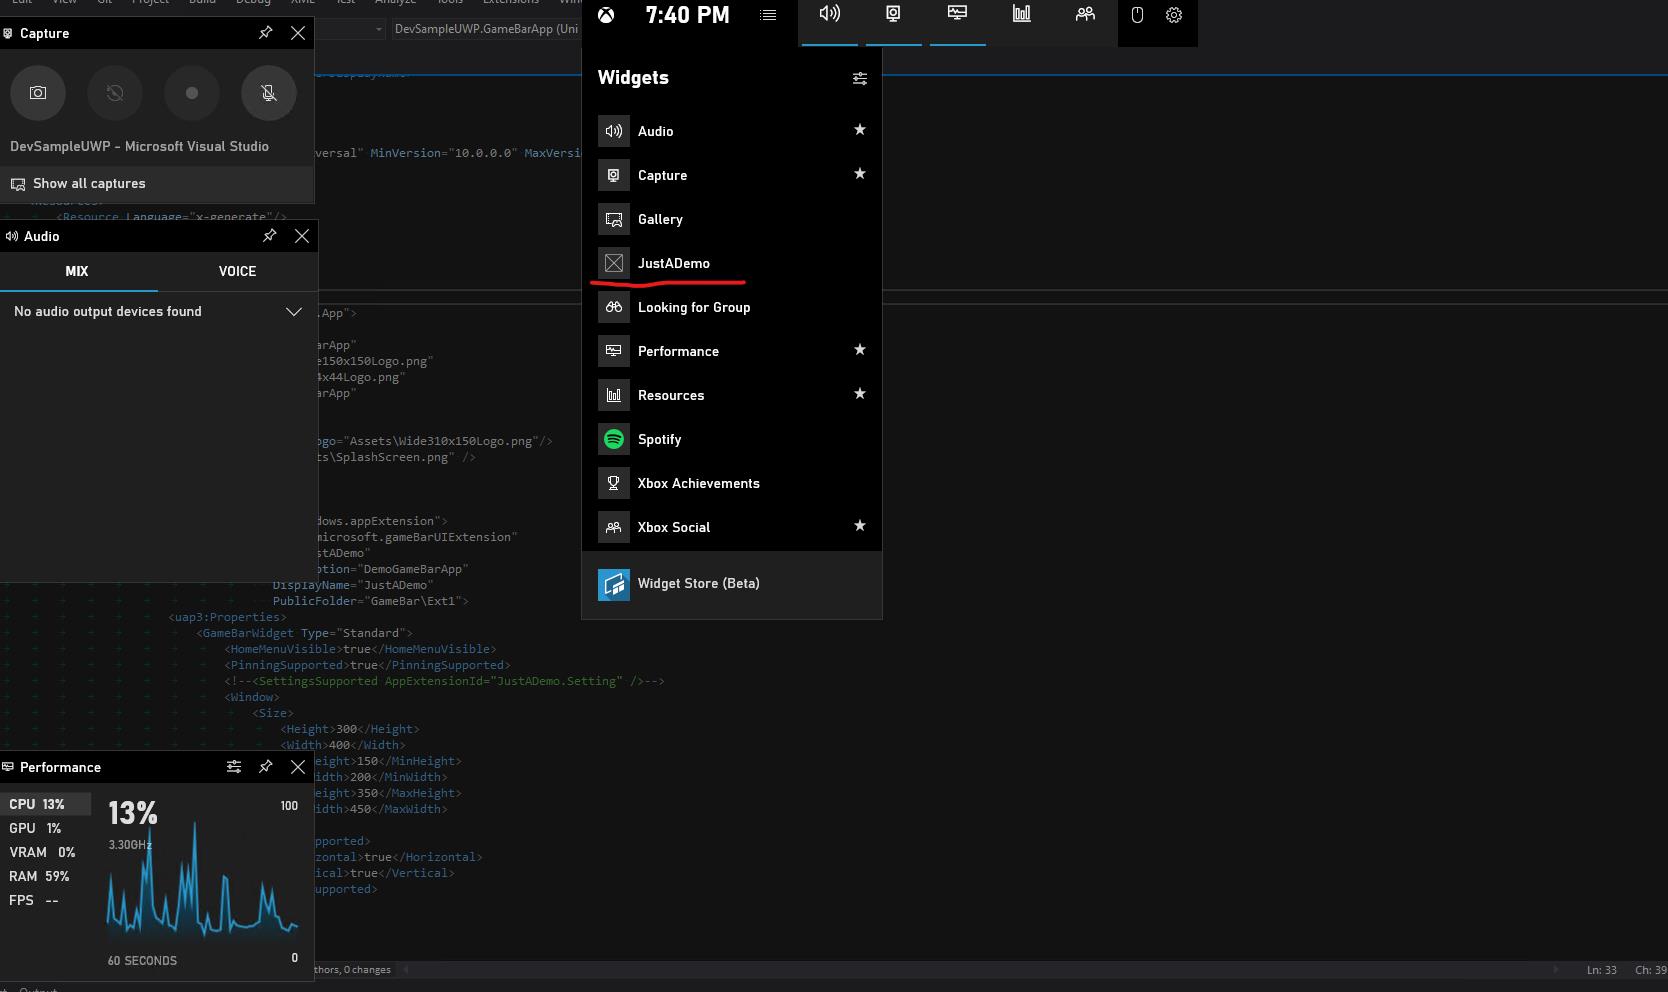
然後啟動該Widget的畫面如下,HomeMenuVisible 和 PinningSupported ( JustADemo 那行右側有個小圖釘 ) 都正常出現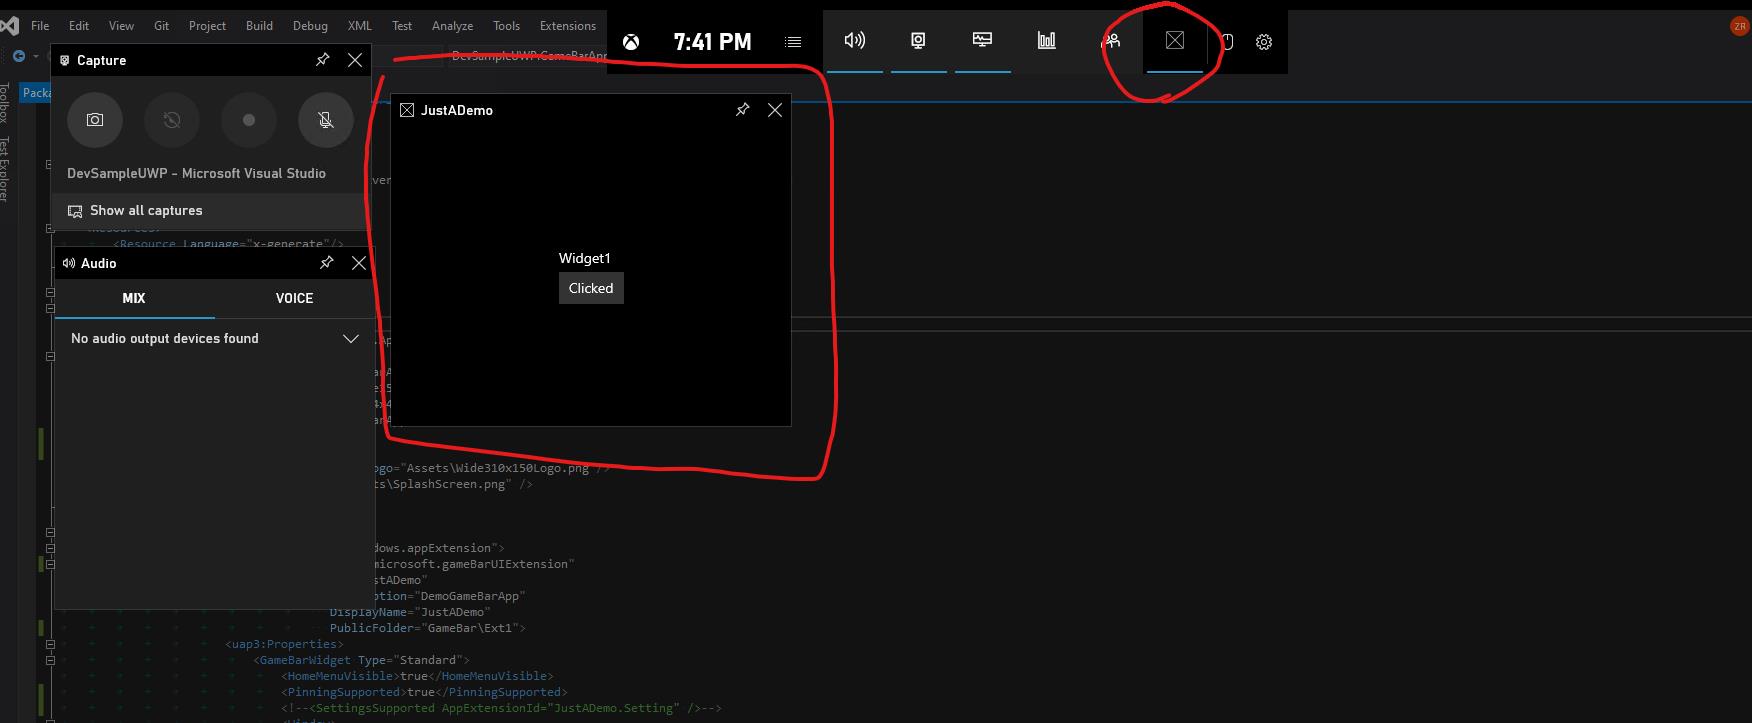
加入Widget Setting的方式就是如上所說的加入SettingsSupported 然後再加入另一個 uap3:Extensions 如下Code
<Extensions>
				<uap3:Extension Category="windows.appExtension">
					<uap3:AppExtension Name="microsoft.gameBarUIExtension"
									   Id="JustADemo"
									   Description="DemoGameBarApp"
									   DisplayName="JustADemo"
									   PublicFolder="GameBar\Ext1">
						<uap3:Properties>
							<GameBarWidget Type="Standard">
								<HomeMenuVisible>true</HomeMenuVisible>
								<PinningSupported>true</PinningSupported>
								<SettingsSupported AppExtensionId="JustADemoSetting" />
								<ActivateAfterInstall>true</ActivateAfterInstall>
								<Window>
									<Size>
										<Height>300</Height>
										<Width>400</Width>
										<MinHeight>150</MinHeight>
										<MinWidth>200</MinWidth>
										<MaxHeight>350</MaxHeight>
										<MaxWidth>450</MaxWidth>
									</Size>
									<ResizeSupported>
										<Horizontal>true</Horizontal>
										<Vertical>true</Vertical>
									</ResizeSupported>
								</Window>
							</GameBarWidget>
						</uap3:Properties>
					</uap3:AppExtension>
				</uap3:Extension>
                <!-- Widget Settings -->
				<uap3:Extension Category="windows.appExtension">
					<uap3:AppExtension Name="microsoft.gameBarUIExtension"
									   Id="JustADemoSetting"
									   DisplayName="JustADemo setting"
									   Description="JustADemo setting page"
									   PublicFolder="GameBar\Ext1">
						<uap3:Properties>
							<GameBarWidget Type="Settings">
								<Window>
									<Size>
										<Height>300</Height>
										<Width>300</Width>
									</Size>
									<ResizeSupported>
										<Horizontal>false</Horizontal>
										<Vertical>false</Vertical>
									</ResizeSupported>
								</Window>
							</GameBarWidget>
						</uap3:Properties>
					</uap3:AppExtension>
				</uap3:Extension>
			</Extensions>
然後將WdigetPage ( 主要的 Widget ) 做些調整,如下Code
if (widgetArgs.IsLaunchActivation)
				{
					var rootFrame = new Frame();
					rootFrame.NavigationFailed += OnNavigationFailed;
					Window.Current.Content = rootFrame;
					switch (widgetArgs.AppExtensionId)
					{
						case "JustADemo":
							widget = new XboxGameBarWidget(widgetArgs, Window.Current.CoreWindow, rootFrame);
							rootFrame.Navigate(typeof(WidgetPage), widget);
							Window.Current.Closed += WidgetWindow_Closed;
							break;
						case "JustADemoSetting":
							widgetSetting = new XboxGameBarWidget(widgetArgs, Window.Current.CoreWindow, rootFrame);
							rootFrame.Navigate(typeof(WidgetSettingPage));
							Window.Current.Closed += SettingWidgetWindow_Closed;
							break;
						default:
							break;
					}
					await SimpleLogWriterAsync($"{DateTime.Now}\t The id of extension => {widgetArgs.AppExtensionId}");
					Window.Current.Activate();
				}
主要加入判斷widget 的 eventargs 內的 AppExtensionId 的流程判斷!然後再 WidgetPage 將 Widget實體帶入。
接者修改 WidgetPage一下,請看下方的Code
private XboxGameBarWidget _widget;
protected override void OnNavigatedTo(NavigationEventArgs e)
		{
			if (TryExtractParameter(e, out var widget))
			{
				_widget = widget;
				SetupWidge();
			}

			base.OnNavigatedTo(e);
		}

		private void SetupWidge()
		{
			_widget.SettingsClicked += OnSettingsClicked;
		}

		private async void OnSettingsClicked(XboxGameBarWidget sender, object args)
		{
			await _widget.ActivateSettingsAsync();
		}

		private bool TryExtractParameter(NavigationEventArgs e, out XboxGameBarWidget widget)
		{
			widget = null;
			if (e.Parameter is XboxGameBarWidget _widget)
			{
				widget = _widget;
				return true;
			}

			return false;
		}
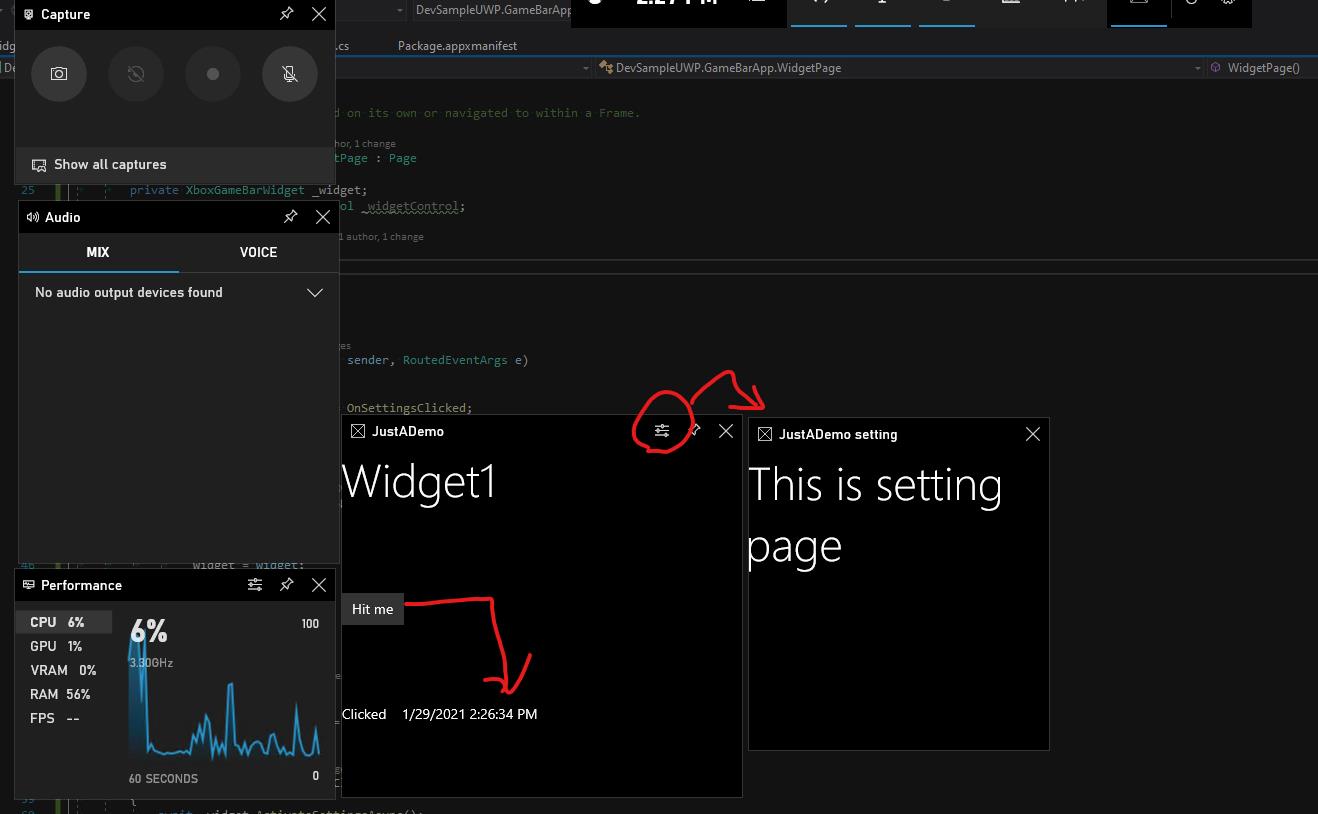
這邊寫過UWP的朋友就會知道要在OnNavigatedTo的地方取出參數,然後把SettingClicked的事件處理函式使用Widget去啟動Setting!這邊會重新拋給App.xaml.cs的OnActivated再次透過AppExtensionId來啟動。
執行起來結果如下~
如果出現這樣錯誤訊息
請調整成 x64或是x86 的編譯並刪除掉 bin和obj的資料夾!
Extra Try 這邊我試了一下配合 Desktop bridge 的方式包裝 UWP和Desktop exe來看看是否能夠在Xbox gamebar 使用...
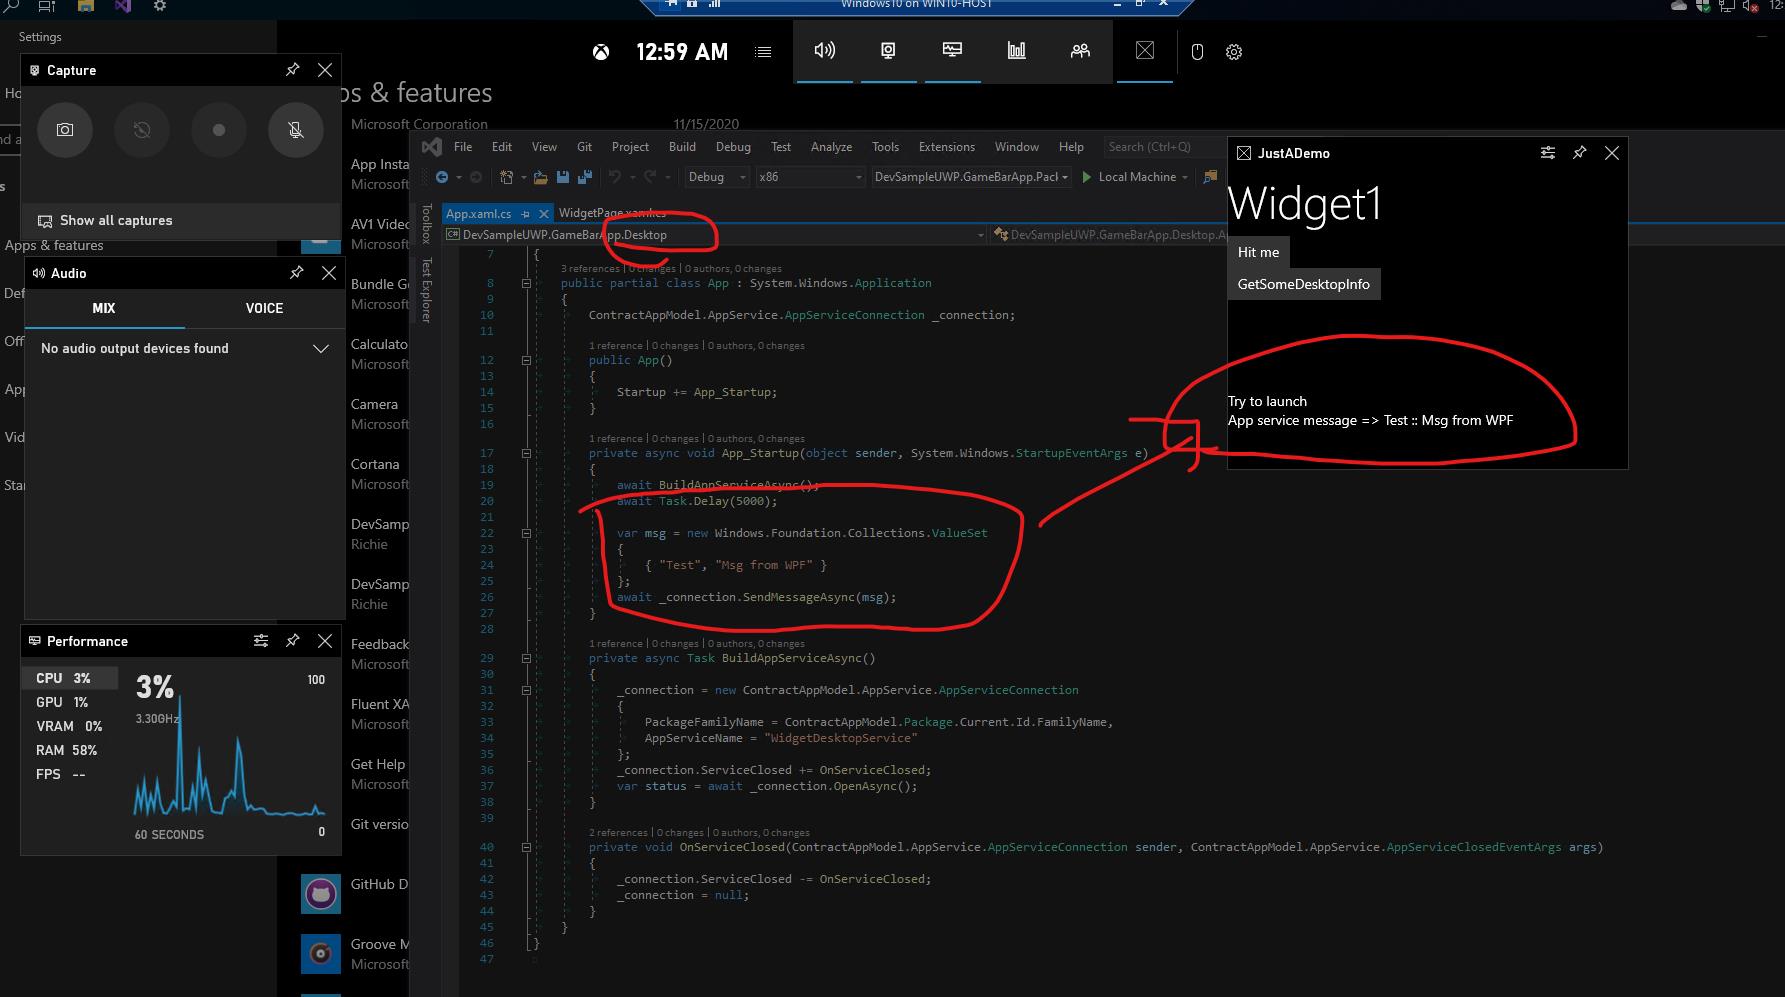 看起來只需要透過 AppService 就可以配合上使用 Desktop Bridge 去呼叫一些 Win32 PInvoke的相關API了!
總結
Xbox GameBar app extension 可以整合一些不錯使用情境,比如設定遊戲鍵盤滑鼠的相關設定或是監看系統資源或是跟遊戲的通訊做整合甚至是直播。 比較注意的是如果需要使用Desktop SDK跟UWP這邊做溝通似乎不能夠使用
相關連結 : Microsoft Docs, Github Samples
***以上Code以及說明都有可能隨著Windows 10 的版本以及Visual Studio 版本有所調整!***
參考資料 Microsoft Docs,Windows Blogs for developer
下次再分享Windows 10 的新技術拉~