介紹微軟在Build 2016為UWP在Anniversary update帶給開發人員的新功能。
本篇文章將介紹在Build 2016微軟即將釋出的Windows 10 年度更新的SDK將強化Action Center, Toast, Tile的部分!
先複習一下去年在Windows 10的幾項重點功能:
- Action Center->之前在Windows phone 8.1的通知訊息管理功能統一帶入到Window 10的家族。
- Adaptive Toast ->可以快速操作接收到的通知訊息。
- Adaptive Tile->可以使用XML來製作更多的Tile樣板。
先說說在Action Center的部份八~Action Center包含了通知的歷史紀錄!所以可以看到APP收到通知的歷程,而現在使用者基本上會有兩三台裝置(以本人來說就有PC, NB, Mobile都是Win10)但一直會有每個通知都需要在不同裝置做清除或回覆的動作!今年MSFT帶來了兩個實用功能在Action Center上!
- Notification Mirroring
- Universal Dismiss
所以在Windows 10的裝置上需要有Cortana支援的國家語系(繁體中文-台灣 還沒有支援...)並且是使用同一組Microsoft Account作為綁定/連結的帳戶才行!這樣技術採用的方式是將Cortana作為雲端的Roaming notification通知到各個裝置上。
如果不需要Notification mirroring的功能在UWP APP可以在參考以下的C# Code
var content = new ToastContent()
{
 // do your code on toast content.
};

var toast = new ToastNotification(content.GetXml())
{
 Mirroring = NotificationMirroring.Disabled
};

ToastNotificationManager.CreateToastNotifier().Show(toast);
或是想要一次性的關閉Notification mirroring功能參考如下Code
ToastNotificationManager.ConfigureNotificationMirroring(NotificationMirroring.Disabled);
在Android上的Java Code
NotificationCompat.Builder mBuilder = new NotificationCompat.Builder(this).setContentTitle("Title").setContentText("Content text");
Bundle extras = new Bundle();
extras.putString("X-WNS-Mirroring","disabled");
mBuilder.setExtras(extras);
NotificationManager mNotificationMgr = (NotificationManager)getSystemService(Context.NOTIFICATION_SERVICE);
mNotificationMgr.notify(5,builder.build());
接者來說明另外一個功能 Universal Dissmiss,Universal Dissmiss就是在其中一裝置移除某個通知再通知中心的時候會一並同步到有使用Notification mirroring的裝置上!這個功能如同上一個功能Notification mirroring的環境需求。而且需要加入某個屬性
UWP參考如下的C# Code
var content = new ToastContent()
{
 // do your code on toast content.
};

var toast = new ScheduledToastNotification(content.GetXml(), startTime)
{
 RemoteId = $"Your guid in here"
};

ToastNotificationManager.CreateToastNotifier().AddToSchedule(toast);
在Andorid的Java code如下
NotificationCompat.Builder mBuilder = new NotificationCompat.Builder(this).setContentTitle("Title").setContentText("Content text");
Bundle extras = new Bundle();
extras.putString("X-WNS-RemoteId", "your guid in here");
mBuilder.setExtras(extras);
NotificationManager mNotificationMgr = (NotificationManager)getSystemService(Context.NOTIFICATION_SERVICE);
mNotificationMgr.notify(5,builder.build());
總結來說Action center的這兩項功能基於將Cortana作為一Sync platform來實現這樣同步的功能!對於iOS來說MSFT也正在進行開發在Build 2016時還無法時做出來~所以目前還沒辦法在iOS上實現Notification mirroring, Universal dismiss功能。
假設一下情境當手機收到SMS的時候發出Toast notification且該裝置有啟用Notification mirroring以及Universal dismiss功能,你的Win 10 裝置也會收到該通知!如果這時候用Win10的通知回復功能則是會同步由手機傳送該SMS訊息。
接者來說今年Build 2016還為Tile, Toast帶來甚麼樣的新功能!
Tile(動態磚)一直以來都是Windows App的簡易又方便的功能,以目前來說動態磚上正在顯示的資訊就沒有辦法在Launch App的時候就可以優先顯示。但這功能在今年的Build帶來Chaseable Tile(可追蹤式動態磚)假設一情件就是你在Tile上看到想要知道詳情的動態但是開啟APP後又無法快速地顯示出來。
這個功能需要怎樣可以被實作呢?在以下的Tile notification的XML說明
<tile>
<visual arguments="action=storyClicked&story=201c9b1">
...
<binding
template="TileLarge"
arguments="action=storiesClicked&story=43f939ag&story=201c9b1&story=d9481ca">
<text>Before San Bernardino...</text>
... (another story)
... (one more story)
</binding>
</visual>
</tile>
需要再visual的部分加入arguments的屬性,然後再和toast處理方式一樣在OnLaunched事件處理args的TileActivatedInformation是否為null以及在TileActivatedInformation.RecentlyShownNotifications是否有顯示在UI上。
如下Sample code
protected override void OnLaunched(LaunchActivatedEventArgs args)
{
    if (args.TileActivatedInfo != null)
    {
        if (args.TileActivatedInfo.RecentlyShownNotifications.Count > 0)
        {
            string[] allArgs = args.TileActivatedInfo.RecentlyShownNotifications.Select(i => i.Arguments).ToArray();
        }
    }
}
接者實際測試的執行截圖,先是把Wide的Tile給予Arguments接著並在OnLaunch得時候佳儒上的Sample Code。
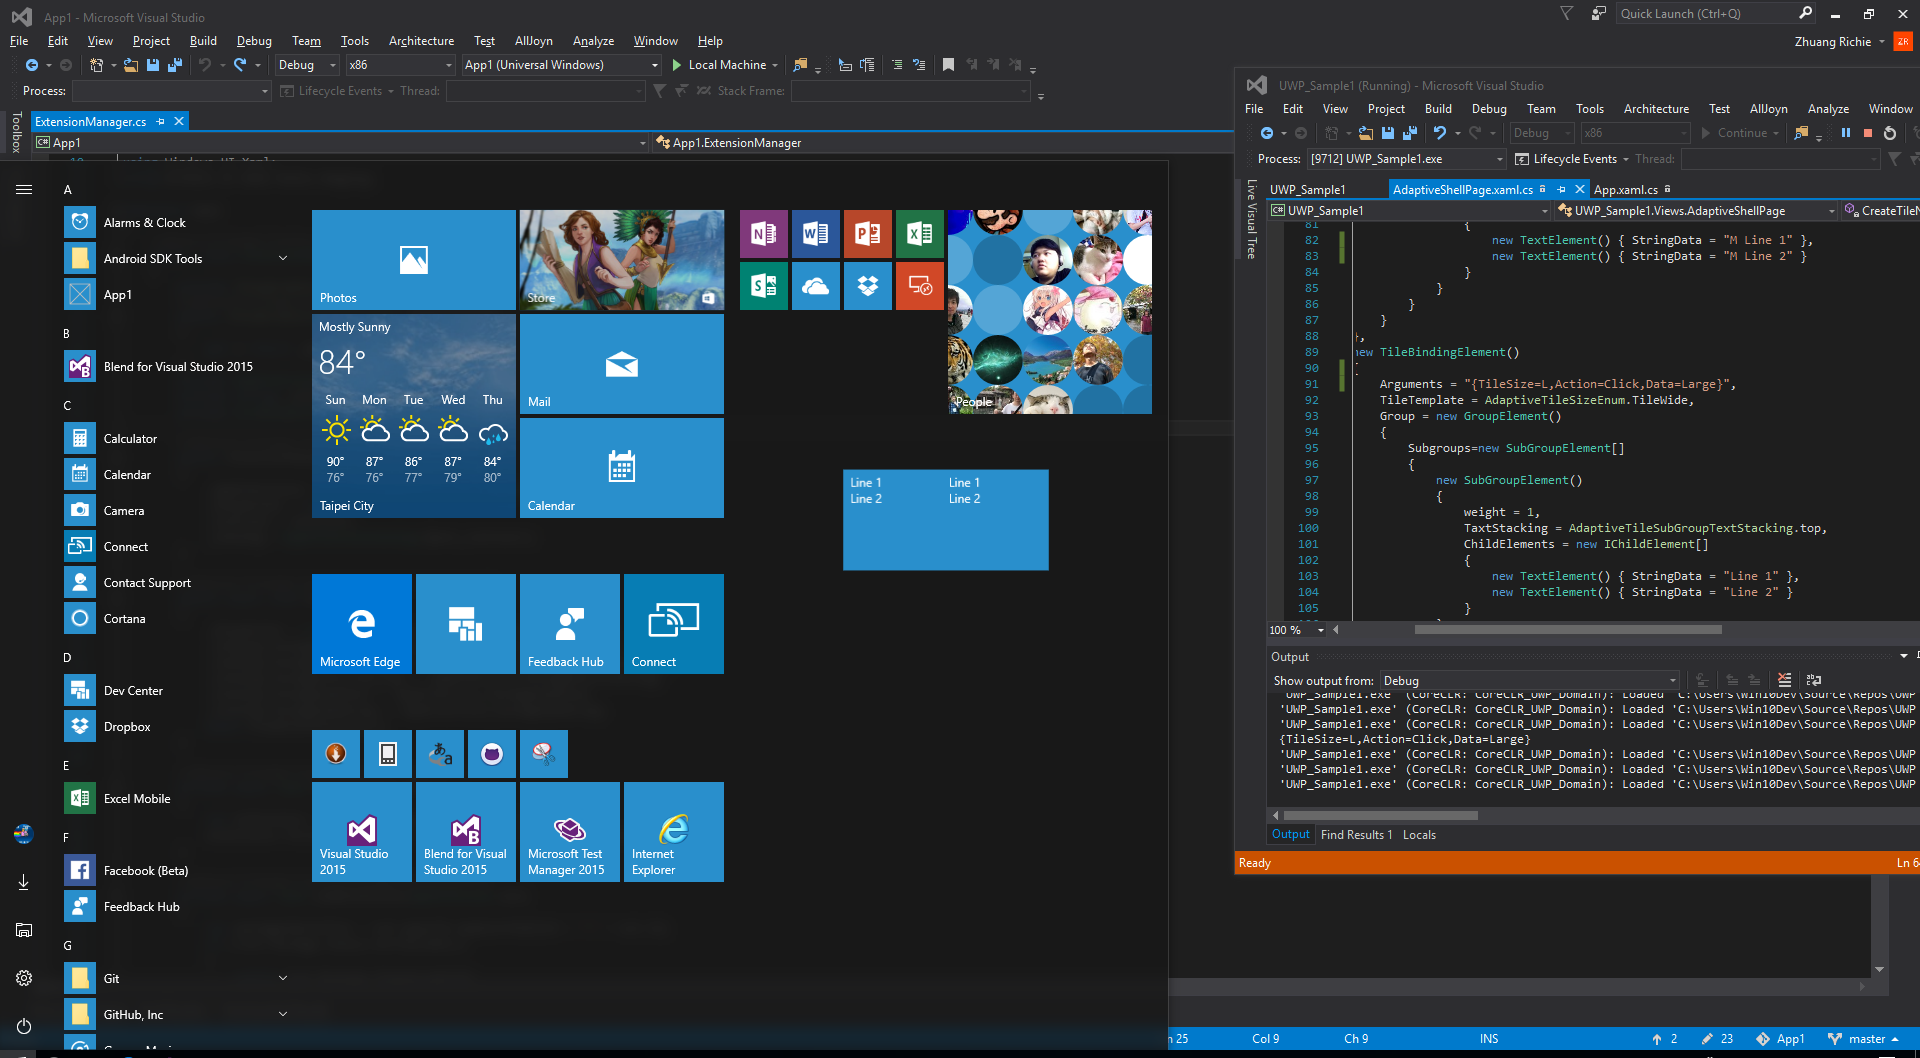
接者說明一下 Toast的重大更新~ 以前Toast的時候會類似像這樣的方式在Action Center
Toast、Action center的新的屬性如下所列
- image的placement有了hero的enum將會在toast的最上方並獲得的顯示空間。
- text也多了個placement的屬性可設定成attribution,類似像註記的顯示方式。
- 在Toast的action多了個placement的屬性,知道可以這定contextMenu的選單或快速Launch Settings的notification頁面或是關閉這支APP的toast通知。
- Action center的紀錄存取權限!
- Action center的UI小變化(Application Icon, More text lines in collapsed, Image size )
- 更多客製化的選項在Settings app
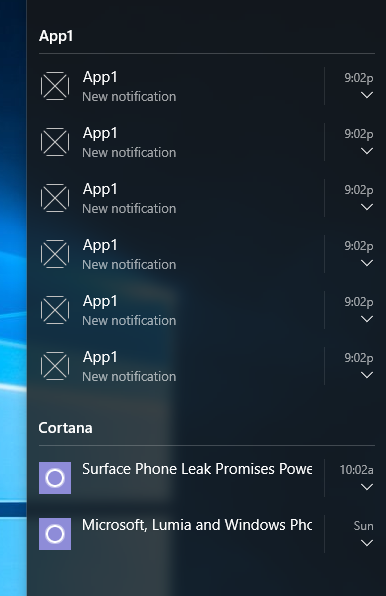 依照個別的Toast來做Grouping的動作而且App如果有使用response toast也會被壓縮成如上的方式(有個下拉選單在右邊),而現在UWP的Windows 10 Anniversary update上將帶來 Adaptive Toast 就如同去年介紹到的 Adaptive Tile一樣在Toast支援了grouping的功能!
先複習一下之前的Adaptive tile的XML語法大致如下
<tile>
   <visual version="3" branding="none" addImageQuery="false">
      <binding template="TileMedium" branding="none" addImageQuery="false" hint-textStacking="top" hint-overlay="0">
         <group>
            <subgroup hint-weight="1" hint-textStacking="top">
               <text hint-maxLines="0" hint-minLines="0" hint-wrap="false" hint-align="left" hint-style="caption">Line 1</text>
               <text hint-maxLines="0" hint-minLines="0" hint-wrap="false" hint-align="left" hint-style="caption">Line 2</text>
            </subgroup>
            <subgroup hint-weight="1" hint-textStacking="center">
               <text hint-maxLines="0" hint-minLines="0" hint-wrap="false" hint-align="left" hint-style="caption">Line 1</text>
               <text hint-maxLines="0" hint-minLines="0" hint-wrap="false" hint-align="left" hint-style="caption">Line 2</text>
            </subgroup>
         </group>
      </binding>
      <binding template="TileWide" branding="none" addImageQuery="false" hint-textStacking="top" hint-overlay="0">
         <group>
            <subgroup hint-weight="1" hint-textStacking="top">
               <text hint-maxLines="0" hint-minLines="0" hint-wrap="false" hint-align="left" hint-style="caption">Line 1</text>
               <text hint-maxLines="0" hint-minLines="0" hint-wrap="false" hint-align="left" hint-style="caption">Line 2</text>
            </subgroup>
         </group>
      </binding>
      <binding template="TileLarge" branding="none" addImageQuery="false" hint-textStacking="top" hint-overlay="0">
         <group>
            <subgroup hint-weight="1" hint-textStacking="top">
               <text hint-maxLines="0" hint-minLines="0" hint-wrap="false" hint-align="left" hint-style="caption">Line 1</text>
               <text hint-maxLines="0" hint-minLines="0" hint-wrap="false" hint-align="left" hint-style="caption">Line 2</text>
            </subgroup>
            <subgroup hint-weight="1" hint-textStacking="top">
               <text hint-maxLines="0" hint-minLines="0" hint-wrap="false" hint-align="left" hint-style="caption">Line 1</text>
               <text hint-maxLines="0" hint-minLines="0" hint-wrap="false" hint-align="left" hint-style="caption">Line 2</text>
            </subgroup>
         </group>
      </binding>
   </visual>
</tile>
在不同的binding(對Tile的template來說就是 tile的size大小) 支援了group以及subgroup的群組功能!
以下是XML code顯示如何簡單的實作adaptive toast功能
<toast>
   <visual >
      <binding template="ToastGeneric" >
         <text>Line 1</text>
         <text>Line 2</text>
         <image src="ms-appx:///Assets/Logo.png" placement="appLogoOverride" addImageQuery="false" hint-crop="circle" />
         <image src="ms-appx:///Assets/IC716666.png" placement="inline" alt="override" addImageQuery="false" hint-crop="none" />
      </binding>
   </visual>
   <actions hint-systemCommand="SnoozeAndDismiss">
      <input id="selections" type="selection" defaultInput="2">
         <selection id="1" content="s1" />
         <selection id="2" content="s2" />
         <selection id="3" content="s3" />
      </input>
      <input id="message" type="text" placeHolderContent="here" />
      <action content="primary" arguments="first" activationType="foreground" />
      <action content="secondary" arguments="secondary" activationType="background" />
   </actions>
</toast>
可以直接把剛剛上面用的apative tile的TileLarge內的group內的XML替換在toast的binding的內容
<toast>
   <visual>
      <binding template="ToastGeneric">
         <binding template="TileLarge" branding="none" addImageQuery="false" hint-textStacking="top" hint-overlay="0">
            <group>
               <subgroup hint-weight="1" hint-textStacking="top">
                  <text hint-maxLines="0" hint-minLines="0" hint-wrap="false" hint-align="left" hint-style="caption">Line 1</text>
                  <text hint-maxLines="0" hint-minLines="0" hint-wrap="false" hint-align="left" hint-style="caption">Line 2</text>
               </subgroup>
            </group>
         </binding>
      </binding>
   </visual>
   <actions hint-systemCommand="SnoozeAndDismiss">
      <input id="selections" type="selection" defaultInput="2">
         <selection id="1" content="s1" />
         <selection id="2" content="s2" />
         <selection id="3" content="s3" />
      </input>
      <input id="message" type="text" placeHolderContent="here" />
      <action content="primary" arguments="first" activationType="foreground" />
      <action content="secondary" arguments="secondary" activationType="background" />
   </actions>
</toast>
至於顯示的方式就如同Adaptive tile的TileLarge的Template的顯示方式一樣啦~
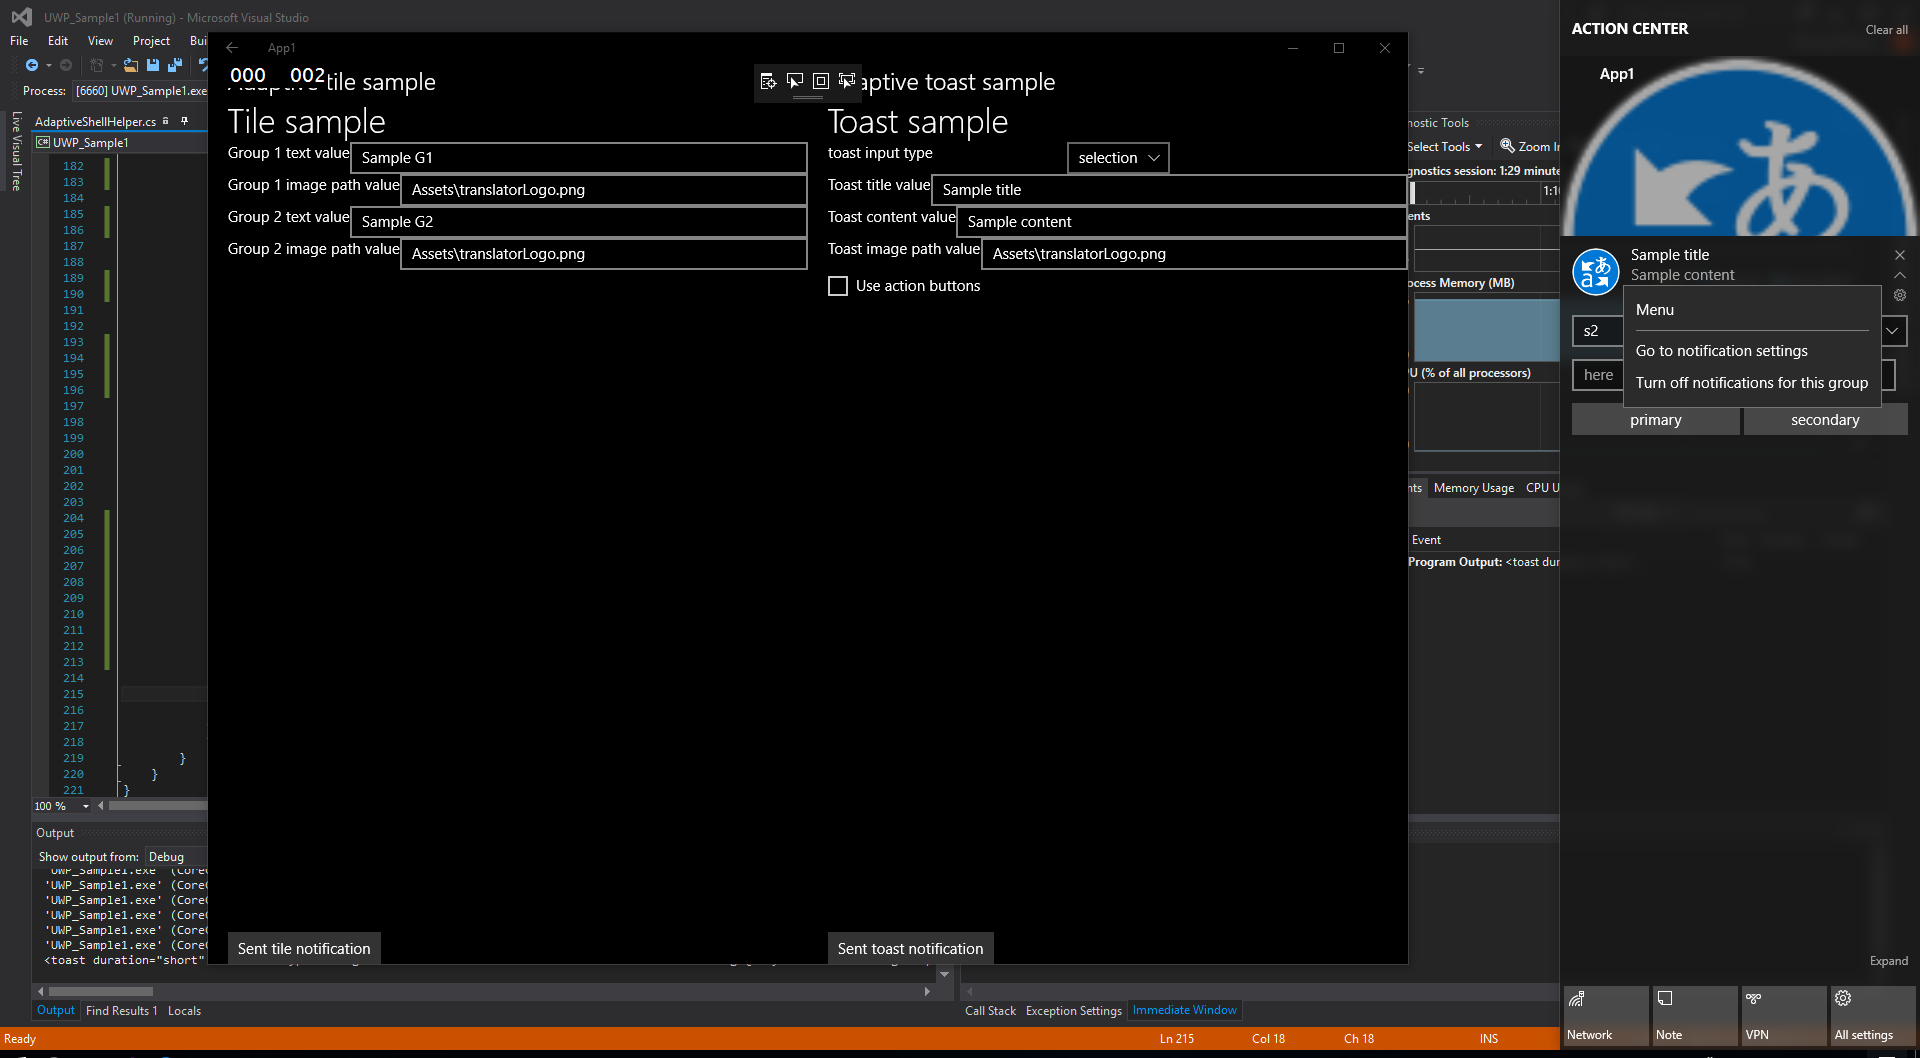
上圖所示包含Hero image、Action in context menu、Image size。
然後來說明一下如何實作Notification listener的功能吧!
先把Package.manifest使用XML的Editor開啟並調整以下部分
<?xml version="1.0" encoding="utf-8"?>
<Package
  xmlns="http://schemas.microsoft.com/appx/manifest/foundation/windows10"
  xmlns:mp="http://schemas.microsoft.com/appx/2014/phone/manifest"
  xmlns:uap="http://schemas.microsoft.com/appx/manifest/uap/windows10"
  xmlns:uap3="http://schemas.microsoft.com/appx/manifest/uap/windows10/3"
  IgnorableNamespaces="uap mp uap3">
  <Capabilities>
    <uap3:Capability Name="userNotificationListener" />
  </Capabilities>
</Package>
主要是加入xmlns的宣告!加入uap3的部分並且需要加入IgnorableNamespaces最後在Capabilities內使用uap3:Capability Name輸入userNotificationListener
這樣在宣告的部分就可以有能力取得Notification history了!
接者輸入以下C# Code、在UWP的特性下需要常用到ApiInformation的Class來判斷系統是否支援該功能!
if (ApiInformation.IsTypePresent("Windows.UI.Notifications.Management.UserNotificationListener"))
            {
                listener = UserNotificationListener.Current;
                var result = await listener.RequestAccessAsync();
                switch (result)
                {
                    case UserNotificationListenerAccessStatus.Allowed:
                        break;
                    case UserNotificationListenerAccessStatus.Denied:
                    case UserNotificationListenerAccessStatus.Unspecified:
                        ErrorMessage = string.Format($"{result}");
                        break;
                }
            }
            else
            {
                ErrorMessage = $"Need 1607 or upper";
            }
接者使用以下Code來抓取Notification的資訊
var rawList = await listener?.GetNotificationsAsync(NotificationKinds.Toast);
抓回來的rawList會是個ReadOnlyList<UserNotification>的列表!這邊需要帶入NotificationKind,目前只有Toast以及Unkown(可以來抓取Ghost notification)
而UserNotification的Class資訊如下
public sealed class UserNotification : IUserNotification
    {
        //
        // Summary:
        //     Gets info about the app that owns the notification.
        //
        // Returns:
        //     The app that owns the notification.
        public AppInfo AppInfo { get; }
        //
        // Summary:
        //     Gets the time at which the notification was created.
        //
        // Returns:
        //     The time at which the notification was created.
        public DateTimeOffset CreationTime { get; }
        //
        // Summary:
        //     Gets the ID of the notification.
        //
        // Returns:
        //     The ID of the notification.
        public System.UInt32 Id { get; }
        //
        // Summary:
        //     Gets the notification content.
        //
        // Returns:
        //     The notification content.
        public Notification Notification { get; }
    }
而Listener本身能夠 取得單筆Notification、移除單筆Notification或是清除整個Notification history!
//抓取單筆Notification
var notification = listener?.GetNotification(notificationId);
//移除單筆Notification
listener?.RemoveNotification(notificationId);
//清除Notification history
listener?.ClearNotifications();
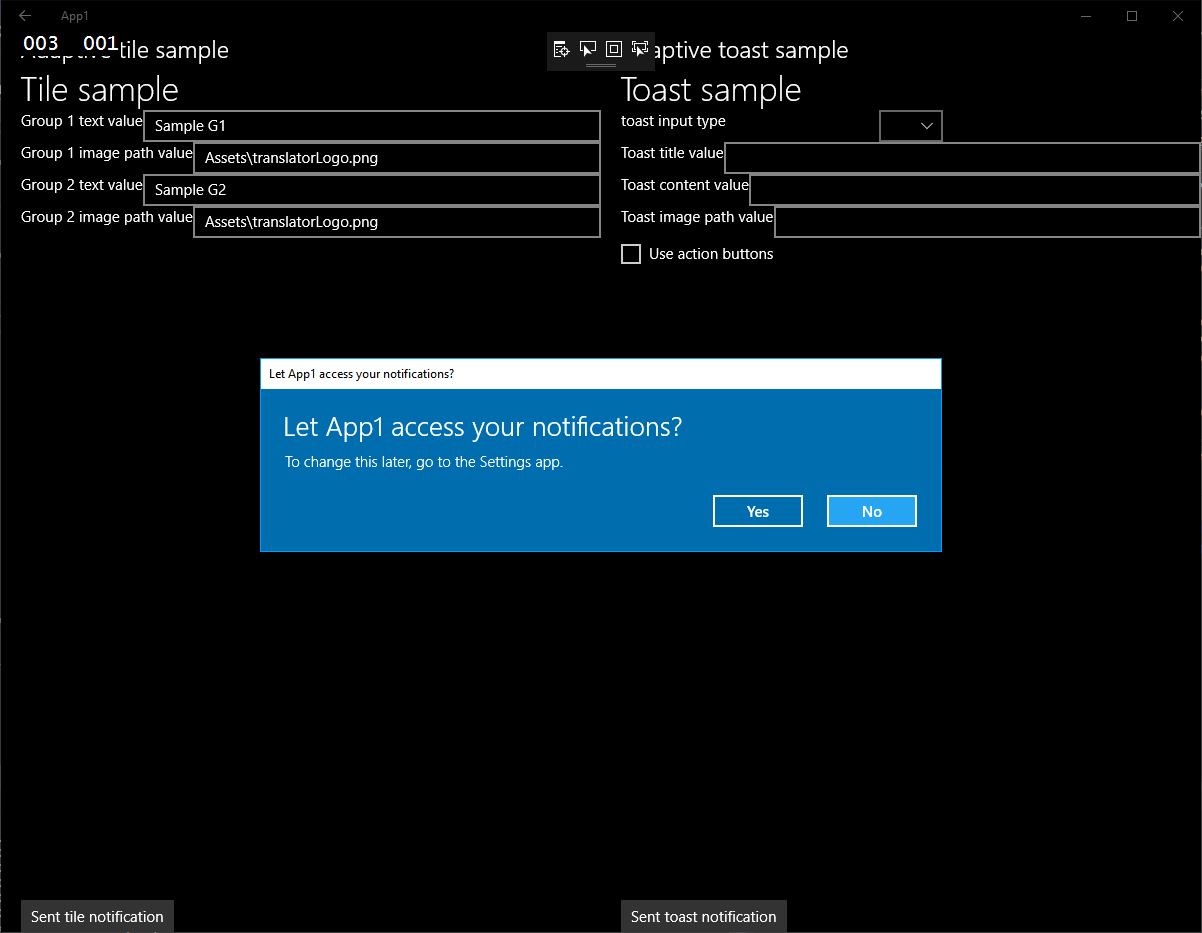 以上截圖是在Request access的Dialog!
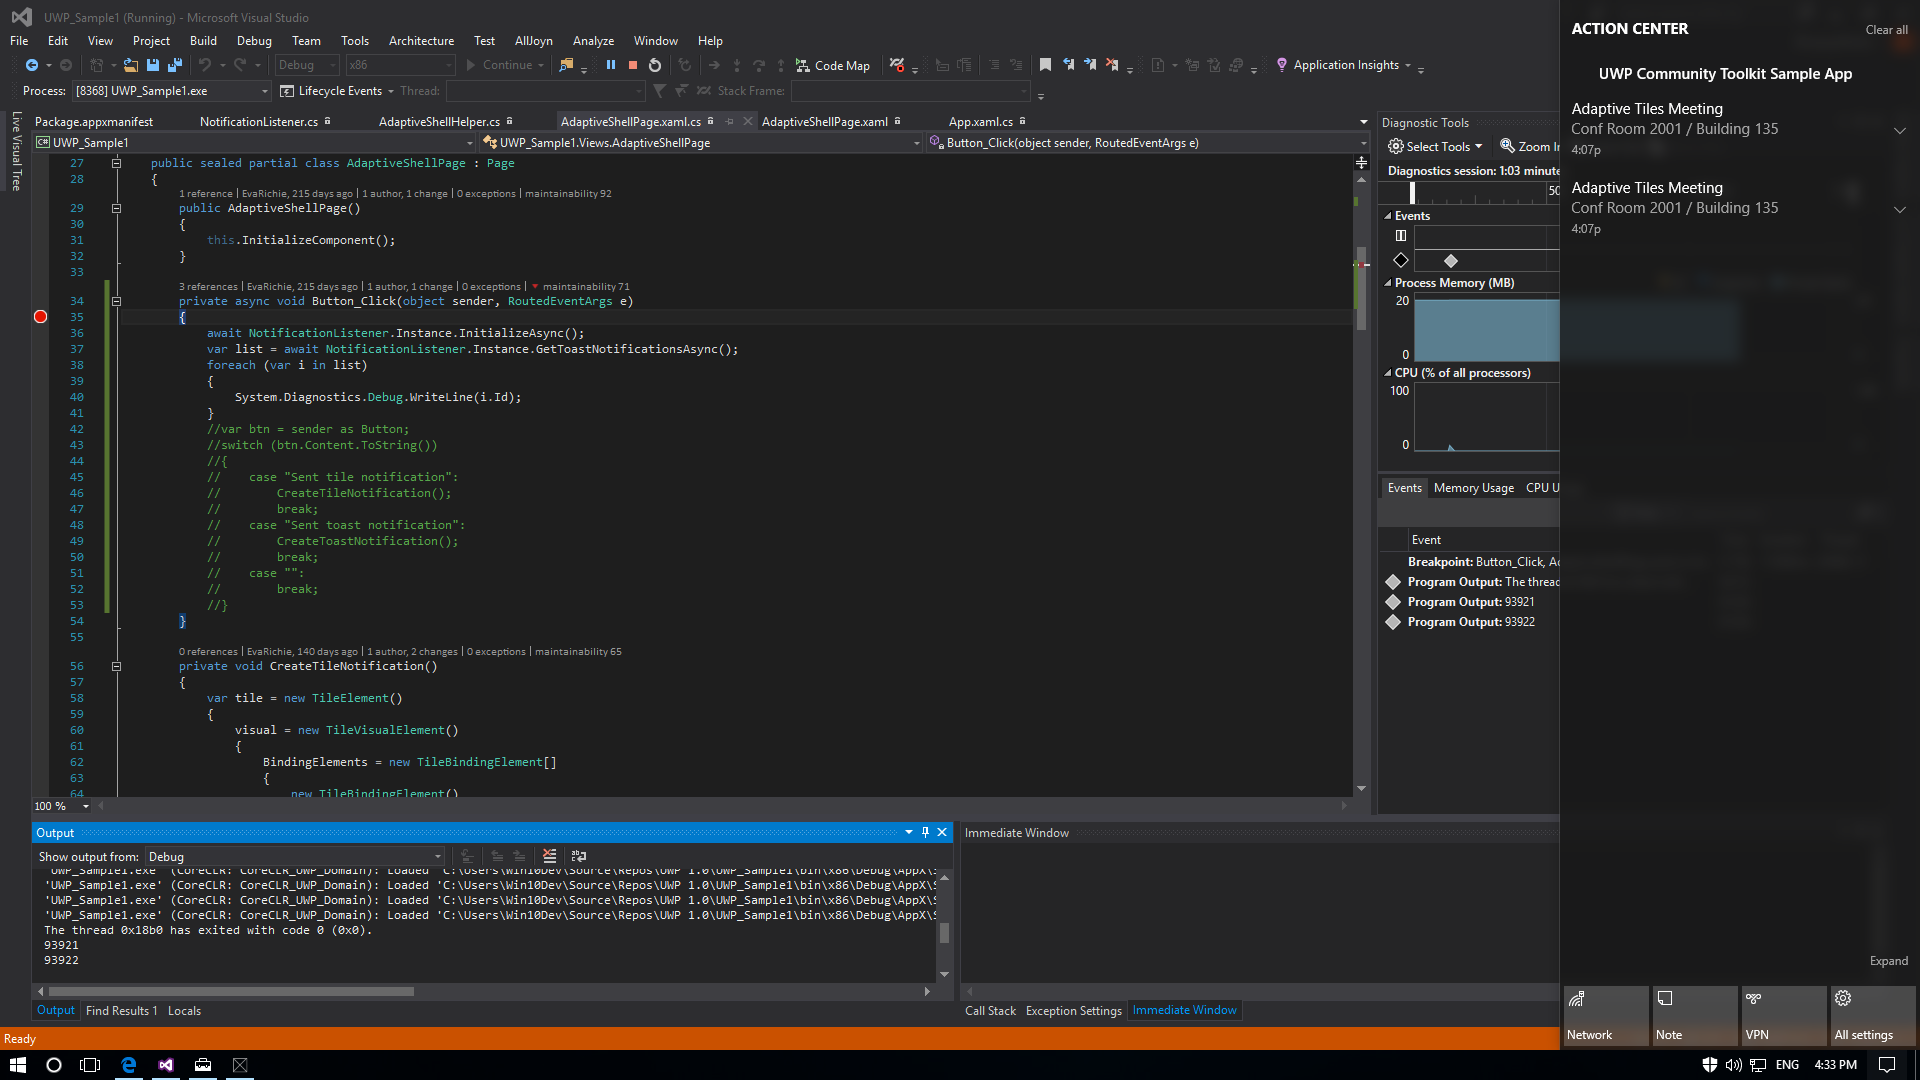 在Visual Studio 的Output的最後兩筆ID顯示的就是Action center中的 Notification的ID!
針對Xbox UWP有給了MUA API(Multi-User App)
然後有個重頭戲是針對User的推播API,以前在APP的時候需要進行登入User的形式來進行Toast的推送!但這樣控管User的部分需要自己實作來Sync是否登入的相關資訊,因此現在有個新的API在App的Static方法中。
var currentUser = App1.GetCurrentUser();
var channel = await PushNotificationChannelManager.GetForUser(currentUser).CreatePushNotificationChannelForApplicationAsync();
channel.PushNotificationReceived += channel_PushNotificationReceived;
以上的簡單C#程式碼就是抓取現在User並建立個別User的Notification Channel。當然能使用MUA的API不只是再建立Notification Channel 還有其他關於Notification的Send toast/ tile, badge notification, handling toast notification activation,locally update primary tile and badges.
UWP在Windows 10 Anniversary Update(RS1)對於Tile以及Toast的幾項特點如上,對於Project Cenntial(Classic Desktop app converter)大部分API也是可以使用!只是Project Cenntial限制也不算少,所以有機會再寫篇關於Project Cenntial的介紹(或是等別人發文就好啦)
***以上Code以及說明都有可能隨著Windows 10 的版本以及Visual Studio 2015版本有所調整!***
參考資料 B871 Notification Futures - Action center in the Cloud and the Windows Notification Platform
參考資料 B803 What`s new in Tile and Toast Notifications
下次再分享Windows 10 的新技術拉~