在 Visual C# 2008 上使用 OpenCV,使用方式是透過 EmguCV
2011/05/17 在 Visual Studio 2010 使用 OpenCV 對於 WebCam 有問題的話,請參考以下連結
http://social.msdn.microsoft.com/Forums/zh-TW/230/thread/d1647ae6-7f61-453e-818a-2fa4f52592bb
一、簡介
以前研究所的時候,有使用 VC.NET 配合 OpenCV 做影像處理,這東西相當讚,可以省去不少開發時間,今天嘗試看看如何在 Visual C# 2008 上使用 OpenCV。
以下引用 OpenCV 中文網站 的介紹
1. 什麼是 OpenCV
OpenCV是Intel®開源電腦視覺庫。它由一系列 C 函數和少量 C++ 類構成,實現了圖像處理和電腦視覺方面的很多通用演算法。
2. OpenCV 重要特性
OpenCV 擁有包括 300 多個C函數的跨平臺的中、高層 API。它不依賴於其它的外部庫——儘管也可以使用某些外部庫。
OpenCV 對非商業應用和商業應用都是免費(FREE)的。(細節參考 license)。
OpenCV 為Intel® Integrated Performance Primitives (IPP) 提供了透明介面。 這意味著如果有為特定處理器優化的的 IPP 庫, OpenCV 將在運行時自動載入這些庫。 更多關於 IPP 的信息請參考: http://www.intel.com/software/products/ipp/index.htm
3. 體驗 OpenCV 的魅力
看了以上對OpenCV的介紹,還是不知道OpenCV在做什麼的話,可以先看這段影片,影片的成果是透過 OpenCV 所撰寫而成。
二、方法
1. 下載與安裝 OpenCV
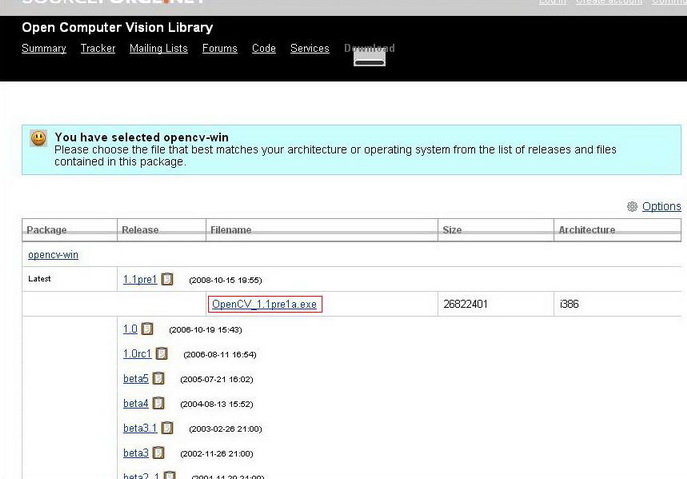
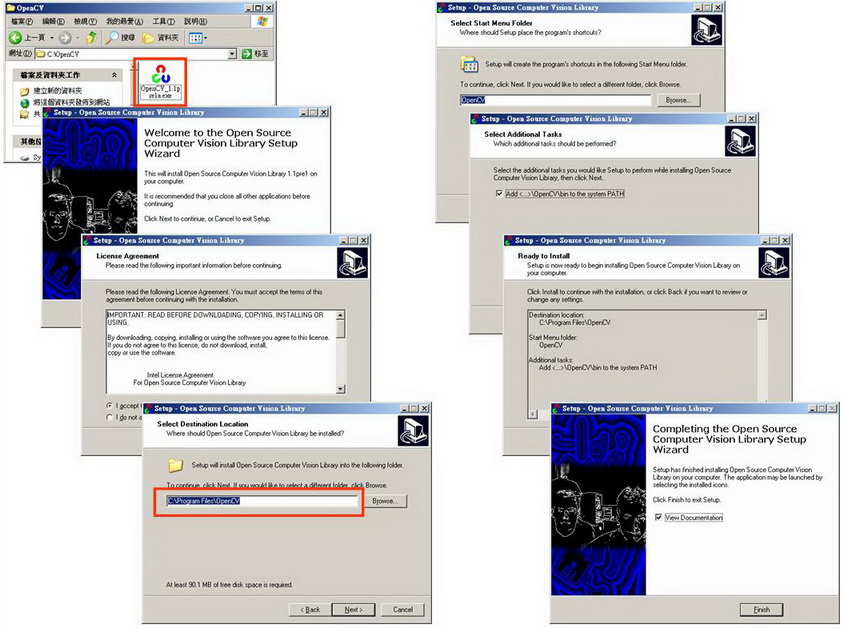
要使用 OpenCV,首先必須要下載並且安裝,點這裡下載 OpenCV_1.1pre1a.exe,下載後執行安裝,安裝過程幾乎都是點選下一步,在此需記住安裝目錄為何,預設為 C:\Program Files\OpenCV。
2. 下載與安裝 EmguCV
EmguCV 封裝了 OpenCV image processing library,而且可在.Net平台使用,因此在本文中,透過EmguCV,讓我們可以在 Visual C# 2008 中使用OpenCV。
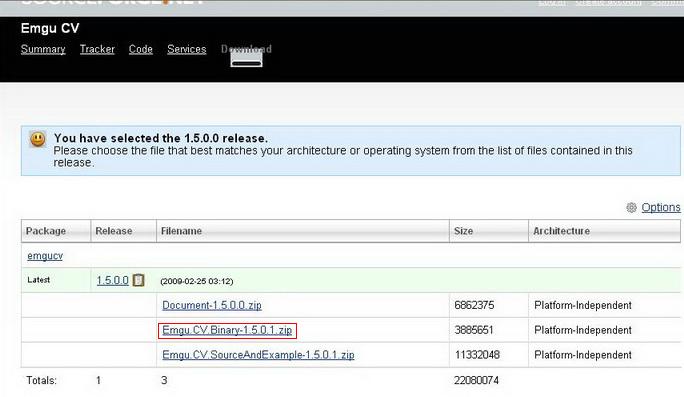
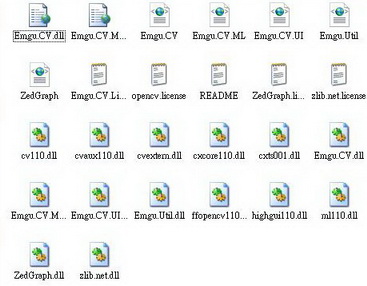
點選這裡下載 Emgu.CV.Binary-1.5.0.1.zip,下載完成後,解壓縮檔案可看EmguCV的DLL檔;我將此目錄放到 C:\Program Files\OpenCV,解壓縮後的檔案只要自己記得就好,因為之後要將這些檔案加入參考。
(1) 下載網頁部份
(2) 下載後解壓縮檔案
3. 新增專案,並且加入相關的參考
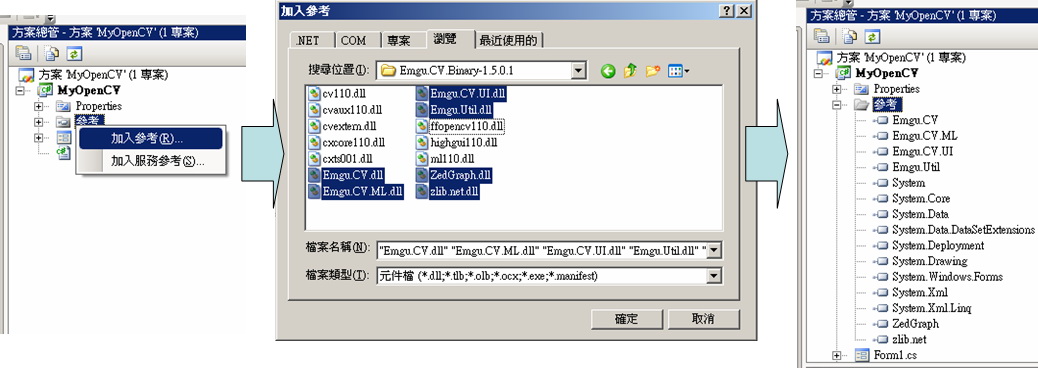
先 [ 新增專案 ] -> [ Visual C# ] -> [ WIndows Form 應用程式 ],接著將上個步驟中的 dll 加入參考,要加入的參考請參考下圖。
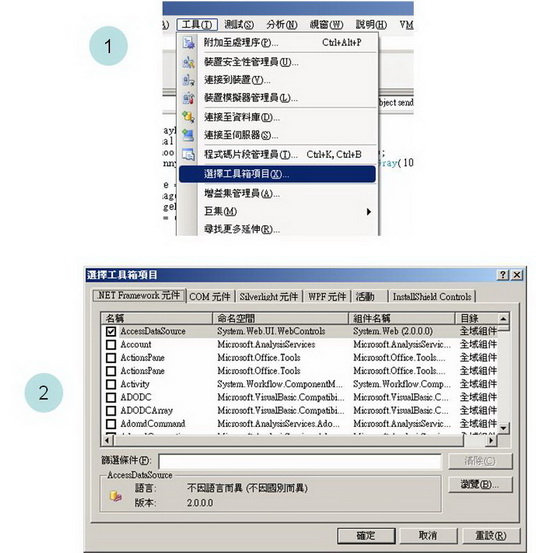
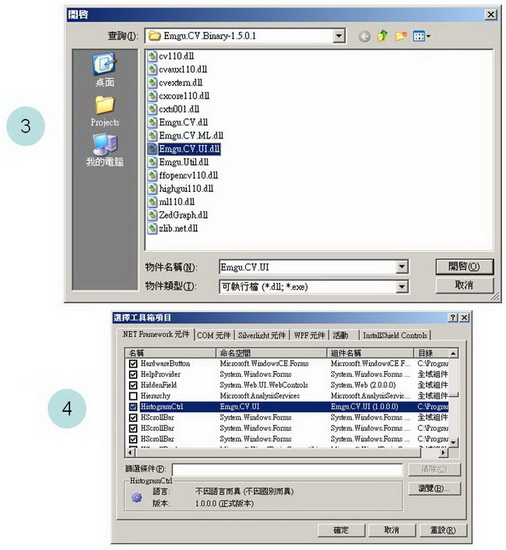
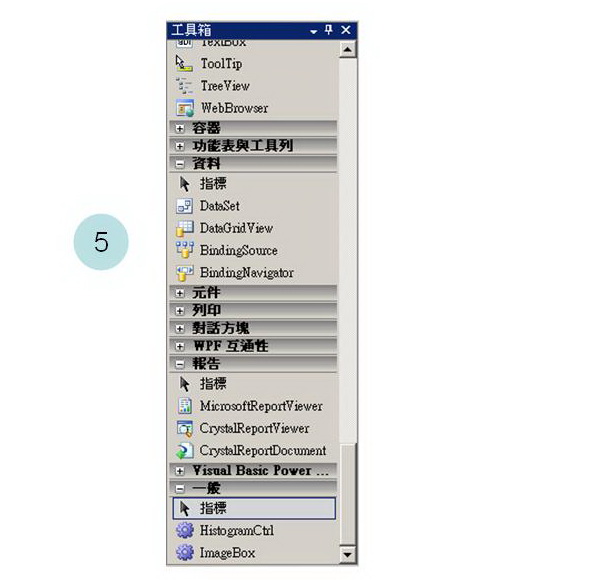
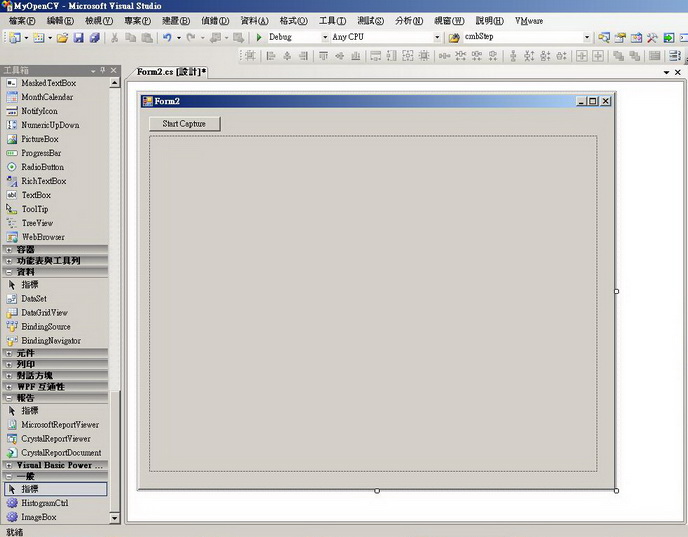
4. 加入 EmguCV 的控制項,到工具箱中
主要是將 Emgu.CV.UI.dll 加入工具箱中,加入後會出現 ImageBox、HistogramCtrl。
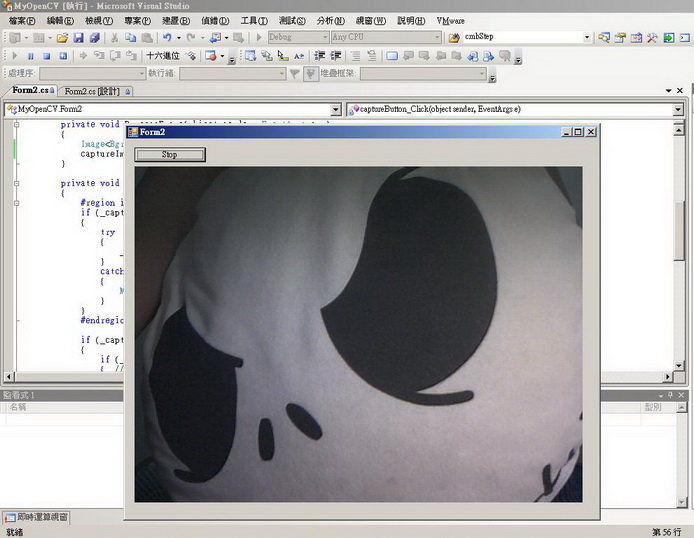
5. 到此,已經將要撰寫OpenCV的工作完成了。開始撰寫程式碼,在這裡示範兩個範例,第一個是開啟並顯示 WebCam 畫面。
5.1 先在Form上拉兩個控制項,分別是 Button ( Name : captureButton )與 ImageBox ( Name : captureImageBox )
5.2 撰寫以下程式碼
 using System;
02
 using System.Collections.Generic;
03
 using System.ComponentModel;
04
 using System.Data;
05
 using System.Drawing;
06
 using System.Linq;
07
 using System.Text;
08
 using System.Windows.Forms;
09

10
 // 要引用的類別
 11
 using Emgu.CV;
12
 using Emgu.CV.Structure;
13
 using Emgu.Util;
14
 using System.Threading;
 15

16
 namespace MyOpenCV
17
 {
{18
 public partial class Form2 : Form
19
 {
{20
 public Form2()
21
 {
{22
 InitializeComponent();
23
 }
}24

25
 private Capture _capture;
26
 private bool _captureInProgress;
27

28
 private void ProcessFrame(object sender, EventArgs arg)
29
 {
{30
 Image<Bgr, Byte> frame = _capture.QueryFrame();
 31
 captureImageBox.Image = frame;
32
 }
}33

34
 private void captureButton_Click(object sender, EventArgs e)
35
 {
{36
 if capture is not created, create it now
49

50
 if (_capture != null)
51
 {
{52
 if (_captureInProgress)
53
 { //stop the capture
 54
 Application.Idle -= new EventHandler(ProcessFrame);
55
 captureButton.Text = "Start Capture";
56
 }
}57
 else
else58
 {
{59
 //start the capture
 60
 captureButton.Text = "Stop";
61
 Application.Idle += new EventHandler(ProcessFrame);
62
 }
}63

64
 _captureInProgress = !_captureInProgress;
65
 }
}66
 }
}67
 }
}68
 }
}
5.3 執行結果,請注意喔,以下顯示的是 Webcam 即時視訊,不是影像喔
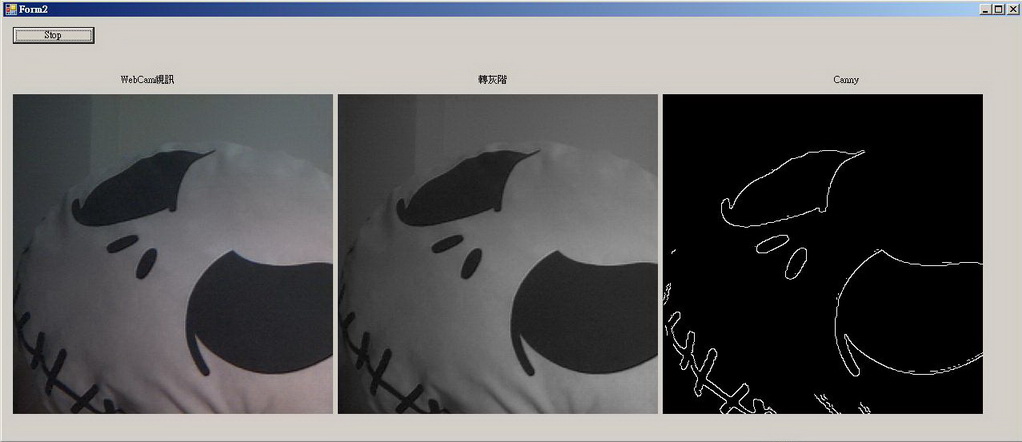
6. 第二個範例,我們將上一個範例,加上灰階、Canny處理
讓大家了解 OpenCV 的強大,而這動作,只需要多拉兩個ImageBox在加上幾行程式就可以了喔,真是太讚了,難怪很多學生想畢業,都用OpenCV
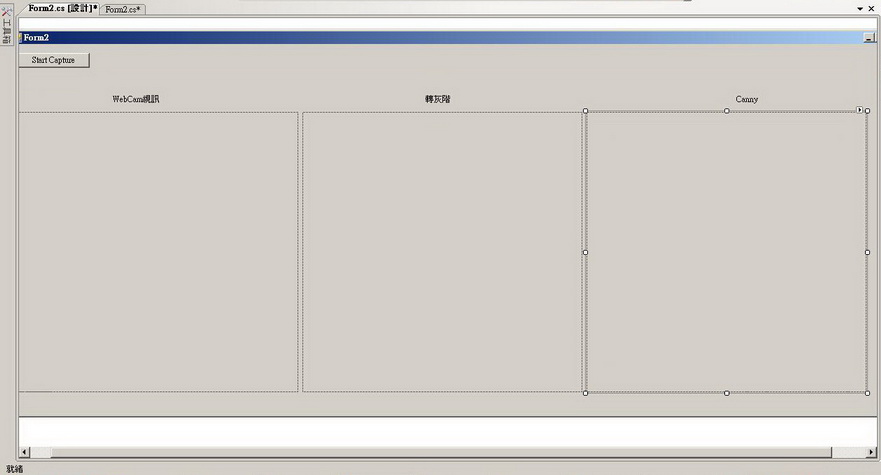
6.1 在上一個範例中,在多拉兩個 ImageBox,Name 分別為 grayscaleImageBox、cannyImageBox
6.2 將上一個範例,加上四行程式碼就可以達成將Webcam視訊灰階以及Canny
 using System;
02
 using System.Collections.Generic;
03
 using System.ComponentModel;
04
 using System.Data;
05
 using System.Drawing;
06
 using System.Linq;
07
 using System.Text;
08
 using System.Windows.Forms;
09

10
 // 要引用的類別
 11
 using Emgu.CV;
12
 using Emgu.CV.Structure;
13
 using Emgu.Util;
14
 using System.Threading;
 15

16
 namespace MyOpenCV
17
 {
{18
 public partial class Form2 : Form
19
 {
{20
 public Form2()
21
 {
{22
 InitializeComponent();
23
 }
}24

25
 private Capture _capture;
26
 private bool _captureInProgress;
27

28
 private void ProcessFrame(object sender, EventArgs arg)
29
 {
{30
 Image<Bgr, Byte> frame = _capture.QueryFrame();
 31
 captureImageBox.Image = frame;
32

33
 // 請再加上以下四行程式碼
 34
 Image<Gray, Byte> grayFrame = frame.Convert<Gray, Byte>();
35
 Image<Gray, Byte> cannyFrame = grayFrame.Canny(new Gray(100), new Gray(60));
36
 grayscaleImageBox.Image = grayFrame;
37
 cannyImageBox.Image = cannyFrame;
38
 }
}39

40
 private void captureButton_Click(object sender, EventArgs e)
41
 {
{42
 if capture is not created, create it now
55

56
 if (_capture != null)
57
 {
{58
 if (_captureInProgress)
59
 { //stop the capture
 60
 Application.Idle -= new EventHandler(ProcessFrame);
61
 captureButton.Text = "Start Capture";
62
 }
}63
 else
else64
 {
{65
 //start the capture
 66
 captureButton.Text = "Stop";
67
 Application.Idle += new EventHandler(ProcessFrame);
68
 }
}69

70
 _captureInProgress = !_captureInProgress;
71
 }
}72
 }
}73
 }
}74
 }
}
6.3 執行結果
三、範例下載
http://cid-101d8ba47227b414.skydrive.live.com/self.aspx/.Public/MyOpenCV.rar
四、遇到錯誤 'Emgu.CV.CvInvoke' 的型別初始設定式發生例外狀況
1. 將您的 OpenCV 資料夾路徑與 Emgu 資料夾路徑加入 Windows 環境變數。
2. 使用 Visual Studio 開啟您的專案。
(1) 在專案上按滑鼠右鍵,選擇 [屬性] / [參考路徑],加入你的 OpenCV 與 Emgu 的安裝路徑。
(2) 在建置組態中,把平台改成 X86,參考 HOW TO:將專案設定成以平台為目標
 using
using 