過去我們會透過第三方套件來實作DI Container(Unity、Autofac等),
但現在不用這麼麻煩了 - ASP.Net Core直接內建DI。
ASP.Net Core除了提供統一的的DI Container,
也將許多組態參數檔的讀取方式改為DI的形式。
而DI的相關操作皆須於Startup.cs中進行註冊動作,
以下介紹組態注入及一般的服務注入使用方式。
組態注入
ASP.Net Core透過IOptions<TModel>注入組態內容(Reflection),
其中TModel為我們自定義的資料繫結Model,
以讀取預設的appsetting.json為例。
appsetting.json
{
  "Logging": {
    "LogLevel": {
      "Default": "Warning"
    }
  },
  "AllowedHosts": "*"
}
資料繫結的Model要記得按照其內容階層定義對應的屬性,
繫結過程會自動忽略大小寫,
但名稱需與json內容屬性相同。
MySetting.cs
public class MySetting
{
    public Logging Logging { get; set; }

    public string AllowedHosts { get; set; }
}

public class Logging
{
    public LogLevel LogLevel { get; set; }
}

public class LogLevel
{
    public string Default { get; set; }
}
最後要記得在Startup.cs的ConfigureServices中註冊。
public void ConfigureServices(IServiceCollection services)
{
    services.Configure<MySetting>(Configuration);

    services.AddMvc().SetCompatibilityVersion(CompatibilityVersion.Version_2_1);
}
好了之後我們在Controller中使用IOptions<MySetting>注入。
public class HomeController : Controller
{
    private IOptions<MySetting> myOption;

    public HomeController(IOptions<MySetting> _option)
    {
        myOption = _option;
    }
}
透過Debug Mode觀察。

自訂組態注入方式與其類似,
不過要另外加入一段ConfigurationBuilder的註冊語法,
我們先新增一個customsetting.json。
{
  "lastupdatetime": "2018/10/1",
  "account": "acc123",
  "password": "pa$$word"
}
接著調整Startup的ConfigureServices。
public void ConfigureServices(IServiceCollection services)
{
    var configBuilder = new ConfigurationBuilder()
    .SetBasePath(Directory.GetCurrentDirectory())
    .AddJsonFile("customsetting.json", optional: true);
    var config = configBuilder.Build();

    services.Configure<MyCustomSetting>(config);

    services.AddMvc().SetCompatibilityVersion(CompatibilityVersion.Version_2_1);
}
執行結果如下。

服務注入
類別注入使用IServiceCollection進行註冊,
預設有三種生命週期:
- Transient:每次注入時都回傳新的物件。
- Scoped:在同一個Request中注入會回傳同一個物件,。
- Singleton:僅於第一次注入時建立新物件,後面注入時會拿到第一次建立的物件(只要執行緒還活著)。
下面範例程式會透過注入不同生命周期的物件,
並觀察其Hashcode來說明。
首先創建三種不同生命週期的物件並實作對應的介面。
public interface ITransientService
{
}

public interface IScopedService
{
}

public interface ISingletonService
{
}
public class TransientService : ITransientService
{
}

public  class ScopedService : IScopedService
{
}

public class SingletonService: ISingletonService
{
}
接著在Startup的ConfigureServices中註冊DI,
沒有介面也是能夠注入的(如MyService)。
public void ConfigureServices(IServiceCollection services)
{
    services.AddTransient<MyService>();
    services.AddTransient<ITransientService, TransientService>();
    services.AddTransient<IScopedService, ScopedService>();
    services.AddTransient<ISingletonService, SingletonService>();


    services.AddMvc().SetCompatibilityVersion(CompatibilityVersion.Version_2_1);
}
最後分別在HomeController及MyService中進行注入,
並比對執行結果。
HomeController.cs
public class HomeController : Controller
{
    private readonly ITransientService transient;
    private readonly IScopedService scoped;
    private readonly ISingletonService singleton;
    private readonly MyService myService;

    public HomeController(ITransientService _transient, IScopedService _scoped, ISingletonService _singleton, MyService _myService)
    {
        this.transient = _transient;
        this.scoped = _scoped;
        this.singleton = _singleton;
        this.myService = _myService;
    }

    public IActionResult Index()
    {
        Debug.WriteLine("[Injection in Controller]");
        Debug.WriteLine($"Transient Hashcode = {transient.GetHashCode()}");
        Debug.WriteLine($"Scoped Hashcode = {scoped.GetHashCode()}");
        Debug.WriteLine($"Singleton Hashcode = {singleton.GetHashCode()}");

        myService.Test();

        return View();
    }
}
MyService.cs
public class MyService
{
    private readonly ITransientService transient;
    private readonly IScopedService scoped;
    private readonly ISingletonService singleton;

    public MyService(ITransientService _transient, IScopedService _scoped, ISingletonService _singleton)
    {
        this.transient = _transient;
        this.scoped = _scoped;
        this.singleton = _singleton;
    }

    public void Test()
    {
        Debug.WriteLine("[Injection in MyService]");
        Debug.WriteLine($"Transient Hashcode = {transient.GetHashCode()}");
        Debug.WriteLine($"Scoped Hashcode = {scoped.GetHashCode()}");
        Debug.WriteLine($"Singleton Hashcode = {singleton.GetHashCode()}");
    }
}
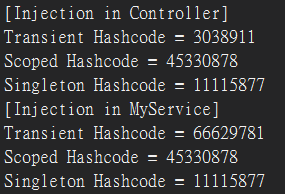
第一次載入(第一次Request)輸出結果如下。
按F5重新整理(第二次Request)。
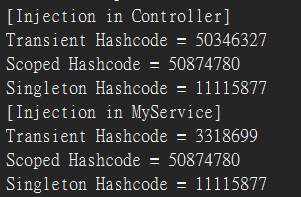
可以發現注入模式為Transient時每次注入的物件都是新的,
Scoped在同一次Request內拿到的都是同一筆,
而Singleton則從頭到尾都是同一筆(在執行緒還沒死掉的情況下)。
如果在View中使用DI,
可以透過@Inject 指令進行注入。
為了方便測試,
我將剛才MyService中的三個服務都公開(public)。
MyService.cs
public class MyService
{
    public readonly ITransientService transient;
    public readonly IScopedService scoped;
    public readonly ISingletonService singleton;

    public MyService(ITransientService _transient, IScopedService _scoped, ISingletonService _singleton)
    {
        this.transient = _transient;
        this.scoped = _scoped;
        this.singleton = _singleton;
    }
}
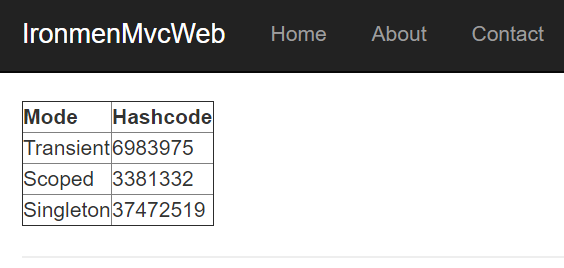
接著在Index.cshtml(任意一個View皆可)注入MyService。
Index.cshtml
@inject MyService myService;

<div class="alert alert-success">
    <table class="table">
        <tr>
            <th>Mode</th>
            <th>Hashcode</th>
        </tr>
        <tr>
            <td>Transient</td>
            <td>@myService.transient.GetHashCode()</td>
        </tr>
        <tr>
            <td>Scoped</td>
            <td>@myService.scoped.GetHashCode()</td>
        </tr>
        <tr>
            <td>Singleton</td>
            <td>@myService.singleton.GetHashCode()</td>
        </tr>
    </table>
</div>
成功注入MyService。
總結
最後補一下筆者個人的看法,
DI雖然可以幫我們注入許多服務,
但一股腦地注入會讓建構子變得非常肥大,
針對未來需要抽換的服務注入可能是比較好的做法,
在許多剛開始導入單元測試的團隊,
適時地使用DI可能是必要之選(注入假物件),
至於如何使用尚須團隊討論出一致的規範。
有關DI的使用就先探討到這,
歡迎大家留言指教。
參考
https://docs.microsoft.com/zh-tw/aspnet/core/fundamentals/dependency-injection?view=aspnetcore-2.1
https://docs.microsoft.com/zh-tw/aspnet/core/fundamentals/configuration/options?view=aspnetcore-2.1