本文章內容:
講解Nginx負載均衡或代理後端的http、https轉換方式。
1. 環境
講解將以3台主機來演示說明。
| 編號 | 主機名 | 作業系統 | 角色 | IP |
| 1 | nginx | CentOS 7 | 負載均衡伺服器或代理伺服器(前端) | 192.168.128.240(面對Client端)、192.168.169.254(面對後端) |
| 2 | toimcat-1 | CentOS 7 | 網站伺服器(後端) | 192.168.169.139 |
| 3 | tomcat-2 | CentOS 7 | 網站伺服器(後端) | 192.168.169.140 |
1.1 tomcat-1主機
1. 安裝jdk以及tomcat
[root@tomcat-1 ~]# yum install tomcat tomcat-admin-webapps tomcat-docs-webapp tomcat-webapps -y  #使用yum安裝Tomcat會自動安裝上OpenJDK,但是不會安裝OpenJDK的devel包
[root@tomcat-1 ~]# java -version
openjdk version "1.8.0_242"
OpenJDK Runtime Environment (build 1.8.0_242-b08)
OpenJDK 64-Bit Server VM (build 25.242-b08, mixed mode)
2. 設定tomcat-1主機應用 (有意設定tomcat-1主機與tomcat-2主機應用不一樣,以便驗證負載均衡是否成功)
[root@tomcat-1 ~]# mkdir -pv /var/lib/tomcat/webapps/test/{WEB-INF,META-INF,lib,classes}
mkdir: created directory ‘/var/lib/tomcat/webapps/test’
mkdir: created directory ‘/var/lib/tomcat/webapps/test/WEB-INF’
mkdir: created directory ‘/var/lib/tomcat/webapps/test/META-INF’
mkdir: created directory ‘/var/lib/tomcat/webapps/test/lib’
mkdir: created directory ‘/var/lib/tomcat/webapps/test/classes’
[root@tomcat-1 ~]# vim /var/lib/tomcat/webapps/test/index.jsp
<%@ page language="java" %>
    <html>
        <head><title>tomcat-1</title></head>
        <body>
            <h1><font color="red">tomcat-1.lab.com</font></h1>
            <table align="centre" border="1">
                <tr>
                    <td>Session ID</td>
                    <% session.setAttribute("lab.com","lab.com");%>
                    <td><%= session.getId() %></td>
                </tr>
                <tr>
                    <td>Created on</td>
                    <td><%= session.getCreationTime() %></td>
                </tr>
            </table>
        </body>
    </html>
3. 啟動Tomcat服務並設定開機自啟動
[root@tomcat-1 ~]# systemctl start tomcat.service
[root@tomcat-1 ~]# systemctl enable tomcat.service
Created symlink from /etc/systemd/system/multi-user.target.wants/tomcat.service to /usr/lib/systemd/system/tomcat.service.
[root@tomcat-1 ~]# ss -tnl
State Recv-Q Send-Q Local Address:Port Peer Address:Port
LISTEN 0 100 [::]:8009 [::]:*
LISTEN 0 100 [::]:8080 [::]:*
LISTEN 0 1 [::ffff:127.0.0.1]:8005 [::]:*
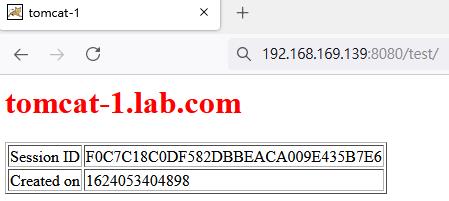
...4. 訪問"192.168.169.139:8080/test" (因為它要編譯非常消耗記憶體,所以第一次訪問會比較慢)
1.2 tomcat-2主機
1.安裝jdk以及tomcat
[root@tomcat-2 ~]# yum install tomcat tomcat-admin-webapps tomcat-docs-webapp tomcat-webapps -y  #使用yum安裝Tomcat會自動安裝上OpenJDK,但是不會安裝OpenJDK的devel包
[root@tomcat-2 ~]# java -version
openjdk version "1.8.0_242"
OpenJDK Runtime Environment (build 1.8.0_242-b08)
OpenJDK 64-Bit Server VM (build 25.242-b08, mixed mode)
2. 設定tomcat-2主機應用 (有意設定tomcat-1主機與tomcat-2主機應用不一樣,以便驗證負載均衡是否成功)
[root@tomcat-2 ~]# mkdir -pv /var/lib/tomcat/webapps/test/{WEB-INF,META-INF,lib,classes}
mkdir: created directory ‘/var/lib/tomcat/webapps/test’
mkdir: created directory ‘/var/lib/tomcat/webapps/test/WEB-INF’
mkdir: created directory ‘/var/lib/tomcat/webapps/test/META-INF’
mkdir: created directory ‘/var/lib/tomcat/webapps/test/lib’
mkdir: created directory ‘/var/lib/tomcat/webapps/test/classes’
[root@tomcat-2 ~]# vim /var/lib/tomcat/webapps/test/index.jsp
<%@ page language="java" %>
    <html>
        <head><title>tomcat-2</title></head>
        <body>
            <h1><font color="green">tomcat-2.lab.com</font></h1>
            <table align="centre" border="1">
                <tr>
                    <td>Session ID</td>
                    <% session.setAttribute("lab.com","lab.com");%>
                    <td><%= session.getId() %></td>
                </tr>
                <tr>
                    <td>Created on</td>
                    <td><%= session.getCreationTime() %></td>
                </tr>
            </table>
        </body>
    </html>
3. 啟動Tomcat服務並設定開機自啟動
[root@tomcat-2 ~]# systemctl start tomcat.service
[root@tomcat-2 ~]# systemctl enable tomcat.service
Created symlink from /etc/systemd/system/multi-user.target.wants/tomcat.service to /usr/lib/systemd/system/tomcat.service.
[root@tomcat-2 ~]# ss -tnl
State Recv-Q Send-Q Local Address:Port Peer Address:Port
LISTEN 0 100 [::]:8009 [::]:*
LISTEN 0 100 [::]:8080 [::]:*
LISTEN 0 1 [::ffff:127.0.0.1]:8005 [::]:*
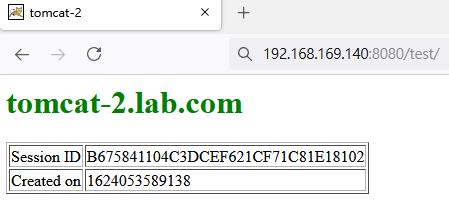
...4. 訪問"192.168.169.140:8080/test" (因為它要編譯非常消耗記憶體,所以第一次訪問會比較慢)
1.3 nginx主機
1. 安裝nginx
[root@nginx ~]# yum install nginx -y2. 啟動Nginx服務並設定開機自啟動
[root@nginx ~]# systemctl start nginx.service
[root@nginx ~]# systemctl enable nginx.service
Created symlink from /etc/systemd/system/multi-user.target.wants/nginx.service to /usr/lib/systemd/system/nginx.service.
[root@nginx ~]# ss -tnl
State      Recv-Q Send-Q                                  Local Address:Port                                                 Peer Address:Port
LISTEN     0      128                                                 *:80                                                              *:*
LISTEN     0      128                                              [::]:80                                                           [::]:*
...
2. https→http
這種情境是Client端使用https協議訪問Nginx,Nginx負載均衡或代理至後端的http協議。
2.1 tomcat-1主機
1. 使用java內建工具keytool來產出keystore檔
[root@tomcat-1 ~]# keytool -genkey -alias tomcat -keyalg RSA -keysize 2048 -keystore /etc/tomcat/tomcat.jks -validity 365002. 使用java內建工具keytool將keystore檔轉為p12檔
[root@tomcat-1 ~]# keytool -importkeystore -srckeystore tomcat.jks -destkeystore keystore.p12 -deststoretype PKCS123. 使用openssl將keystore檔分解出crt(證書)以及key(私鑰)
[root@tomcat-1 ~]# openssl pkcs12 -in keystore.p12 -nokeys -out tomcat.crt
[root@tomcat-1 ~]# openssl pkcs12 -in keystore.p12 -nocerts -nodes -out tomcat.key
4.將tomcat.crt(證書)、tomcat.key(私鑰)傳送到nginx主機
[root@tomcat-1 ~]# scp tomcat.crt tomcat.key 192.168.169.254:/root2.2 nginx主機
1. 編輯/etc/nginx/nginx.conf設定檔,設定以下38~41內容
[root@nginx ~]# vim /etc/nginx/nginx.conf
...
 36     include /etc/nginx/conf.d/*.conf;
 37
 38     upstream tcsrvs {
 39         server 192.168.169.139:8080;  #後端網站伺服器http協議的port是8080
 40         server 192.168.169.140:8080;  #後端網站伺服器http協議的port是8080
 41     }
 42
 43     server {
...
2.新增/etc/nginx/conf.d/www-ilinux-io_http_tomcat.conf設定檔,設定以下內容
[root@nginx ~]# vim /etc/nginx/conf.d/www-ilinux-io_http_tomcat.conf
server {
   listen 443 ssl;  #提供https協議給Client端訪問
   server_name www.ilinux.io;  #網站虛擬主機名
   ssl_certificate /root/tomcat.crt;  #證書(由tomcat主機產出)
   ssl_certificate_key /root/tomcat.key;  #證書私鑰(由tomcat主機產出)
   ssl_session_timeout 5m;
   ssl_protocols TLSv1 TLSv1.1 TLSv1.2;
   ssl_ciphers ECDHE-RSA-AES128-GCM-SHA256:HIGH:!aNULL:!MD5:!RC4:!DHE;
   ssl_prefer_server_ciphers on;
   location / {
       proxy_pass http://tcsrvs;  #代理到後端主機,http不能寫https,因為/etc/nginx/nginx.conf的upstream設定後端的port是8080,如果寫https會訪問不到
   }
}
3. 重啟nginx服務
[root@nginx ~]# nginx -t
nginx: the configuration file /etc/nginx/nginx.conf syntax is ok
nginx: configuration file /etc/nginx/nginx.conf test is successful
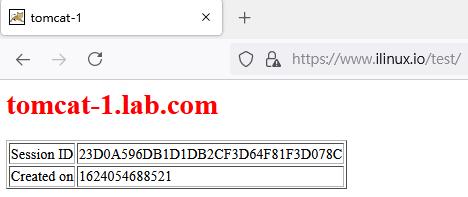
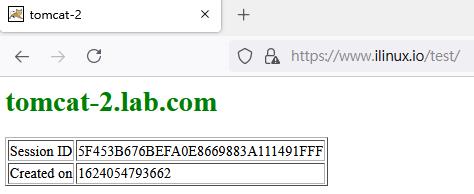
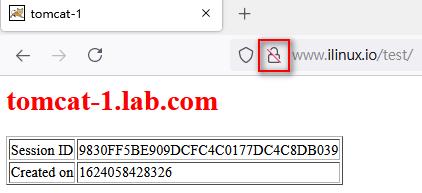
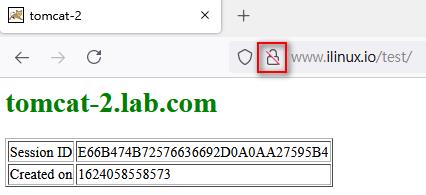
[root@nginx ~]# nginx -s reload2.3 Client訪問https://www.ilinux.io/test
2.4 設定讓Client端訪問http://www.ilinux.io/test能夠跳轉到https://www.ilinux.io/test
在nginx主機做以下設定:
1. 編輯/etc/nginx/conf.d/www-ilinux-io_http_tomcat.conf設定檔,追加以下內容
[root@nginx ~]# vim /etc/nginx/conf.d/www-ilinux-io_http_tomcat.conf
…
server {
   listen 80;  #提供http協議給Client端訪問
   server_name www.ilinux.io;  #網站虛擬主機名
   location / {
       return 302 https://www.ilinux.io$request_uri;  #跳轉成以https協議的形式訪問,就走listen 443 ssl;那的設定。注意:它會直接訪問跳轉的頁面,所以不能寫跳轉到https://tcsrvs;;$request_uri一定要加,不然只能訪問後端首頁
   }
}
2. 重啟nginx服務
[root@nginx ~]# nginx -t
nginx: the configuration file /etc/nginx/nginx.conf syntax is ok
nginx: configuration file /etc/nginx/nginx.conf test is successful
[root@nginx ~]# nginx -s reload
3.Client端訪問http://www.ilinux.io/test會跳轉為訪問https://www.ilinux.io/test
2.5 小結
Client端訪問的是https,加解密在前端nginx處理,後端tomcat不處理加解密。
3. https→https
這種情境是Client端使用https協議訪問Nginx,Nginx負載均衡或代理至後端的https協議。
3.1 tomcat-1主機
1. 使用java內建工具keytool來產出keystore檔
[root@tomcat-1 ~]# keytool -genkey -alias tomcat -keyalg RSA -keysize 2048 -keystore /etc/tomcat/tomcat.jks -validity 365002. 使用java內建工具keytool將keystore檔轉為p12檔
[root@tomcat-1 ~]# keytool -importkeystore -srckeystore tomcat.jks -destkeystore keystore.p12 -deststoretype PKCS123. 使用openssl將keystore檔分解出crt(證書)以及key(私鑰)
[root@tomcat-1 ~]# openssl pkcs12 -in keystore.p12 -nokeys -out tomcat.crt
[root@tomcat-1 ~]# openssl pkcs12 -in keystore.p12 -nocerts -nodes -out tomcat.key
4.將tomcat.crt(證書)、tomcat.key(私鑰)傳送到nginx主機
[root@tomcat-1 ~]# scp tomcat.crt tomcat.key 192.168.169.254:/root5. 將keystore檔傳送到/etc/tomcat目錄
[root@tomcat-1 ~]# cp tomcat.jsk /etc/tomcat
[root@tomcat-1 ~]# ll /etc/tomcat/
total 232
...
-rw-r--r--. 1 root root     2244 Jun 18 15:41 tomcat.jks
...
6. 編輯/etc/tomcat/server.xml檔,設定以下內容
[root@tomcat-1 ~]# vim /etc/tomcat/server.xml
...
87     <Connector port="8443" protocol="org.apache.coyote.http11.Http11Protocol"
88                maxThreads="150" SSLEnabled="true" scheme="https" secure="true"
89                keystoreFile="conf/tomcat.jks" keystorePass="123456" clientAuth="false" sslProtocol="TLS" />  #keystoreFile的conf目錄是相對於/etc/tomcat目錄,ll /usr/share/tomcat/conf可以得知
...
7. 重啟tomcat服務,可以看到8443已經運行起來
[root@tomcat-1 ~]# systemctl restart tomcat
[root@tomcat-1 ~]# ss -tnl
State      Recv-Q Send-Q                                  Local Address:Port                                                 Peer Address:Port
LISTEN     0      128                                                 *:22                                                              *:*
LISTEN     0      100                                         127.0.0.1:25                                                              *:*
LISTEN     0      100                                              [::]:8009                                                         [::]:*
LISTEN     0      100                                              [::]:8080                                                         [::]:*
LISTEN     0      128                                              [::]:22                                                           [::]:*
LISTEN     0      100                                             [::1]:25                                                           [::]:*
LISTEN     0      100                                              [::]:8443                                                         [::]:*
LISTEN     0      1                                  [::ffff:127.0.0.1]:8005                                                         [::]:*
3.2 tomcat-2主機
1. 使用java內建工具keytool來產出keystore檔
[root@tomcat-2 ~]# keytool -genkey -alias tomcat -keyalg RSA -keysize 2048 -keystore /etc/tomcat/tomcat.jks -validity 365002. 將keystore檔傳送到/etc/tomcat目錄
[root@tomcat-2 ~]# cp tomcat.jsk /etc/tomcat
[root@tomcat-2 ~]# ll /etc/tomcat/
total 232
...
-rw-r--r--. 1 root root     2244 Jun 18 15:41 tomcat.jks
...
3. 編輯/etc/tomcat/server.xml檔,設定以下內容
[root@tomcat-2 ~]# vim /etc/tomcat/server.xml
...
87     <Connector port="8443" protocol="org.apache.coyote.http11.Http11Protocol"
88                maxThreads="150" SSLEnabled="true" scheme="https" secure="true"
89                keystoreFile="conf/tomcat.jks" keystorePass="123456" clientAuth="false" sslProtocol="TLS" />  #keystoreFile的conf目錄是相對於/etc/tomcat目錄,ll /usr/share/tomcat/conf可以得知
...
4. 重啟tomcat服務,可以看到8443已經運行起來
[root@tomcat-2 ~]# systemctl restart tomcat
[root@tomcat-2 ~]# ss -tnl
State      Recv-Q Send-Q                                  Local Address:Port                                                 Peer Address:Port
LISTEN     0      128                                                 *:22                                                              *:*
LISTEN     0      100                                         127.0.0.1:25                                                              *:*
LISTEN     0      100                                              [::]:8009                                                         [::]:*
LISTEN     0      100                                              [::]:8080                                                         [::]:*
LISTEN     0      128                                              [::]:22                                                           [::]:*
LISTEN     0      100                                             [::1]:25                                                           [::]:*
LISTEN     0      100                                              [::]:8443                                                         [::]:*
LISTEN     0      1                                  [::ffff:127.0.0.1]:8005                                                         [::]:*
3.3 nginx主機
1. 編輯/etc/nginx/nginx.conf設定檔,設定以下38~41內容
[root@nginx ~]# vim /etc/nginx/nginx.conf
...
 36     include /etc/nginx/conf.d/*.conf;
 37
 38     upstream tcsrvs {
 39         server 192.168.169.139:8443;  #後端網站伺服器https協議的port是8443
 40         server 192.168.169.140:8443;  #後端網站伺服器https協議的port是8443
 41     }
 42
 43     server {
...
2.新增/etc/nginx/conf.d/www-ilinux-io_http_tomcat.conf設定檔,設定以下內容
[root@nginx ~]# vim /etc/nginx/conf.d/www-ilinux-io_http_tomcat.conf
server {
   listen 443 ssl;  #提供https協議給Client端訪問
   server_name www.ilinux.io;  #網站虛擬主機名
   ssl_certificate /root/tomcat.crt;  #證書(由tomcat主機產出)
   ssl_certificate_key /root/tomcat.key;  #證書私鑰(由tomcat主機產出)
   ssl_session_timeout 5m;
   ssl_protocols TLSv1 TLSv1.1 TLSv1.2;
   ssl_ciphers ECDHE-RSA-AES128-GCM-SHA256:HIGH:!aNULL:!MD5:!RC4:!DHE;
   ssl_prefer_server_ciphers on;
   location / {
       proxy_pass https://tcsrvs;  #代理到後端主機,https不能寫http
   }
}
3. 重啟nginx服務
[root@nginx ~]# nginx -t
nginx: the configuration file /etc/nginx/nginx.conf syntax is ok
nginx: configuration file /etc/nginx/nginx.conf test is successful
[root@nginx ~]# nginx -s reload
3.4 Client訪問https://www.ilinux.io/test
3.5 設定讓Client端訪問http://www.ilinux.io/test能夠跳轉到https://www.ilinux.io/test
在nginx主機做以下設定:
1. 編輯/etc/nginx/conf.d/www-ilinux-io_http_tomcat.conf設定檔,追加以下內容
[root@nginx ~]# vim /etc/nginx/conf.d/www-ilinux-io_http_tomcat.conf
…
server {
   listen 80;  #提供http協議給Client端訪問
   server_name www.ilinux.io;  #網站虛擬主機名
   location / {
       return 302 https://www.ilinux.io$request_uri;  #跳轉成以https協議的形式訪問,就走listen 443 ssl;那的設定。注意:它會直接訪問跳轉的頁面,所以不能寫跳轉到https://tcsrvs;;$request_uri一定要加,不然只能訪問後端首頁
   }
}
2. 重啟nginx服務
[root@nginx ~]# nginx -t
nginx: the configuration file /etc/nginx/nginx.conf syntax is ok
nginx: configuration file /etc/nginx/nginx.conf test is successful
[root@nginx ~]# nginx -s reload
3.Client端訪問http://www.ilinux.io/test會跳轉為訪問https://www.ilinux.io/test
3.6 小結
Client端訪問的是https,加解密在前端nginx以及後端tomcat都要處理。
4. http→https
這種情境是Client端使用http協議訪問Nginx,Nginx負載均衡或代理至後端的https協議。
4.1 tomcat-1主機
1. 使用java內建工具keytool來產出keystore檔
[root@tomcat-1 ~]# keytool -genkey -alias tomcat -keyalg RSA -keysize 2048 -keystore /etc/tomcat/tomcat.jks -validity 365002. 將keystore檔傳送到/etc/tomcat目錄
[root@tomcat-1 ~]# cp tomcat.jsk /etc/tomcat
[root@tomcat-1 ~]# ll /etc/tomcat/
total 232
...
-rw-r--r--. 1 root root     2244 Jun 18 15:41 tomcat.jks
...
3. 編輯/etc/tomcat/server.xml檔,設定以下內容
[root@tomcat-1 ~]# vim /etc/tomcat/server.xml
...
87     <Connector port="8443" protocol="org.apache.coyote.http11.Http11Protocol"
88                maxThreads="150" SSLEnabled="true" scheme="https" secure="true"
89                keystoreFile="conf/tomcat.jks" keystorePass="123456" clientAuth="false" sslProtocol="TLS" />  #keystoreFile的conf目錄是相對於/etc/tomcat目錄,ll /usr/share/tomcat/conf可以得知
...
4. 重啟tomcat服務,可以看到8443已經運行起來
[root@tomcat-1 ~]# systemctl restart tomcat
[root@tomcat-1 ~]# ss -tnl
State      Recv-Q Send-Q                                  Local Address:Port                                                 Peer Address:Port
LISTEN     0      128                                                 *:22                                                              *:*
LISTEN     0      100                                         127.0.0.1:25                                                              *:*
LISTEN     0      100                                              [::]:8009                                                         [::]:*
LISTEN     0      100                                              [::]:8080                                                         [::]:*
LISTEN     0      128                                              [::]:22                                                           [::]:*
LISTEN     0      100                                             [::1]:25                                                           [::]:*
LISTEN     0      100                                              [::]:8443                                                         [::]:*
LISTEN     0      1                                  [::ffff:127.0.0.1]:8005                                                         [::]:*
4.2 tomcat-2主機
1. 使用java內建工具keytool來產出keystore檔
[root@tomcat-2 ~]# keytool -genkey -alias tomcat -keyalg RSA -keysize 2048 -keystore /etc/tomcat/tomcat.jks -validity 365002. 將keystore檔傳送到/etc/tomcat目錄
[root@tomcat-2 ~]# cp tomcat.jsk /etc/tomcat
[root@tomcat-2 ~]# ll /etc/tomcat/
total 232
...
-rw-r--r--. 1 root root     2244 Jun 18 15:41 tomcat.jks
...
3. 編輯/etc/tomcat/server.xml檔,設定以下內容
[root@tomcat-2 ~]# vim /etc/tomcat/server.xml
...
87     <Connector port="8443" protocol="org.apache.coyote.http11.Http11Protocol"
88                maxThreads="150" SSLEnabled="true" scheme="https" secure="true"
89                keystoreFile="conf/tomcat.jks" keystorePass="123456" clientAuth="false" sslProtocol="TLS" />  #keystoreFile的conf目錄是相對於/etc/tomcat目錄,ll /usr/share/tomcat/conf可以得知
...
4. 重啟tomcat服務,可以看到8443已經運行起來
[root@tomcat-2 ~]# systemctl restart tomcat
[root@tomcat-2 ~]# ss -tnl
State      Recv-Q Send-Q                                  Local Address:Port                                                 Peer Address:Port
LISTEN     0      128                                                 *:22                                                              *:*
LISTEN     0      100                                         127.0.0.1:25                                                              *:*
LISTEN     0      100                                              [::]:8009                                                         [::]:*
LISTEN     0      100                                              [::]:8080                                                         [::]:*
LISTEN     0      128                                              [::]:22                                                           [::]:*
LISTEN     0      100                                             [::1]:25                                                           [::]:*
LISTEN     0      100                                              [::]:8443                                                         [::]:*
LISTEN     0      1                                  [::ffff:127.0.0.1]:8005                                                         [::]:*
4.3 nginx主機
1. 編輯/etc/nginx/nginx.conf設定檔,設定以下38~41內容
[root@nginx ~]# vim /etc/nginx/nginx.conf
...
 36     include /etc/nginx/conf.d/*.conf;
 37
 38     upstream tcsrvs {
 39         server 192.168.169.139:8443;  #後端網站伺服器https協議的port是8443
 40         server 192.168.169.140:8443;  #後端網站伺服器https協議的port是8443
 41     }
 42
 43     server {
...
2.新增/etc/nginx/conf.d/www-ilinux-io_http_tomcat.conf設定檔,設定以下內容
[root@nginx ~]# vim /etc/nginx/conf.d/www-ilinux-io_http_tomcat.conf
server {
   listen 80;
   server_name www.ilinux.io;

   location / {
       proxy_pass https://tcsrvs;  #代理到後端主機,https不能寫http,因為/etc/nginx/nginx.conf的upstream設定後端的port是8443,如果寫http會訪問不到
   }
}
3. 重啟nginx服務
[root@nginx ~]# nginx -t
nginx: the configuration file /etc/nginx/nginx.conf syntax is ok
nginx: configuration file /etc/nginx/nginx.conf test is successful
[root@nginx ~]# nginx -s reload
4.4 Client訪問http://www.ilinux.io/test
雖然後端有https但前端沒有,Client端看的是前端。
4.5 小結
Client端訪問的是前端http,就算後端有https最終返回給Client端的狀態是前端。
5. 總結
- https→http:Client端到前端nginx資料傳輸是加密的,前端nginx到後端資料傳輸是明文的。
- https→https:Client端到前端nginx資料傳輸是加密的,前端nginx到後端資料傳輸是加密的。
- https→http:Client端到前端nginx資料傳輸是明文的,前端nginx到後端資料傳輸是加密的。
公網危險、私網相對安全。