本文章內容:
1. Zabbix Server端建置
2. Zabbix Client端建置
環境:
1. zabbix-server1
[root@zabbix-server1 ~]# cat /etc/redhat-release
CentOS Linux release 7.8.2003 (Core)
[root@zabbix-server1 ~]# ip a | grep ens33
2: ens33: <BROADCAST,MULTICAST,UP,LOWER_UP> mtu 1500 qdisc pfifo_fast state UP group default qlen 1000
    inet 192.168.128.180/24 brd 192.168.128.255 scope global noprefixroute dynamic ens33
2. zabbix-client1
[root@zabbix-client1 ~]# cat /etc/redhat-release
CentOS Linux release 7.8.2003 (Core)
[root@zabbix-client1 ~]# ip a | grep ens33
2: ens33: <BROADCAST,MULTICAST,UP,LOWER_UP> mtu 1500 qdisc pfifo_fast state UP group default qlen 1000
    inet 192.168.128.183/24 brd 192.168.128.255 scope global noprefixroute dynamic ens33
1. Zabbix Server端建置
1.1 安裝Mariadb並設定
1.1.1 安裝mariadb-server
[root@zabbix-server1 ~]# yum install mariadb-server -y
1.1.2 設定/etc/my.cnf
[root@zabbix-server1 ~]# cp /etc/my.cnf{,.ori}
[root@zabbix-server1 ~]# vim /etc/my.cnf
 ...
 10 skip_name_resolve = ON
 11 innodb_file_per_table = ON
 ...
1.1.3 啟動mariadb服務並設定開機自啟動服務
[root@zabbix-server1 ~]# systemctl start mariadb.service  #啟動mariadb服務
[root@zabbix-server1 ~]# ss -tnl  #查看3306 port有沒有起來
State      Recv-Q Send-Q                                  Local Address:Port                                                 Peer Address:Port
LISTEN     0      50                                                  *:3306                                                            *:*
...
[root@localhost ~]# systemctl enable mariadb.service  #設定開機自啟動服務
Created symlink from /etc/systemd/system/multi-user.target.wants/mariadb.service to /usr/lib/systemd/system/mariadb.service.
1.1.4 設定安全性 (預設root密碼為空且可以遠程登入)
[root@zabbix-server1 ~]# mysql_secure_installation

NOTE: RUNNING ALL PARTS OF THIS SCRIPT IS RECOMMENDED FOR ALL MariaDB
      SERVERS IN PRODUCTION USE!  PLEASE READ EACH STEP CAREFULLY!

In order to log into MariaDB to secure it, we'll need the current
password for the root user.  If you've just installed MariaDB, and
you haven't set the root password yet, the password will be blank,
so you should just press enter here.

Enter current password for root (enter for none):  #按enter,因為預設root密碼為空
OK, successfully used password, moving on...

Setting the root password ensures that nobody can log into the MariaDB
root user without the proper authorisation.

Set root password? [Y/n] y  #輸入y表示要設定root密碼
New password:  #輸入新密碼
Re-enter new password:  #再輸入一次新密碼
Password updated successfully!
Reloading privilege tables..
 ... Success!


By default, a MariaDB installation has an anonymous user, allowing anyone
to log into MariaDB without having to have a user account created for
them.  This is intended only for testing, and to make the installation
go a bit smoother.  You should remove them before moving into a
production environment.

Remove anonymous users? [Y/n] y  #刪除匿名用戶
 ... Success!

Normally, root should only be allowed to connect from 'localhost'.  This
ensures that someone cannot guess at the root password from the network.

Disallow root login remotely? [Y/n] y  #禁止root遠程登入
 ... Success!

By default, MariaDB comes with a database named 'test' that anyone can
access.  This is also intended only for testing, and should be removed
before moving into a production environment.

Remove test database and access to it? [Y/n] n  #要不要刪除test資料庫
 ... skipping.

Reloading the privilege tables will ensure that all changes made so far
will take effect immediately.

Reload privilege tables now? [Y/n] y  #重載授權表
 ... Success!

Cleaning up...

All done!  If you've completed all of the above steps, your MariaDB
installation should now be secure.

Thanks for using MariaDB!
1.1.5 連到mariadb上創建一個用戶帳號,並授權其能使用zabbix資料庫,最後刷新授權表
[root@zabbix-server1 ~]# mysql -uroot -p
Enter password:  #使用剛設定的密碼登入
Welcome to the MariaDB monitor.  Commands end with ; or \g.
Your MariaDB connection id is 10
Server version: 5.5.65-MariaDB MariaDB Server

Copyright (c) 2000, 2018, Oracle, MariaDB Corporation Ab and others.

Type 'help;' or '\h' for help. Type '\c' to clear the current input statement.

MariaDB [(none)]> CREATE DATABASE zabbix CHARSET 'utf8' COLLATE 'utf8_bin';  #創建zabbix資料庫,設定字符集為utf8以允許能出現中文不報錯
Query OK, 1 row affected (0.00 sec)

MariaDB [(none)]> GRANT ALL ON zabbix.* TO 'zbxuser'@'192.168.128.180' IDENTIFIED BY 'zbxuser';  #創建zbxuser用戶並授權能遠程使用zabbix資料庫(其實只授權自己,因為我們都安裝在同一台主機上),將來如果zabbix server、zabbix database、zabbix web gui是安裝在不同主機的話就要授權遠程連接,像192.168.128.%這樣
Query OK, 0 rows affected (0.00 sec)

MariaDB [(none)]> GRANT ALL ON zabbix.* TO 'zbxuser'@'127.0.0.1' IDENTIFIED BY 'zbxuser';  #也授權zbxuser能本地連接,本地使用Socket連接
Query OK, 0 rows affected (0.00 sec)

MariaDB [(none)]>  FLUSH PRIVILEGES;  #刷新授權表
Query OK, 0 rows affected (0.00 sec)

MariaDB [(none)]> \q
Bye
1.2 安裝Zabbix Server並設定
1.2.1 安裝Zabbix提供的倉庫
[root@zabbix-server1 ~]# rpm -Uvh https://repo.zabbix.com/zabbix/5.0/rhel/7/x86_64/zabbix-release-5.0-1.el7.noarch.rpm
Retrieving https://repo.zabbix.com/zabbix/5.0/rhel/7/x86_64/zabbix-release-5.0-1.el7.noarch.rpm
warning: /var/tmp/rpm-tmp.keJTwj: Header V4 RSA/SHA512 Signature, key ID a14fe591: NOKEY
Preparing...                          ################################# [100%]
Updating / installing...
   1:zabbix-release-5.0-1.el7         ################################# [100%]
[root@localhost ~]# yum clean all
Loaded plugins: fastestmirror
Cleaning repos: base epel extras updates zabbix zabbix-non-supported
Cleaning up list of fastest mirrors
1.2.2 安裝zabbix-server-mysql、zabbix-agent、zabbix-get (因為Zabbix Server也要監控自己,所以安裝zabbix-agent,至於zabbix-agent的設定請看"2. Zabbix Client端建置"章節)
[root@zabbix-server1 ~]# yum install zabbix-server-mysql zabbix-agent zabbix-get -y
1.2.3 導入Zabbix的資料庫結構
[root@zabbix-server1 ~]# cp /usr/share/doc/zabbix-server-mysql-5.0.3/create.sql.gz ./
[root@zabbix-server1 ~]# gzip -d create.sql.gz
[root@zabbix-server1 ~]# ls
anaconda-ks.cfg  create.sql
[root@localhost ~]# mysql -uzbxuser -h127.0.0.1 -p zabbix < ./create.sql  #導入Zabbix的資料庫結構,也可以使用zcat /usr/share/doc/zabbix-server-mysql-5.0.3/create.sql.gz | mysql -uzbxuser -p zabbix
Enter password:
[root@localhost ~]# mysql -uzbxuser -h127.0.0.1 -p  #連入Mariadb看是否有導入成功
Enter password:
Welcome to the MariaDB monitor.  Commands end with ; or \g.
Your MariaDB connection id is 15
Server version: 5.5.65-MariaDB MariaDB Server

Copyright (c) 2000, 2018, Oracle, MariaDB Corporation Ab and others.

Type 'help;' or '\h' for help. Type '\c' to clear the current input statement.

MariaDB [(none)]> use zabbix  #進入zabbix資料庫
Reading table information for completion of table and column names
You can turn off this feature to get a quicker startup with -A

Database changed
MariaDB [zabbix]> SHOW TABLES;  #zabbix資料庫產生了許多表,表示有導入成功
+----------------------------+
| Tables_in_zabbix           |
+----------------------------+
| acknowledges               |
| actions                    |
| alerts                     |
| application_discovery      |
...
MariaDB [zabbix]> \q
Bye
1.2.4 設定/etc/zabbix/zabbix_server.conf
[root@zabbix-server1 ~]# cp /etc/zabbix/zabbix_server.conf{,.ori}
[root@zabbix-server1 ~]# vim /etc/zabbix/zabbix_server.conf
...
  6 ### Option: ListenPort
  7 #       Listen port for trapper.
  8 #
  9 # Mandatory: no
 10 # Range: 1024-32767
 11 # Default:
 12 # ListenPort=10051  #設定監聽的port,預設是10051
...
 14 ### Option: SourceIP
 15 #       Source IP address for outgoing connections.
 16 #
 17 # Mandatory: no
 18 # Default:
 19 # SourceIP=  #如果Zabbix Server有多個IP的話,則這裡要指明向Zabbix Client監控的IP,因為Zabbix Client會設定允許Zabbix Server的那些IP來監控
...
 31 ### Option: LogFile
 32 #       Log file name for LogType 'file' parameter.
 33 #
 34 # Mandatory: yes, if LogType is set to file, otherwise no
 35 # Default:
 36 # LogFile=
 37
 38 LogFile=/var/log/zabbix/zabbix_server.log  #預設日誌記錄的位置
...
 40 ### Option: LogFileSize
 41 #       Maximum size of log file in MB.
 42 #       0 - disable automatic log rotation.
 43 #
 44 # Mandatory: no
 45 # Range: 0-1024
 46 # Default:
 47 # LogFileSize=1
 48
 49 LogFileSize=0  #可以設定日誌達到多大就換一個新文件,0表示沒限制,單位是MB
...
 51 ### Option: DebugLevel
 52 #       Specifies debug level:
 53 #       0 - basic information about starting and stopping of Zabbix processes
 54 #       1 - critical information
 55 #       2 - error information
 56 #       3 - warnings
 57 #       4 - for debugging (produces lots of information)
 58 #       5 - extended debugging (produces even more information)
 59 #
 60 # Mandatory: no
 61 # Range: 0-5
 62 # Default:
 63 # DebugLevel=3  #定義日誌的詳細級別,預設是3(warnings)
...
 84 ### Option: DBHost
 85 #       Database host name.
 86 #       If set to localhost, socket is used for MySQL.
 87 #       If set to empty string, socket is used for PostgreSQL.
 88 #
 89 # Mandatory: no
 90 # Default:
 91 # DBHost=localhost
 92 DBHost=192.168.128.180  #設定Zabbix Server資料庫主機
...
 94 ### Option: DBName
 95 #       Database name.
 96 #
 97 # Mandatory: yes
 98 # Default:
 99 # DBName=
100
101 DBName=zabbix  #設定Zabbix Server的資料庫名稱
...
110 ### Option: DBUser
111 #       Database user.
112 #
113 # Mandatory: no
114 # Default:
115 # DBUser=
116
117 DBUser=zbxuser  #連接Zabbix Server資料庫使用的用戶
...
119 ### Option: DBPassword
120 #       Database password.
121 #       Comment this line if no password is used.
122 #
123 # Mandatory: no
124 # Default:
125 # DBPassword=
126 DBPassword=zbxuser  #連接Zabbix Server資料庫使用的用戶的密碼
...
128 ### Option: DBSocket
129 #       Path to MySQL socket.
130 #
131 # Mandatory: no
132 # Default:
133 # DBSocket=  #如果"Option: DBHost"是設定127.0.0.1連接的話會使用Socket連接,那這裡預設路徑可能跟你的/var/my.cnf第3行設定的不一樣
...
135 ### Option: DBPort
136 #       Database port when not using local socket.
137 #
138 # Mandatory: no
139 # Range: 1024-65535
140 # Default:
141 # DBPort=  #設定Mariadb監聽的port,預設是3306
...
1.2.5 檢查trousers包的版本是否大於0.3.12,沒有的話需下載大於0.3.12版本的包來安裝
[root@zabbix-server1 ~]# yum info trousers
Loaded plugins: fastestmirror
Loading mirror speeds from cached hostfile
 * base: centos.mirror.hostinginside.com
 * extras: centos.mirror.hostinginside.com
 * updates: centos.mirror.hostinginside.com
Installed Packages
Name        : trousers
Arch        : x86_64
Version     : 0.3.14  #有超過0.3.12
Release     : 2.el7
Size        : 817 k
Repo        : installed
From repo   : anaconda
Summary     : TCG's Software Stack v1.2
URL         : http://trousers.sourceforge.net
License     : BSD
Description : TrouSerS is an implementation of the Trusted Computing Group's Software Stack
            : (TSS) specification. You can use TrouSerS to write applications that make use
            : of your TPM hardware. TPM hardware can create, store and use RSA keys
            : securely (without ever being exposed in memory), verify a platform's software
            : state using cryptographic hashes and more.
1.2.6 啟動zabbix-server服務並設定開機自啟動服務
[root@zabbix-server1 ~]# systemctl start zabbix-server.service
[root@zabbix-server1 ~]# ss -tnl
State      Recv-Q Send-Q                                  Local Address:Port                                                 Peer Address:Port
LISTEN     0      128                                                 *:10051                                                           *:*
LISTEN     0      128                                              [::]:10051                                                        [::]:*
...
[root@zabbix-server1 ~]# systemctl enable zabbix-server.service
Created symlink from /etc/systemd/system/multi-user.target.wants/zabbix-server.service to /usr/lib/systemd/system/zabbix-server.service.
1.3 安裝Zabbix Web並設定
1.3.1 安裝SCL倉庫 (有些依賴包在這個倉庫中)
[root@zabbix-server1 ~]# yum install centos-release-scl -y
1.3.2 啟用Zabbix提供的倉庫的"[zabbix-frontend]"
[root@zabbix-server1 ~]# vim /etc/yum.repos.d/zabbix.repo
...
  8 [zabbix-frontend]
  9 name=Zabbix Official Repository frontend - $basearch
 10 baseurl=http://repo.zabbix.com/zabbix/5.0/rhel/7/$basearch/frontend
 11 enabled=1  #設定為1
 12 gpgcheck=1
 13 gpgkey=file:///etc/pki/rpm-gpg/RPM-GPG-KEY-ZABBIX-A14FE591
...
1.3.3 安裝zabbix-web-mysql-scl、zabbix-apache-conf-scl
[root@zabbix-server1 ~]# yum install zabbix-web-mysql-scl zabbix-apache-conf-scl -y
1.3.4 設定PHP時區
[root@zabbix-server1 ~]# cp /etc/opt/rh/rh-php72/php-fpm.d/zabbix.conf{,.ori}
[root@zabbix-server1 ~]# vim /etc/opt/rh/rh-php72/php-fpm.d/zabbix.conf
...
 24 php_value[date.timezone] = Asia/Taipei  #取消註釋,改成合適的時區
1.3.5 啟動httpd、rh-php72-php-fpm服務並設定開機自啟動服務
[root@zabbix-server1 ~]# systemctl start httpd.service rh-php72-php-fpm.service
[root@zabbix-server1 ~]# ss -tnl
State      Recv-Q Send-Q                                  Local Address:Port                                                 Peer Address:Port
...
LISTEN     0      128                                         127.0.0.1:9000                                                            *:*
LISTEN     0      128                                              [::]:80                                                           [::]:*
[root@zabbix-server1 ~]# systemctl enable httpd.service rh-php72-php-fpm.service
Created symlink from /etc/systemd/system/multi-user.target.wants/httpd.service to /usr/lib/systemd/system/httpd.service.
Created symlink from /etc/systemd/system/multi-user.target.wants/rh-php72-php-fpm.service to /usr/lib/systemd/system/rh-php72-php-fpm.service.
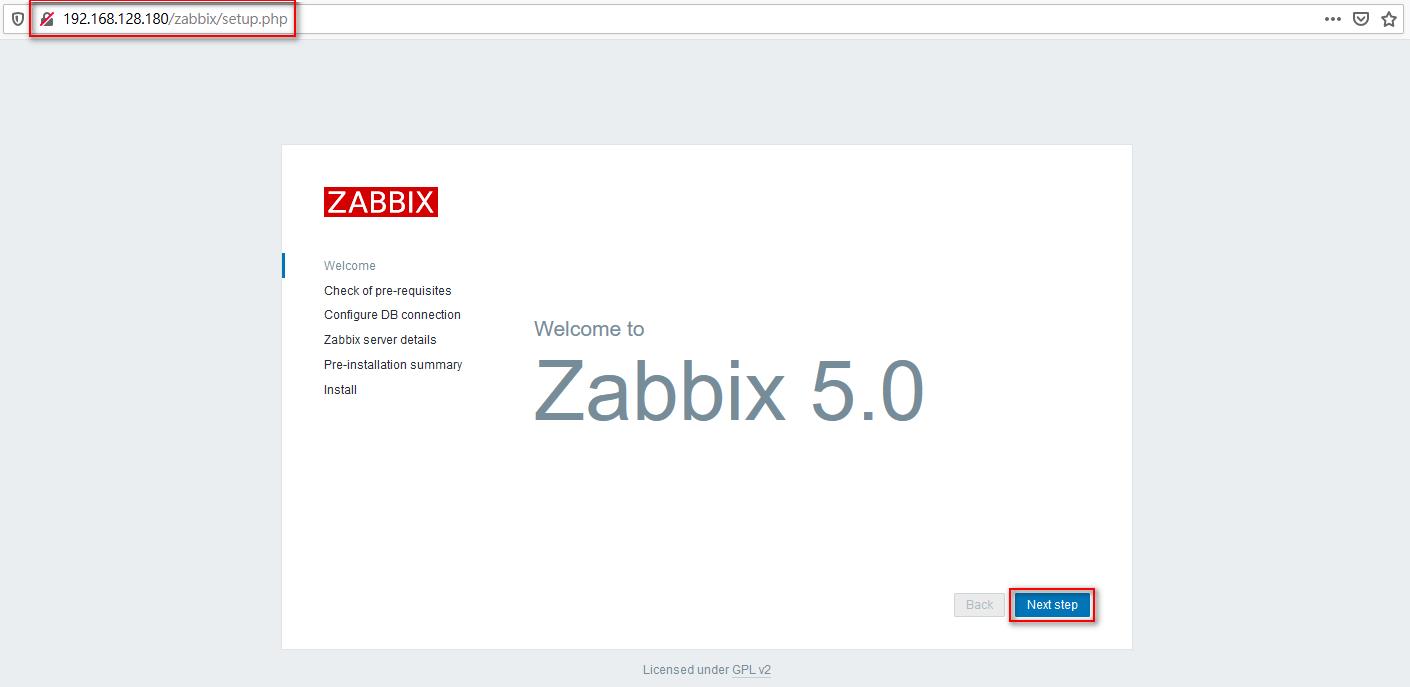
1.3.6 訪問"http://192.168.128.180/zabbix" → 點"Next step"
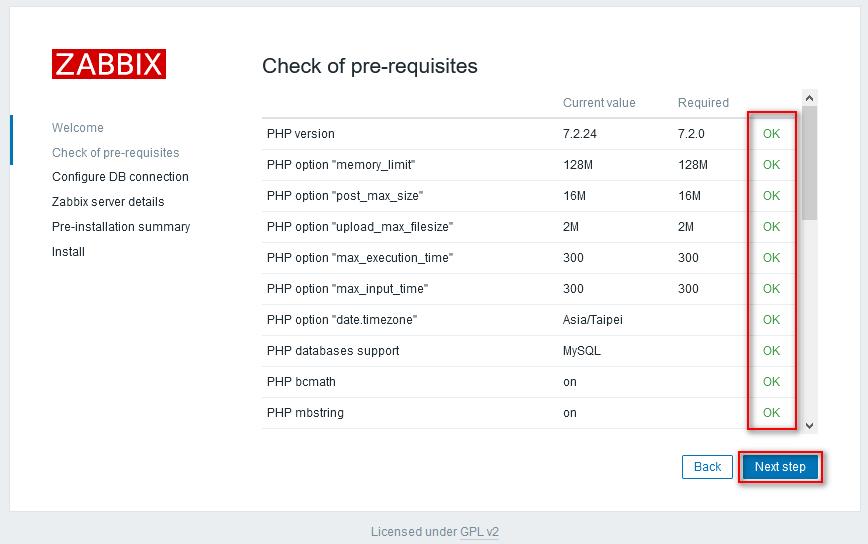
1.3.7 檢查環境是否符合條件 → 點"Next step"
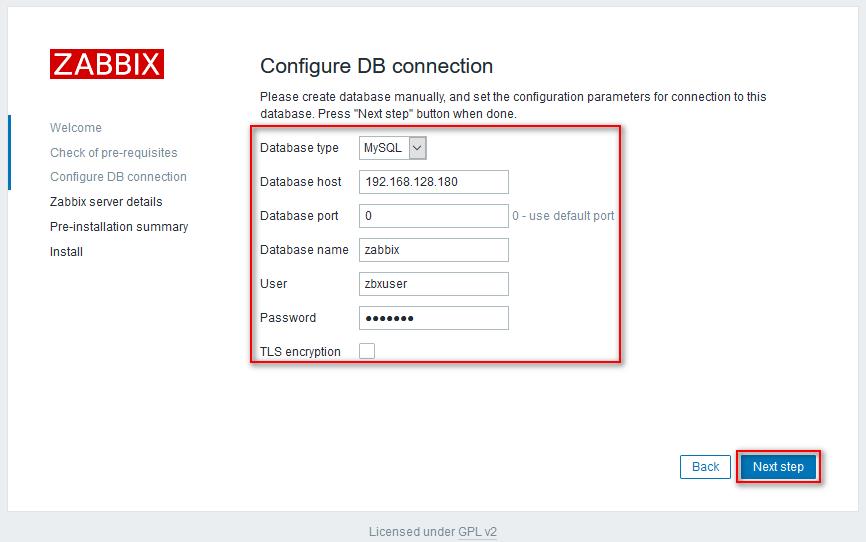
1.3.8 設定連接DB的相關資訊 → 點"Next step"
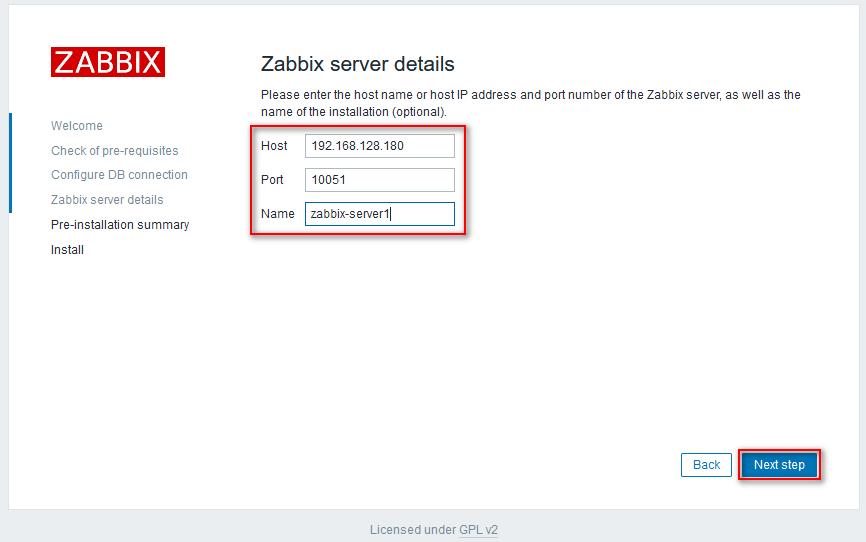
1.3.9 (可填可不填) 設定Zabbix Server的一些詳細信息,Host可填主機名或IP → 點"Next step"
1.3.10 顯示設定摘要,沒問題的話就點"Next step"
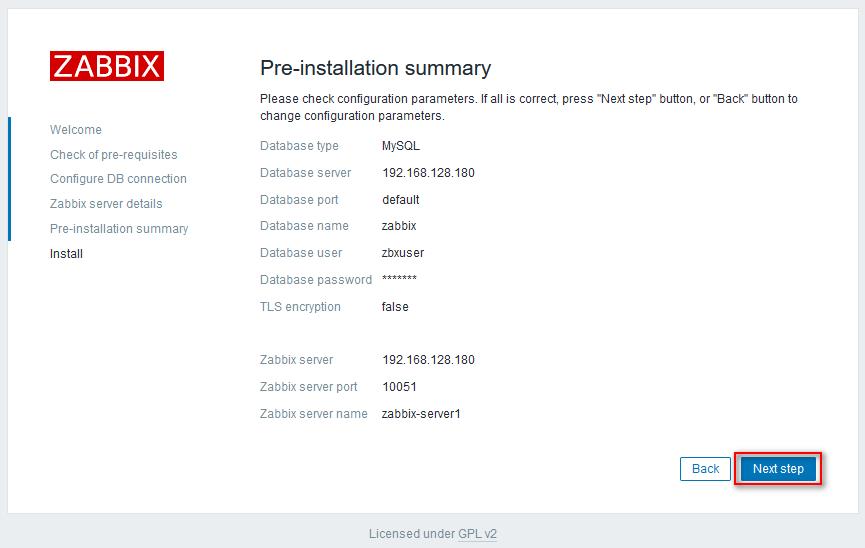
1.3.11 產生了Zabbix Web的設定文件,如果之前填錯了想改就改這文件即可,點"Finish"
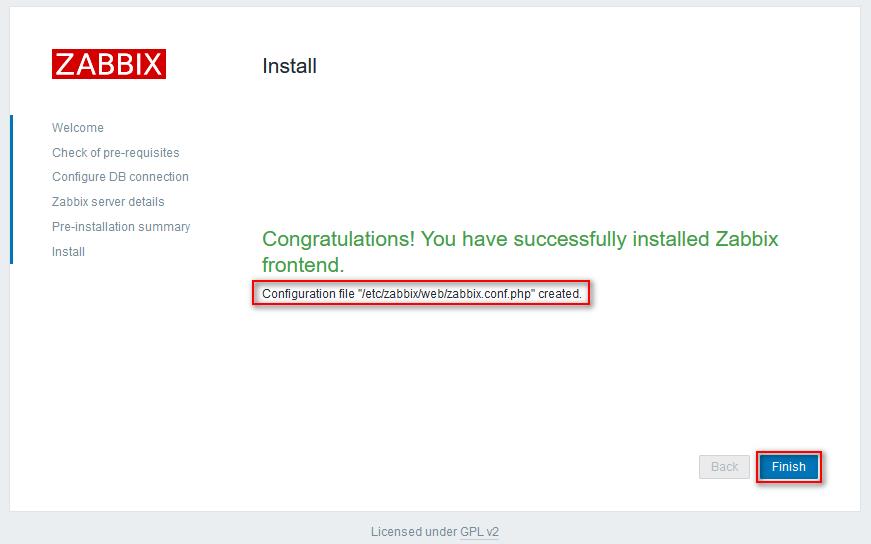
1.3.12 預設管理員帳號是Admin,密碼是zabbix
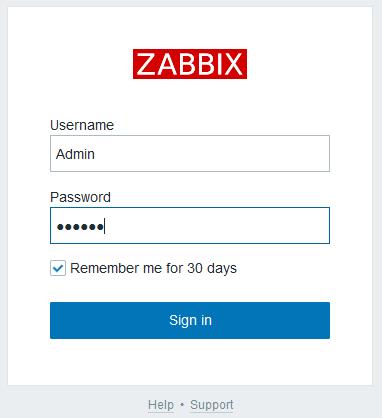
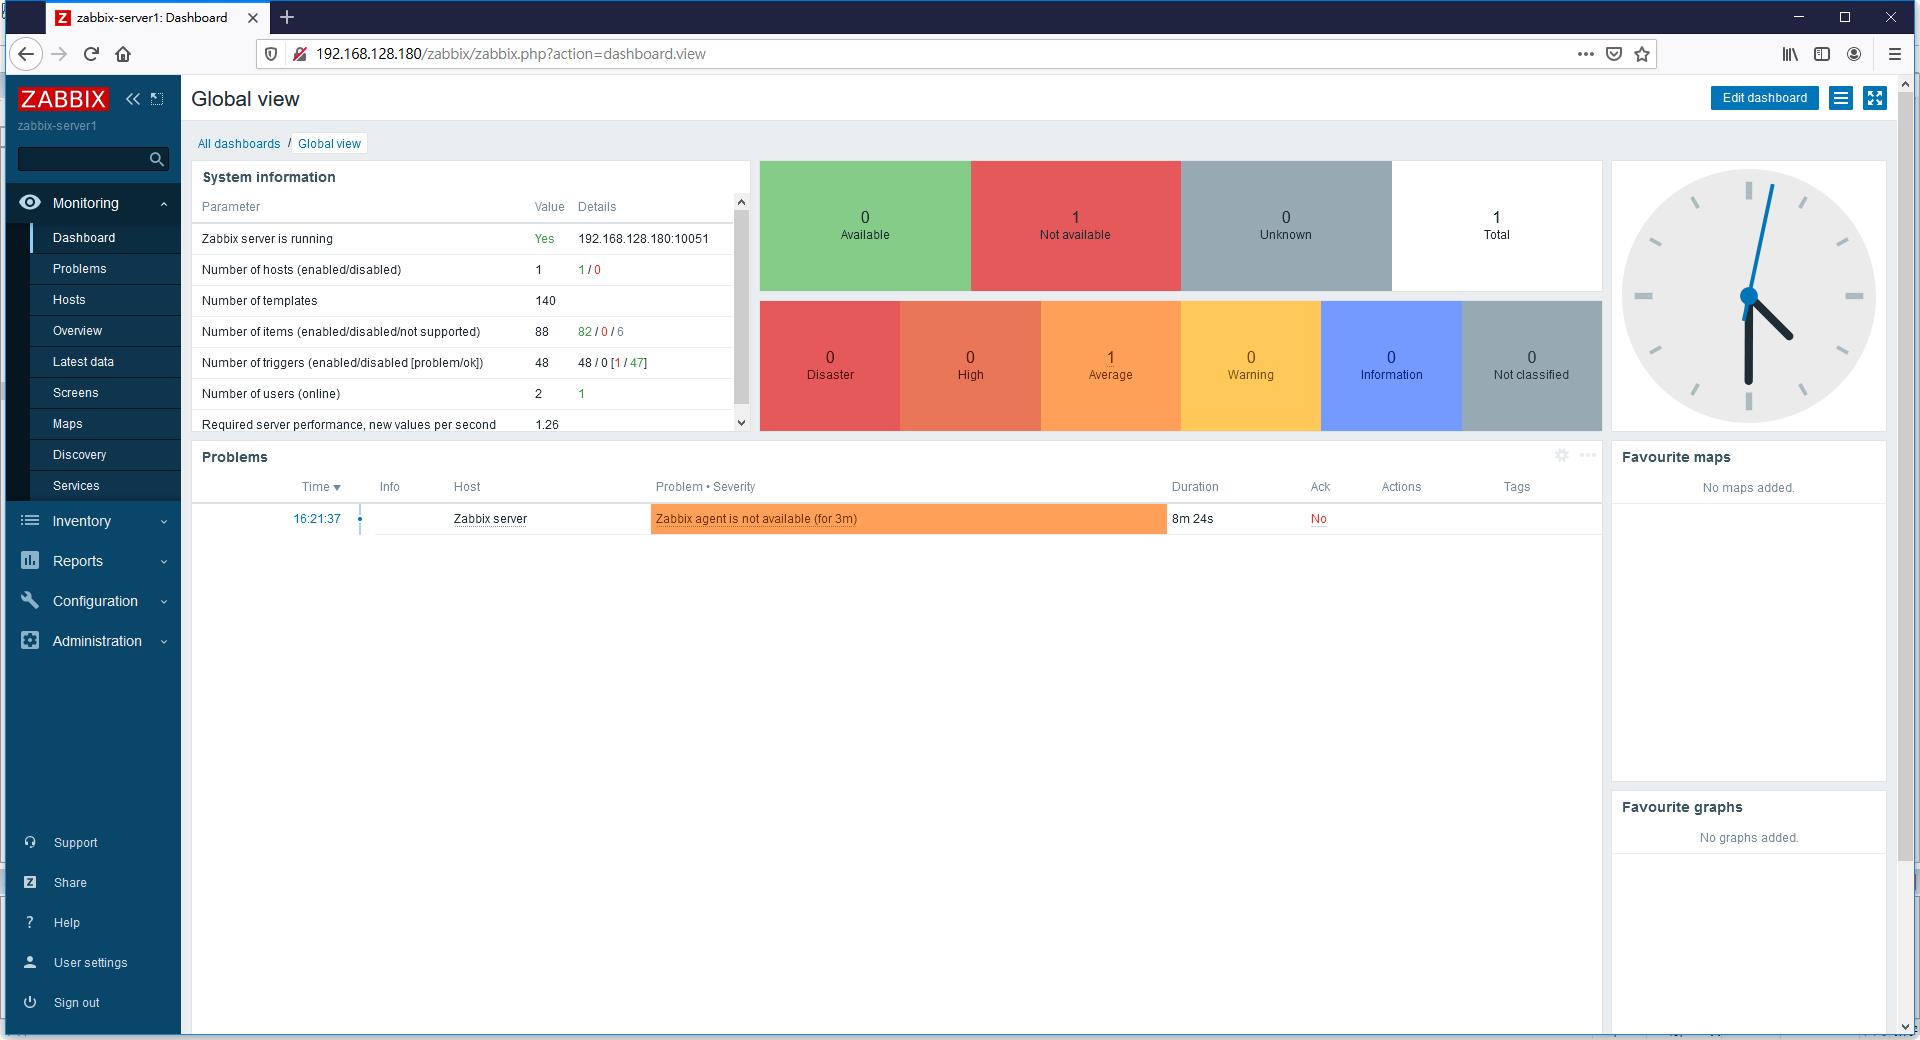
1.3.13 至此,Zabbix Server端建置完成
2. Zabbix Client端建置
2.1 安裝Zabbix提供的倉庫
[root@zabbix-client1 ~]# rpm -Uvh https://repo.zabbix.com/zabbix/5.0/rhel/7/x86_64/zabbix-release-5.0-1.el7.noarch.rpm
Retrieving https://repo.zabbix.com/zabbix/5.0/rhel/7/x86_64/zabbix-release-5.0-1.el7.noarch.rpm
warning: /var/tmp/rpm-tmp.vejjcr: Header V4 RSA/SHA512 Signature, key ID a14fe591: NOKEY
Preparing...                          ################################# [100%]
Updating / installing...
   1:zabbix-release-5.0-1.el7         ################################# [100%]
[root@zabbix-client1 ~]# yum clean all
Loaded plugins: fastestmirror
Cleaning repos: base extras updates zabbix zabbix-non-supported
Cleaning up list of fastest mirrors
2.2 安裝zabbix-agent、zabbix-sender
[root@zabbix-client1 ~]# yum install zabbix-agent zabbix-sender -y
2.3 設定/etc/zabbix/zabbix_agentd.conf
[root@zabbix-client1 ~]# cp /etc/zabbix/zabbix_agentd.conf{,.ori}
[root@zabbix-server1 ~]# vim /etc/zabbix/zabbix_agentd.conf
...
 25 ### Option: LogFile
 26 #       Log file name for LogType 'file' parameter.
 27 #
 28 # Mandatory: yes, if LogType is set to file, otherwise no
 29 # Default:
 30 # LogFile=
 31
 32 LogFile=/var/log/zabbix/zabbix_agentd.log  #預設日誌記錄的位置
...
 34 ### Option: LogFileSize
 35 #       Maximum size of log file in MB.
 36 #       0 - disable automatic log rotation.
 37 #
 38 # Mandatory: no
 39 # Range: 0-1024
 40 # Default:
 41 # LogFileSize=1
 42
 43 LogFileSize=0  #可以設定日誌達到多大就換一個新文件,0表示沒限制,單位是MB
...
 45 ### Option: DebugLevel
 46 #       Specifies debug level:
 47 #       0 - basic information about starting and stopping of Zabbix processes
 48 #       1 - critical information
 49 #       2 - error information
 50 #       3 - warnings
 51 #       4 - for debugging (produces lots of information)
 52 #       5 - extended debugging (produces even more information)
 53 #
 54 # Mandatory: no
 55 # Range: 0-5
 56 # Default:
 57 # DebugLevel=3  #定義日誌的詳細級別,預設是3(warnings)
...
103 ##### Passive checks related  #被動監控模式的相關設定
104
105 ### Option: Server
106 #       List of comma delimited IP addresses, optionally in CIDR notation, or DNS names of Zabbix servers and Zabbix proxies.
107 #       Incoming connections will be accepted only from the hosts listed here.
108 #       If IPv6 support is enabled then '127.0.0.1', '::127.0.0.1', '::ffff:127.0.0.1' are treated equally
109 #       and '::/0' will allow any IPv4 or IPv6 address.
110 #       '0.0.0.0/0' can be used to allow any IPv4 address.
111 #       Example: Server=127.0.0.1,192.168.1.0/24,::1,2001:db8::/32,zabbix.example.com
112 #
113 # Mandatory: yes, if StartAgents is not explicitly set to 0
114 # Default:
115 # Server=
116
117 Server=192.168.128.180  #設定Zabbix Server的IP
...
119 ### Option: ListenPort
120 #       Agent will listen on this port for connections from the server.
121 #
122 # Mandatory: no
123 # Range: 1024-32767
124 # Default:
125 # ListenPort=10050  #設定監聽port
...
127 ### Option: ListenIP
128 #       List of comma delimited IP addresses that the agent should listen on.
129 #       First IP address is sent to Zabbix server if connecting to it to retrieve list of active checks.
130 #
131 # Mandatory: no
132 # Default:
133 # ListenIP=0.0.0.0  #設定監聽的IP,預設是監聽全部IP
...
144 ##### Active checks related  #主動監控模式的相關設定
145
146 ### Option: ServerActive
147 #       List of comma delimited IP:port (or DNS name:port) pairs of Zabbix servers and Zabbix proxies for active checks.
148 #       If port is not specified, default port is used.
149 #       IPv6 addresses must be enclosed in square brackets if port for that host is specified.
150 #       If port is not specified, square brackets for IPv6 addresses are optional.
151 #       If this parameter is not specified, active checks are disabled.
152 #       Example: ServerActive=127.0.0.1:20051,zabbix.domain,[::1]:30051,::1,[12fc::1]
153 #
154 # Mandatory: no
155 # Default:
156 # ServerActive=
157
158 ServerActive=192.168.128.180  #設定Zabbix Server的IP
...
160 ### Option: Hostname
161 #       Unique, case sensitive hostname.
162 #       Required for active checks and must match hostname as configured on the server.
163 #       Value is acquired from HostnameItem if undefined.
164 #
165 # Mandatory: no
166 # Default:
167 # Hostname=
168
169 Hostname=zabbix-client1  #可以設定hostname或hostid,但必須唯一
2.4 啟動zabbix-agent服務並設定開機自啟動服務
[root@zabbix-client1 ~]# systemctl start zabbix-agent.service
[root@zabbix-client1 ~]# ss -tnl
State      Recv-Q Send-Q                                  Local Address:Port                                                 Peer Address:Port
...
LISTEN     0      128                                                 *:10050                                                           *:*
LISTEN     0      128                                              [::]:10050                                                        [::]:*
[root@zabbix-client1 ~]# systemctl enable zabbix-agent.service
Created symlink from /etc/systemd/system/multi-user.target.wants/zabbix-agent.service to /usr/lib/systemd/system/zabbix-agent.service.
2.5 到http://192.168.128.180/zabbix納入被監控主機即可