2018.05.23 補充說明
Angulare官方第五版開始,將舊的 HttpModule被標示為不建議使用,建議改用 HttpClient
這篇文章所使用的例子,後續再回頭看會覺得設計不洽當,因為Service應該只提供取資料的方法,
真正物件建立應該是要在component裡面去執行並且暫存,不應該是放在Service裡面。
在Angular2的架構底下,需要使用Ajax跟後端溝通API進行資料存取的時候,就會用到HttpModuel
本文內容為參考這篇文章。
要使用HttpModuel的第一個步驟,
1.import { HttpModule } from '@angular/http';
2.在imports: [] 中加入 HttpModule
在assets目錄模擬後端程式
接著我們在src/assets中加入一個todo-list.json的程式,來模擬後端取得TodoList的資料
[{
        "id": 4,
        "value": "Todo Item From HttpModuel No.1",
        "done": false
    },
    {
        "id": 5,
        "value": "Todo Item From HttpModuel No.2",
        "done": true
    },
    {
        "id": 6,
        "value": "Todo Item From HttpModuel No.3",
        "done": false
    }
]
在Angular CLI建立的專案架構下,在使用ng serve或ng build指令時,預設會將src/assets目錄裡的內容都當作靜態內容,將裡面的程式都移到輸出路徑的/assets裡面
為了跟之前寫好的Service區隔,新增一個Service來交叉比對結果
使用Angular CLI指令新增一個新的Service: ng g s service\todo-list-Moduel
開始編輯service
注意:http 是以建構式注入的方式來引用!!
import { Injectable } from '@angular/core';
import { ITodoItem } from '../interface/i-todo-item'; //import Todoitem interface

import { Http } from '@angular/http'; // import 我們要使用的Http
import 'rxjs/add/operator/toPromise'; // 幫助我們將RxJs轉為Promise

@Injectable()
export class TodoListModuelService {

  //宣告物件:todoItems
  todoItems: ITodoItem[];

  // http 是以 建構式注入 的方式來引用
  constructor(private http: Http) { }

  loadTodoList() {
    // 使用http.get取得後端資料
    // http.get會回傳RxJS的Observable物件
    // 我們先用.toPromise()轉回我們會使用的ES6 Prmoise
    this.http.get('/assets/todo_list.json')
      .toPromise()
      .then(response => {
        this.todoItems = response.json();
      });
  };

  addTodoListItem(text) {
    this.todoItems.push({
      id: (new Date()).getTime(),
      value: text,
      done: false
    });
  }

  delTodoListItem(paraObject: ITodoItem) {
    this.todoItems = this.todoItems.filter(function (ele) {
      return ((ele.id != paraObject.id) && (ele.value != paraObject.value));
    });
  }

  togoogleTodoItem(item: ITodoItem) {
    item.done = !item.done;
  }

}
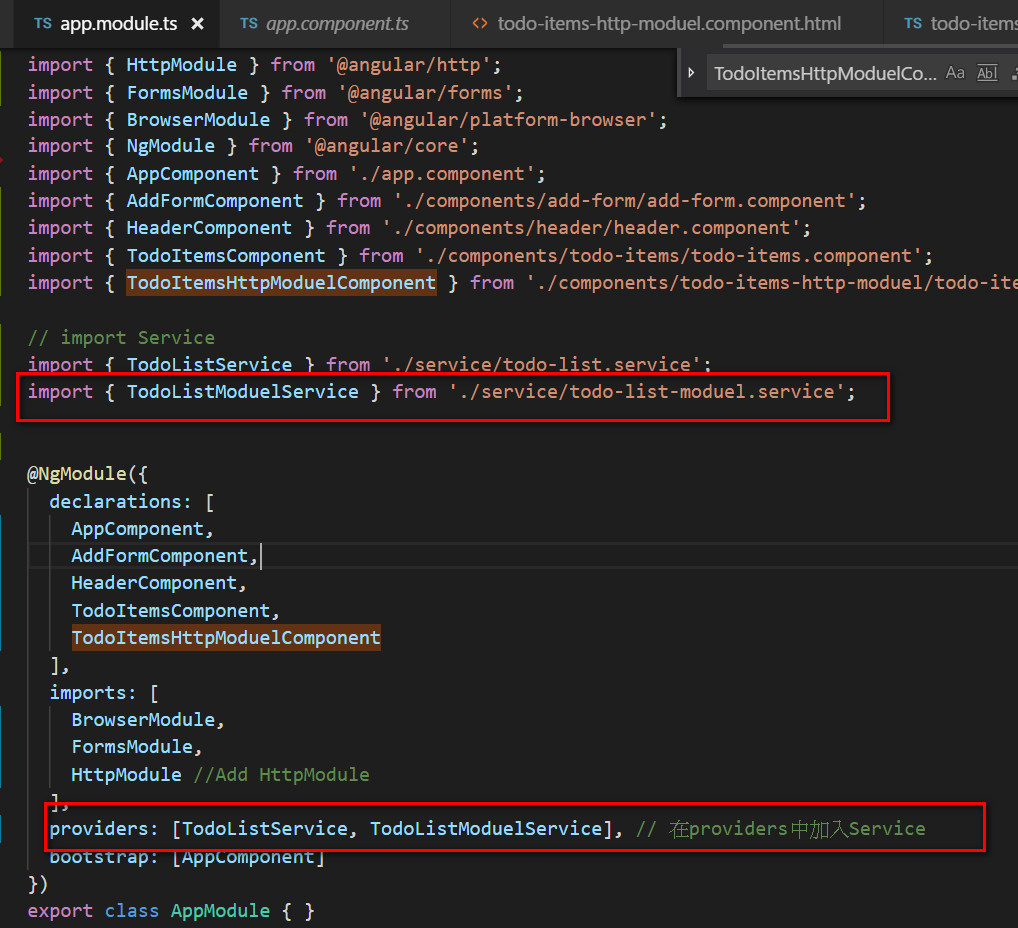
接著新增一個Component來測試這個Service
component要使用service之前須注意,
service要先import到app.module.ts,接著再新增到providers
建立測試用的Component
ng g c components\todo-items-http-moduel
這邊使用Service的方式跟之前紀錄的一樣,唯一差別在於,
之前的Service是把陣列內容定義再Service內,現在要測試httpModuel,
所以陣列內容是透過todo-list-moduel.service.ts 內定義的Method:loadTodoList()來初始化,
Component再使用這個Service的時候也需要去做初始化的動作
把這個動作放在ngOnInit() 內,其他使用的方法就跟之前寫Service的時候一樣
import { Component, OnInit } from '@angular/core';
import { TodoListModuelService } from '../../service/todo-list-moduel.service';
import { ITodoItem } from '../../interface/i-todo-item';

@Component({
  selector: 'app-todo-items-http-moduel',
  templateUrl: './todo-items-http-moduel.component.html',
  styleUrls: ['./todo-items-http-moduel.component.css']
})
export class TodoItemsHttpModuelComponent implements OnInit {

  constructor(private todoModuelService: TodoListModuelService) { }

  ngOnInit() {
    //在這裡初始化todo-list-moduel.service 的內容
    this.todoModuelService.loadTodoList();
  }

  getTodoList() {
    return this.todoModuelService.getTodoList();
  }

  clickTodoList(item: ITodoItem) {
    this.todoModuelService.togoogleTodoItem(item);
  }

  delTodoItem(item: ITodoItem) {
    this.todoModuelService.delTodoListItem(item);
  }

}