[ASP.NET MVC] 使用Entity Framework Code First移轉,移轉Model與資料庫的變更。
Code First 移轉
在這個章節中,將使用Entity Framework Code First Migrations來遷移Model的改變,這樣Model的改變便會應用到資料庫中。
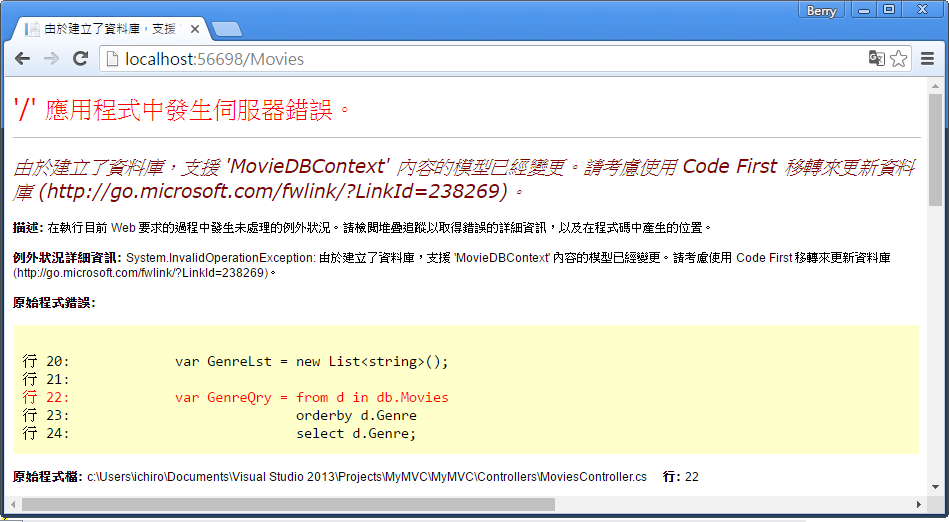
在預設中,使用Entity Framework Code First會自動建立一個資料庫。
Code First在資料庫裡新增一個資料表,用來追蹤資料庫是否與Model同步,要是沒有同步的話,Entity Framework會拋出錯誤訊息。
這使得在開發時能夠輕鬆的追蹤問題,否則就只能在執行應用程式時才能發現問題。
設置 Code First 移轉
在方案總管App_Start/Movies.mdf 右鍵選擇刪除。如果沒看到Movies.mdf檔案的話,在方案總管的上方按下顯示所有檔案。
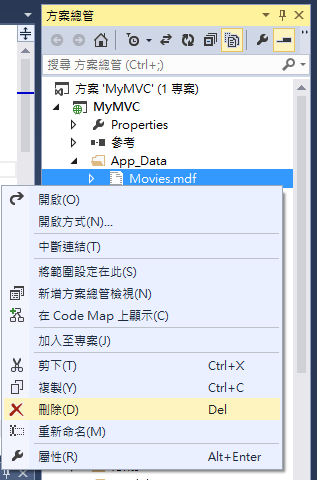
接著先重新建置,確定應用程式目前沒有任何錯誤。
在Visual Studio的工具選單中,選擇Nuget套件管理員>套件管理器主控台。
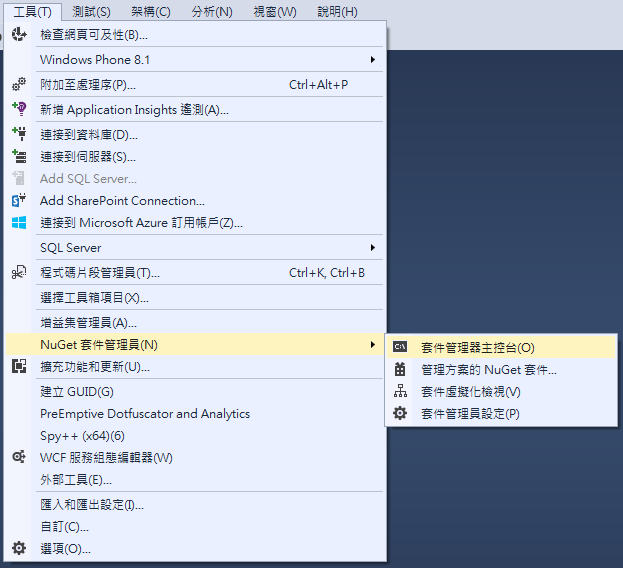
在套件管理器主控台的視窗中輸入以下指令:
Enable-Migrations -ContextTypeName MyMVC.Models.MovieDBContext

上面的Enable-Migrations指令會建立一個新的Migrations文件與Configuration.cs檔。
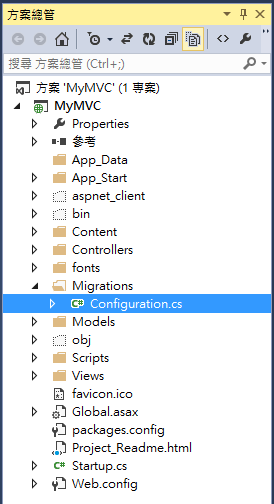
開啟Configuration.cs。可以看到已經有一個Seed的方法,其中內容為註解說明。
將Seed方法改寫為以下:
protected override void Seed(MyMVC.Models.MovieDBContext context)
{
    context.Movies.AddOrUpdate(i => i.Title,
           new Movie
           {
               Title = "高年級實習生",
               ReleaseDate = DateTime.Parse("2015-9-25"),
               Genre = "喜劇",
               Price = 100
           },

            new Movie
            {
                Title = "走鋼索的人 ",
                ReleaseDate = DateTime.Parse("2015-10-8"),
                Genre = "劇情",
                Price = 100
            },

            new Movie
            {
                Title = "動物方城市",
                ReleaseDate = DateTime.Parse("2016-2-26"),
                Genre = "動畫",
                Price = 150
            },

          new Movie
          {
              Title = "我就要你好好的",
              ReleaseDate = DateTime.Parse("2016-6-17"),
              Genre = "愛情",
              Price = 200
          }
      );
}
改寫後會發現在Movie底下有紅色波浪並顯示錯誤訊息,在Movie上點擊右鍵>解析> using MyMVC.Models;
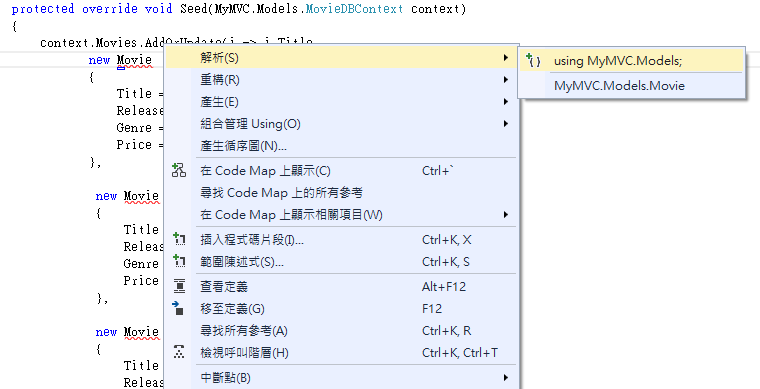
可以看到在頂端加上了引用
using MyMVC.Models;
接著再次建置方案(若沒有建置的話,會在接下來的步驟發生錯誤)
接下來要幫初始的移轉建立一個DbMigration方法。這個移轉會建立一個新的資料庫,這也是為什麼在先前步驟要將movie.mdf檔案刪除的原因。
在套件管理器主控台視窗中,輸入指令add-migration Initial來建立初始的移轉。Initial是一個隨意的名稱,主要是用來命名建立的移轉檔案。

Code First移轉會在Migrations文件中建立一個Class檔案(命名為日期_Initial.cs)。
開啟Initial.cs檔,會看到CreateTable的程式碼。當使用以下指令更新資料庫時,會執行Initial.cs建立資料庫架構,然後執行Seed方法將測試的資料加入至資料庫中。
在套件管理器主控台輸入指令 update-database 來建立資料庫與執行Seed方法。

如果執行指令時出現訊息類似資料表已經建立無法新增的錯誤,那麼有可能是因為在刪除資料庫到執行update-database指令的這段期間有執行過應用程式。
在這種情況下,再次刪除Movies.mdf檔並重新執行update-database指令。
若還是有問題的話,刪除migrations文件夾然後最上面的步驟重新開始。
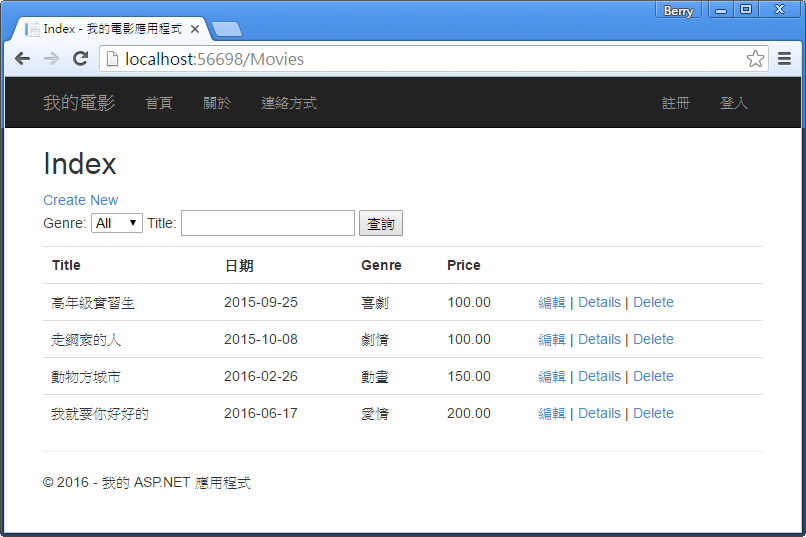
執行應用程式,瀏覽到網址/Movies,可以看到資料的顯示。
新增Rating屬性
打開Models\Movie.cs檔,在Movie Class中加入Rating屬性:
public string Rating { get; set; }
完整的Movie Class如下:
public class Movie
{
    public int ID { get; set; }
    public string Title { get; set; }

    [Display(Name = "日期")]
    [DataType(DataType.Date)]
    [DisplayFormat(DataFormatString = "{0:yyyy-MM-dd}", ApplyFormatInEditMode = true)]
    public DateTime ReleaseDate { get; set; }
    public string Genre { get; set; }
    public decimal Price { get; set; }
    public string Rating { get; set; }
}
重新建置應用程式。
更新MoviesController中,Create及Edit Action方法的bind屬性,加入Rating屬性:
[Bind(Include = "ID,Title,ReleaseDate,Genre,Price,Rating")]
接著,更新View來顯示、新增、修改Rating。
開啟\Views\Movies\Index.cshtml檔。新增<th>Rating</th>欄位,以及更下方加入<td>欄位來顯示@item.Rating的值。
更新後的Index.cshtml如下:
@model IEnumerable<MyMVC.Models.Movie>

@{
    ViewBag.Title = "Index";
}

<h2>Index</h2>

    @Html.ActionLink("Create New", "Create")

    @using (Html.BeginForm("Index", "Movies", FormMethod.Get))
    {
    <p>
        Genre: @Html.DropDownList("movieGenre", "All")
        Title: @Html.TextBox("searchString")
        <input type="submit" value="查詢" />
    </p>
    }

<table class="table">
    <tr>
        <th>
            @Html.DisplayNameFor(model => model.Title)
        </th>
        <th>
            @Html.DisplayNameFor(model => model.ReleaseDate)
        </th>
        <th>
            @Html.DisplayNameFor(model => model.Genre)
        </th>
        <th>
            @Html.DisplayNameFor(model => model.Price)
        </th>
        <th>
            @Html.DisplayNameFor(model => model.Rating)
        </th>
        <th></th>
    </tr>

@foreach (var item in Model) {
    <tr>
        <td>
            @Html.DisplayFor(modelItem => item.Title)
        </td>
        <td>
            @Html.DisplayFor(modelItem => item.ReleaseDate)
        </td>
        <td>
            @Html.DisplayFor(modelItem => item.Genre)
        </td>
        <td>
            @Html.DisplayFor(modelItem => item.Price)
        </td>
        <td>
            @Html.DisplayFor(modelItem => item.Rating)
        </td>
        <td>
            @Html.ActionLink("編輯", "Edit", new { id=item.ID }) |
            @Html.ActionLink("Details", "Details", new { id=item.ID }) |
            @Html.ActionLink("Delete", "Delete", new { id=item.ID })
        </td>
    </tr>
}

</table>
接下來,開啟\Views\Movies\Create.cshtml檔並加入Rating區塊:
<div class="form-group">
    @Html.LabelFor(model => model.Rating, htmlAttributes: new { @class = "control-label col-md-2" })
    <div class="col-md-10">
        @Html.EditorFor(model => model.Rating, new { htmlAttributes = new { @class = "form-control" } })
        @Html.ValidationMessageFor(model => model.Rating, "", new { @class = "text-danger" })
    </div>
</div>
加入後的Create.cshtml檔如下: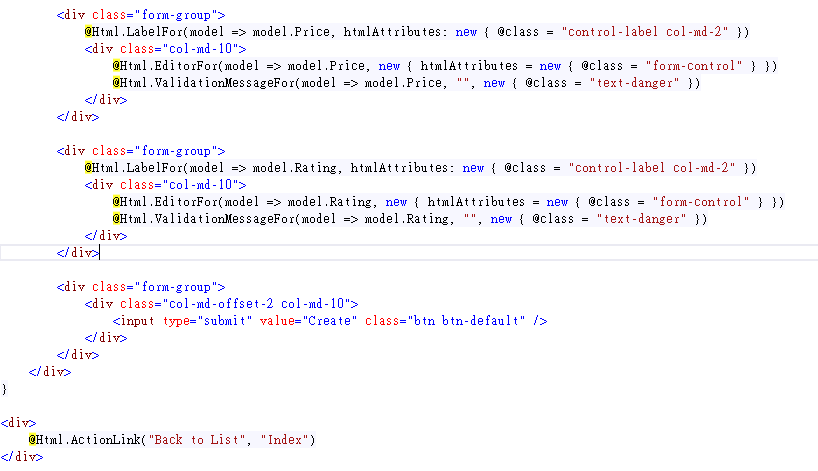
完成上面步驟後,執行應用程式將網址瀏覽到/Movies,會看到錯誤訊息。
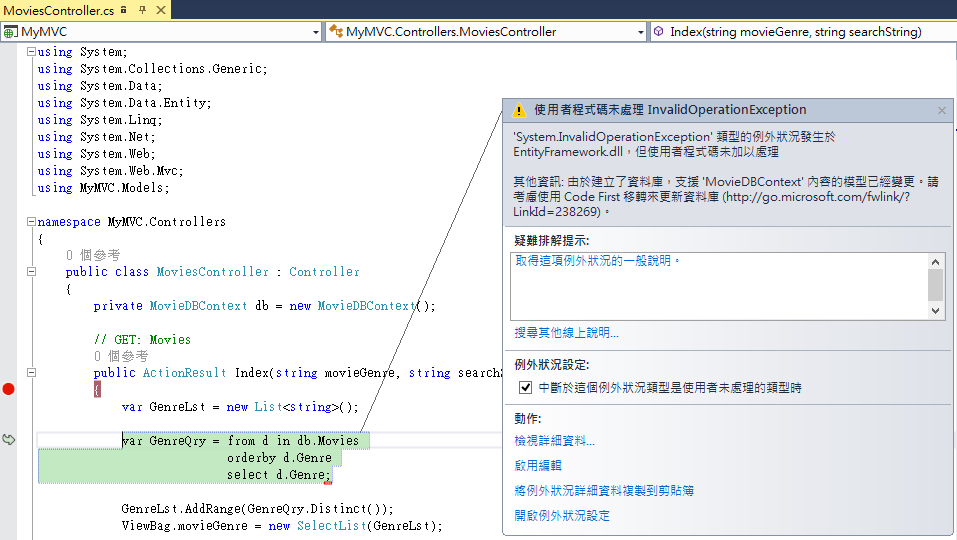
這個錯誤是因為目前的資料庫中,並沒有Rating這個欄位。依照頁面上的處理方式,使用Code First移轉來更新資料庫。
開啟Migrations\Configuration.cs檔。更新Seed方法。在每個Movie物件中加入Rating的值:
protected override void Seed(MyMVC.Models.MovieDBContext context)
{
    context.Movies.AddOrUpdate(i => i.Title,
           new Movie
           {
               Title = "高年級實習生",
               ReleaseDate = DateTime.Parse("2015-9-25"),
               Genre = "喜劇",
               Rating="保護級",
               Price = 100
           },

            new Movie
            {
                Title = "走鋼索的人 ",
                ReleaseDate = DateTime.Parse("2015-10-8"),
                Genre = "劇情",
                Rating = "普遍級",
                Price = 100
            },

            new Movie
            {
                Title = "動物方城市",
                ReleaseDate = DateTime.Parse("2016-2-26"),
                Genre = "動畫",
                Rating = "普遍級",
                Price = 150
            },

          new Movie
          {
              Title = "我就要你好好的",
              ReleaseDate = DateTime.Parse("2016-6-17"),
              Genre = "Western",
              Rating = "保護級",
              Price = 200
          }
      );
}
開啟套件管理器主控台,在視窗中輸入指令:add-migration Rating。
執行add-migration指令後,會檢察當前的Model與資料庫,並產生必要的程式來移轉資料庫到新的Model。指令中的名稱Rating,會用於migration檔案的命名,以幫助識別轉移的步驟。
當指令執行完畢後,Visual Studio會建立一個Class檔案來定義新的DbMIgration,在Up方法中會看到產生新欄位的程式。
public partial class Rating : DbMigration
{
    public override void Up()
    {
        AddColumn("dbo.Movies", "Rating", c => c.String());
    }

    public override void Down()
    {
        DropColumn("dbo.Movies", "Rating");
    }
}
接著,在套件管理器主控台視窗中輸入指令:update-database。
重新執行應用程式,瀏覽到網址/Movies,便能看到Rating的欄位。
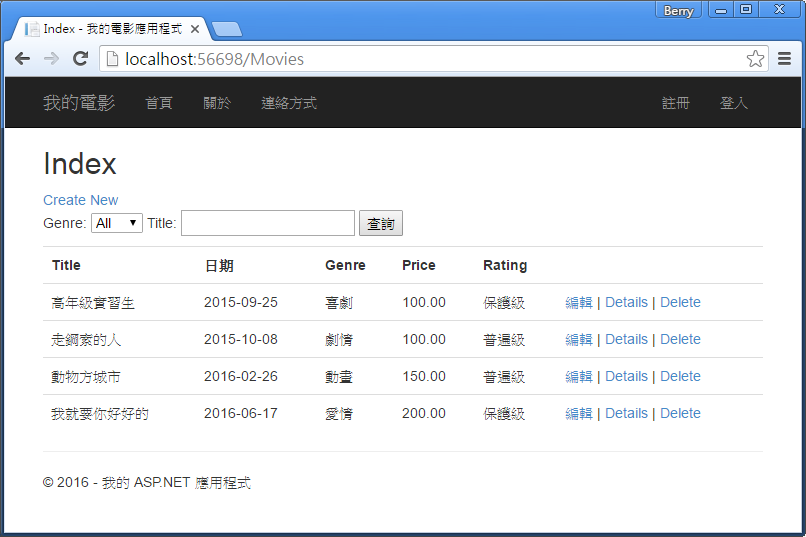
點擊Create New新增電影,可以看到Rating的欄位
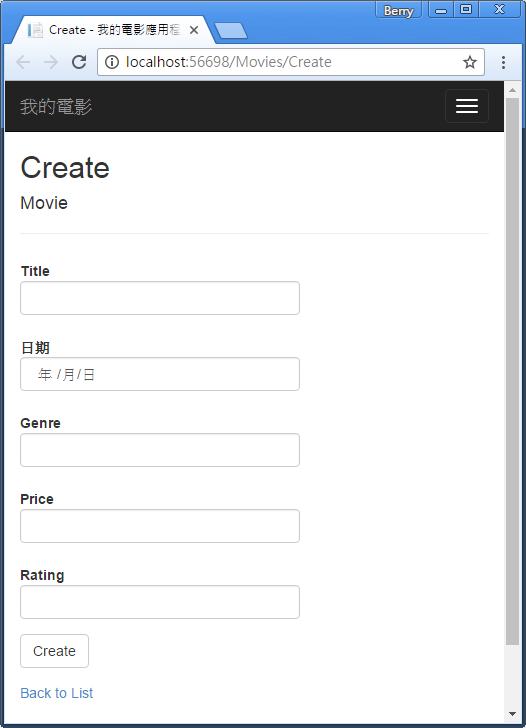
除了新增電影外,也在編輯與Details中Rating。
在Edit.cshtml中,於Price區塊後加入Rating的編輯區塊:
<div class="form-group">
	@Html.LabelFor(model => model.Rating, htmlAttributes: new { @class="control-label col-md-2" })
	<div class="col-md-10">
		@Html.EditorFor(model => model.Rating, new { htmlAttributes = new {@class="form-control" } })
		@Html.ValidationMessageFor(model => model.Rating, "", new { @class="text-danger"})
	</div>
</div>
在Details.cshtml中,於Price區塊後加入Rating的區塊:
<dt>
    @Html.DisplayNameFor(model=>model.Rating)
</dt>
<dd>
    @Html.DisplayFor(model=>model.Rating)
</dd>
